Manuals
/
Humax
/
TV and Video
/
Satellite TV System
Humax
HDCI-2000
manual
Menu Map
Models:
HDCI-2000
1
77
86
86
Download
86 pages
44.82 Kb
74
75
76
77
78
79
80
81
Troubleshooting
Specifications
Install
Error messages
Scart Signal
Password
Default Setting
Meaning of Symbols
Configuring Menu
Reset Position
Page 77
Image 77
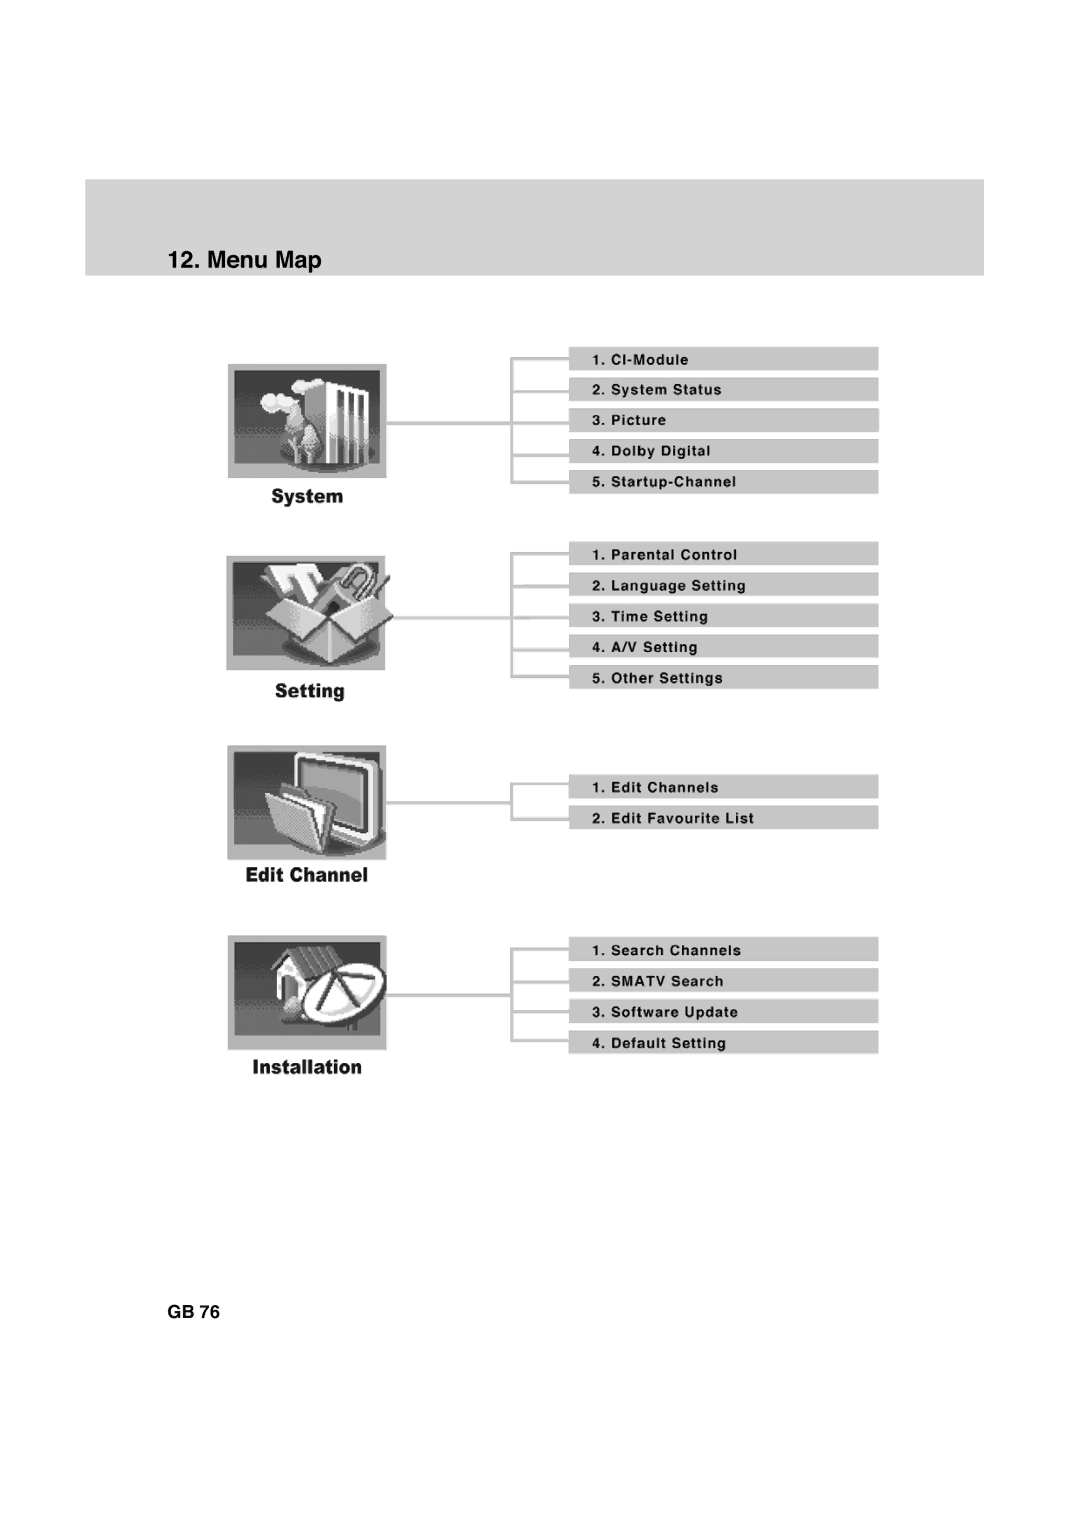
12. Menu Map
12. Menu Map
GB 76
Page 76
Page 78
Page 77
Image 77
Page 76
Page 78
Contents
Page
Copyright Copyright 2007 Humax Corporation
Meaning of Symbols
Safety Instructions and Precautions
Safety and Warning
To avoid damage of the power cord or plug
Replacement of Parts
LIGHTNING, STORM, or not in USE
To avoid electrical shock
Contents
Software Update
Installation
Menu Map Trouble Shooting
Specification Glossary Service and Support
Package Contents
Before Using the Product
P + Button
Front Panel
Inserting a CI with Smartcard
Conditional Access
RS-232C
Rear Panel
Remote Control
Information
16.OK
17.V- / V+
Using Hdmi Connector
Setup
When equipped with an A/V receiver
Using DVI Connector
When there is no A/V receiver available
Using Component Cable
Using Scart Cable
Powering On
Search Channel
Installation Wizard
Language
Installation Wizard
Time
Software Update
Volume Control
Switching Channel
Basic Operation
Lip-Sync
Audio
Resolution
Option List
Subtitle
Teletext
General Information
Programme Information i- plate
Detailed Programme Information
All Channel List
Channel List
Renaming Channels
Deleting Channels
Including Channels in Favourite Group
Favourite List
Using Lock/Unlock
Configuring Menu
Scramble List
Satellite List
EPG Main
Using EPG
EPG
NUMERIC0-9 buttons
Reserving Programmes
Channel List
Modifying Schedule
EPG Table
Schedule List
Deleting Schedule
Find Programme
New Reservation
Choosing Genre
Search by Day of Week
Entering Programme Name
Search by Time
Search Result
System Status
System
CI-Module
Display Format
Picture
TV Screen Format
AV Control
Scart Signal
Dolby Digital
Startup-Channel
Setting the Startup-Channel
Startup-Channel
Censorship Classification
Setting
Parental Control
Installation Lock
Change Password
Subtitle Display
Language Setting
Menu Language
GMT Offset
Time Setting
Subtitle Font
Power Off
Power On
Audio Output
A/V Setting
OSD Transparency
Other Settings
Display Time
Edit Channels
Edit Channels
Moving Channels
Locking/Unlocking Channels
Select/Unselect All Channels
Selecting a Channel Group
Renaming Favourite Groups
Edit Favourite List
Selecting/Unselecting All Channels
Moving Favourite Channels
Selecting Favourite Groups
Adding/Removing Channels
Fixed Antenna
Installation
Search Channels
LNB Frequency
Satellite
22KHz Tone
DiSEqC Input
Motor Type
Motor Antenna
My Latitude
My Longitude
Edit Satellite Data
Enable Channel search is available Disable
Activate Satellite
Satellite Longitude
Transponder Motor Driving
Motor Setting
Continuous Motor moves continuously Step
Time Motor moves during specified
Recalculate
Go to Stored Position
Store Current Position
Motor Limit
Installer Menu
Limit Position
Set Limit
Transponder
Reset Position
Frequency
Polarization
Modulation
Symbol Rate
Transmission
Channel Type
Network Search
Scrambled Type
Search Result
Antenna
Advanced Search
Audio PID
Video PID
Start/End Frequency
Smatv Search
Smatv Automatic Search
Smatv Manual Search
Manual Update
Automatic Update
Polarisation
Press the OK or Back button
Default Setting
OTA Over the Air
Software Update
Mandatory Update
New software is found when powering on
Menu Map
Trouble Shooting
Trouble Shooting
No picture on TV set
Poor picture/sound quality
No password information is given
Remote control does not operate
Cannot update new software
No or poor sound
Error message Possible causes What to do
Error Message
Tuner & Channel
Specification
Audio/Video/Data In/Out
Glossary
PID Packet Identifier
Qpsk Quaternary Phase Shift Keying
Smartcard
Pdif Sony/Philips Digital Interface format
Service and Support
Sweden Tel
Italy Tel
Finland Tel Opening Hours
Austria Tel
Top
Page
Image
Contents