2 PANEL DESCRIPTION
■Front panel
MARINE RADAR | GAIN |
POWER
SEA TX
SAVE
RAIN
![]() MOB
MOB ![]()
TARGET TRAILS
![]() ZOOM
ZOOM ![]()
ALM MODE
![]() OFF CENT
OFF CENT![]()
EBL1 EBL2
VRM1 VRM2
PI
BRILL MENU
![]() HL OFF
HL OFF ![]()
GAIN |
|
!3 | POWER |
| |
SEA | TX |
| SAVE |
!4
+![]()
RAIN
!5 ![]()
![]()
!6 |
|
| |
|
| MOB | |
!7 | TARGET | TRAILS | |
|
| ZOOM | |
!8 | ALM | MODE | |
| OFF CENT | ||
!9 | EBL1 | EBL2 | |
VRM1 | VRM2 | ||
| |||
|
| PI | |
@0 | BRILL | MENU | |
| HL OFF | ||
q!3
w
!4
e
!5
!6
r
t!7
y
u !8 i
o!9
!0 !1 @0 !2
q
w
e
r
t y u i
o !0 !1 !2
Control panel (English) | Control panel (Chinese) |
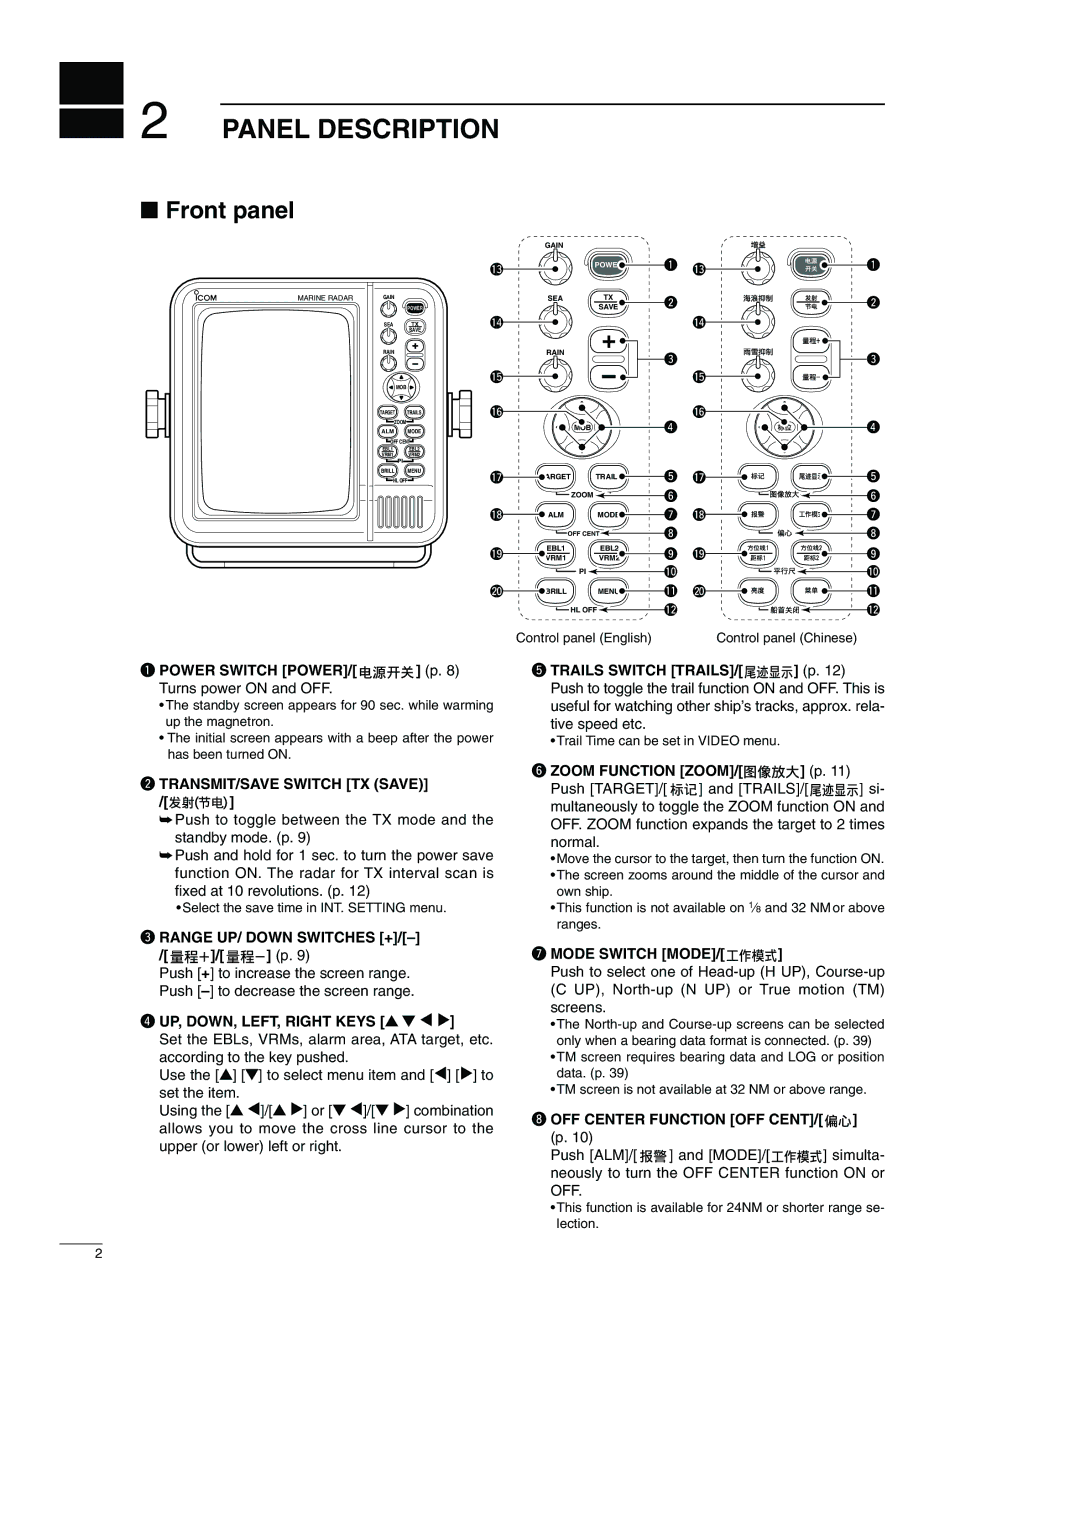
qPOWER SWITCH [POWER]/[ 


 ] (p. 8) Turns power ON and OFF.
•The standby screen appears for 90 sec. while warming up the magnetron.
•The initial screen appears with a beep after the power has been turned ON.
tTRAILS SWITCH [TRAILS]/[ ![]()
![]()
![]()
![]() ] (p. 12) Push to toggle the trail function ON and OFF. This is useful for watching other ship’s tracks, approx. rela- tive speed etc.
] (p. 12) Push to toggle the trail function ON and OFF. This is useful for watching other ship’s tracks, approx. rela- tive speed etc.
• Trail Time can be set in VIDEO menu.
wTRANSMIT/SAVE SWITCH [TX (SAVE)]
/[![]()
![]()
![]()
![]() ]
]
➥Push to toggle between the TX mode and the standby mode. (p. 9)
➥Push and hold for 1 sec. to turn the power save function ON. The radar for TX interval scan is fixed at 10 revolutions. (p. 12)
•Select the save time in INT. SETTING menu.
eRANGE UP/ DOWN SWITCHES
/[ ![]()
![]()
![]() ]/[
]/[ ![]()
![]()
![]() ] (p. 9)
] (p. 9)
Push [+] to increase the screen range. Push
rUP, DOWN, LEFT, RIGHT KEYS [Ù Ú Ω ≈]
Set the EBLs, VRMs, alarm area, ATA target, etc. according to the key pushed.
Use the [Ù] [Ú] to select menu item and [Ω] [≈] to set the item.
Using the [Ù Ω]/[Ù ≈] or [Ú Ω]/[Ú ≈] combination allows you to move the cross line cursor to the upper (or lower) left or right.
yZOOM FUNCTION [ZOOM]/[


 ] (p. 11)
Push [TARGET]/[ ![]()
![]() ] and [TRAILS]/[
] and [TRAILS]/[ ![]()
![]()
![]()
![]() ] si- multaneously to toggle the ZOOM function ON and OFF. ZOOM function expands the target to 2 times normal.
] si- multaneously to toggle the ZOOM function ON and OFF. ZOOM function expands the target to 2 times normal.
•Move the cursor to the target, then turn the function ON.
•The screen zooms around the middle of the cursor and own ship.
•This function is not available on 1⁄8 and 32 NM or above ranges.
uMODE SWITCH [MODE]/[ 


 ]
]
Push to select one of
•The
•TM screen requires bearing data and LOG or position data. (p. 39)
•TM screen is not available at 32 NM or above range.
iOFF CENTER FUNCTION [OFF CENT]/[ 
 ] (p. 10)
Push [ALM]/[ ![]() ] and [MODE]/[
] and [MODE]/[ ![]()
![]()
![]()
![]() ] simulta- neously to turn the OFF CENTER function ON or OFF.
] simulta- neously to turn the OFF CENTER function ON or OFF.
•This function is available for 24NM or shorter range se- lection.
2
