DSR-7.3
Contents
Grounding or Polarization The appliance may be
Modèle pour les Canadien
Precautions
For U.S. model
For Canadian model
Recording Copyright
Power
Regional Restriction Codes Region Number
About This Manual
Table of Contents
Other Features
Features
Receiver Features
DVD/CD Player Features
Connection cable Cable
Supplied Accessories
Power cord
FM antenna AM loop antenna Audio/video Video connection
This DVD Receiver can playback the following discs
Playable Discs
About Video CDs
MP3 compatibility information
Storing Discs
Cleaning Discs
Handling Discs
Differences in Disc Composition
Front panel
Index to Parts and Controls
Display
Index to Parts and Controls
Remote controller
Press Mode Recvr to use the following gray buttons
∞ Setup button 30
≠ Timer button
FM Mode button 35
Rear panel
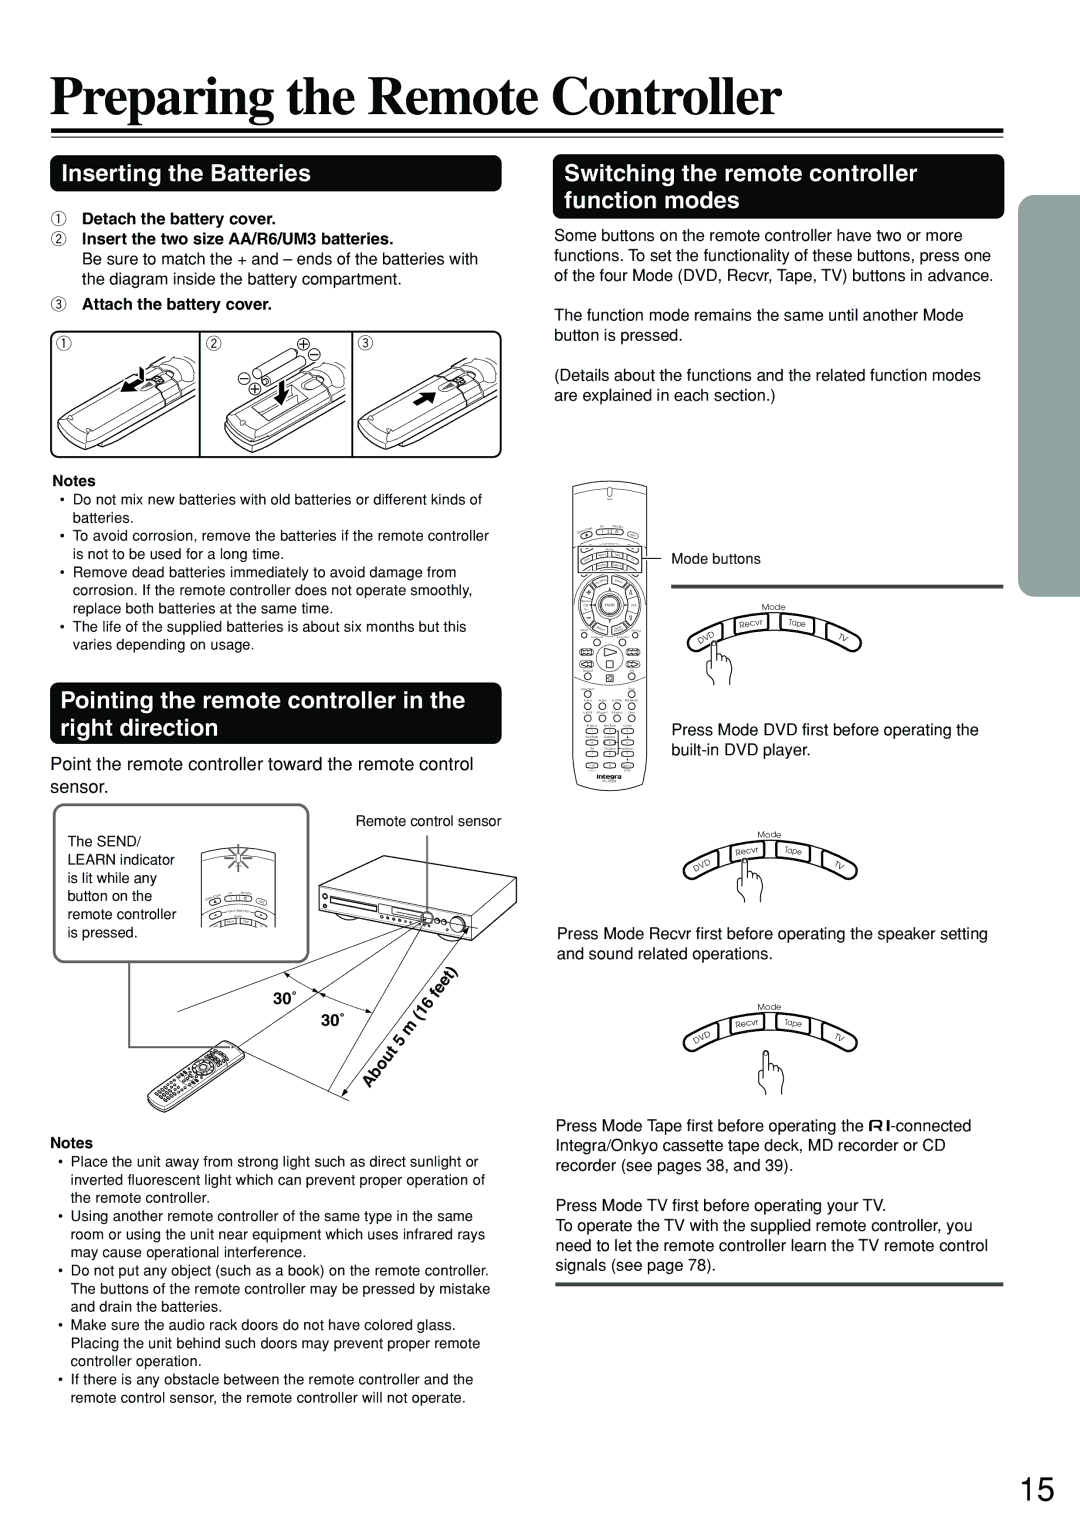
Inserting the Batteries
Preparing the Remote Controller
Switching the remote controller function modes
Pointing the remote controller in the right direction
TV or projector
Connecting to a TV
Connecting to a TV or projector
Before connecting
Surround R Surround L
Connecting Speakers
Before connecting
Active Subwoofer Front R Center Front L
Front
Standard speaker placement of the speakers system
Using the provided speaker labels
Positioning Speakers
Cassette Tape Deck, MD Recorder CD Recorder, etc
Connecting to Audio/Video Equipment
Optical fiber cable Signal flow
BS tuner MD player, etc
Power off function
Power on/ready function
Program Timer
Sleep Timer
From the connecting block Mini plug cable
Adjusting the position of the AM indoor antenna
Connecting the Supplied FM and AM Indoor Antennas
Connecting an AM Outdoor Antenna
Adjusting the position of the FM indoor antenna
Directional Iinkage
Connecting an FM Outdoor Antenna
Setting the Clock Display
Before operating the remote controller
Press Mode Recvr
To activate the IPM function
Press SW Mode on the remote controller
Speaker Setup
Changing the units of measurement
Adjusting Each Speakers Relative Volume Balance Test Tone
Speaker Setup
Getting Started Using Your DVD Receiver
When an operation is prohibited
Playing DVDs, Video CDs, CDs and MP3s
To exit the Setup Navigator
Getting Started Using Your DVD Receiver
Using the Setup Navigator
When setting up for the first time
Setting the OSD Language On-Screen Display Language
Setting the TV screen size
Confirming the settings
To navigate a menu screen
When a Menu Screen is Displayed
When screen saver appears
To Open or Return To the DVD or Video CD Menu Screen
Fast forward and reverse scanning
Remote controller Advancing to the next chapter track
Press ¢
Press
Stopping Playback and Switching Power Off
Resuming playback from where you stopped
Tuning Manually
Presetting Radio Stations
Listening to the Radio
Start the Auto Memory function
FM Auto Preset Memory
Naming a Preset Station
Button for a few more seconds to
Erasing a Preset Station
Selecting Preset Stations
Changing the Tape display to match the connected source
Playing the Connected Source
Various Functions While Playing the Connected Source
About digital sound
Press Mode Tape
Muting the Sound
Adjusting the Volume
Listening Through Headphones
Various Functions Common to all the Sources
Using the Timer Functions
Setting the current date and time
Displaying the current time
Using the Timer Functions
Types of timers
Using the Sleep Timer
Presetting the playback timer
Setting the record timer
Case of overlapping timer settings
Switching the timer on or off
Integra’s original Digital Signal Processing DSP modes
Enjoying the Sound Effects
Dolby PRO Logic II Surround
Checking the Sound System of the Playing Source
Theater-Dimensional T-D* mode
Importance of the speaker setup
Input Sources and Available Listening Modes
Enjoying the Sound Effects
Choosing Theater-Dimensional Mode
Press T-D Setup
Press Up/Down 5/∞ to select the setting of the item
Press T-D/ST on the remote
Using Dolby Pro Logic II/ Integra’s Original DSP Modes
Stereo/Theater-Dimensional on the unit
Changing the Sound to Stereo
Volume balance
Saving the adjusted values
Checking each speaker’s relative volume balance
Adjusting each speaker’s relative
Press A. Control on the Remote
Using the Late Night Function
Boosting the Super Bass Sounds/High Frequency Sounds
Press Late Night
Press Search repeatedly to select the type of search
Search using the number buttons
When performing a time search
To perform a direct title or chapter/track
Navigate using the following controls
Using the MP3 Navigator
Repeat Play
Repeating a Disc, Title, Folder, Chapter or Track
Repeating a Specific Segment
To return to normal playback
Still Frame/Slow Play
Viewing a still frame
Viewing slow playback
Programming DVDs
Playing in a Favorite Order
Programming Video CDs, CDs
To save a program in memory
To erase a program saved in memory
Program screen
Playing in a Favorite Order
Programming MP3s
Press Program to enter the MP3
Additional programming options
To stop random play
Random Play
Playing in Random Order
To change titles or chapters during random play
Changing the Audio Language Multi- Language Function
Selecting a Subtitle Language Multi-Language Subtitles
Changing Audio Type
Resuming playback from where Last M was pressed
Memorizing a Last Memory location to return to later
To clear the Last Memory location
Press Angle during playback
Selecting the Camera Angle
Viewing from a Desired Camera Angle Multi-Angle
To check whether or not a disc is recorded with angles
Displayed
Video CD with PBC disabled
Viewing Disc Information
Viewing Disc Information during while a disc is playing
Viewing Disc Information while a disc is stopped
Using the Setup Screen Menus
Customizing the Function Settings
Setup/TV Input
Settings Expert Basic Factory setting
Wide Factory setting
Customizing the Function Settings
Setting the TV Screen Size
Settings 43 Letter Box Pan & Scan
Turning the Screen Saver On and Off Expert
Setting the Video 1 Options
Connecting to a progressive scan- compatible TV
Switching the S-Video Output Expert
Selecting a preprogrammed setting
Adjusting the Video Quality
Hue
Fine Focus
Contrast
Chroma Level
Changing the Background of the Screen
Setting the Video 2 Options
Setting the Position of the On-screen Display Expert
Turning the angle indicator on and off Expert
Selecting a subtitle language preference
Setting the Language Options
Setting the On-screen Display OSD Language
Selecting an audio language preference
Selecting subtitles, assist subtitles or no
When Other is selected
Selecting a DVD menu language preference
Forcing subtitles to be displayed Expert
Language Input-code
Language Code List
Changing the Password
Setting the Parental Lock Level
Entering the Password
Setting the Parental Lock Level
Press Enter to set the new Country Code
Country Code List
Resetting the DVD Receiver to System Settings
Setting the Country Code
Pre-programming codes
Learning a pre-programming code
Buttons given below have operations programmed Into them
Press the Mode TV button
Controlling TV
Press the desired operation button
Basic Recording Procedure
Recording Using the Connected Equipment
Troubleshooting
Symptoms Causes Remedies Pages
CD/Audio CD
DVD Video CD/Audio CD Symptoms Causes Remedies Pages
Troubleshooting
Pages
Symptoms Causes Remedies
Tuner
Other
Specifications
Page
Page
Page
Onkyo U.S.A. Corporation