FRONT RIGGINGS | PROCEDURE 3 |
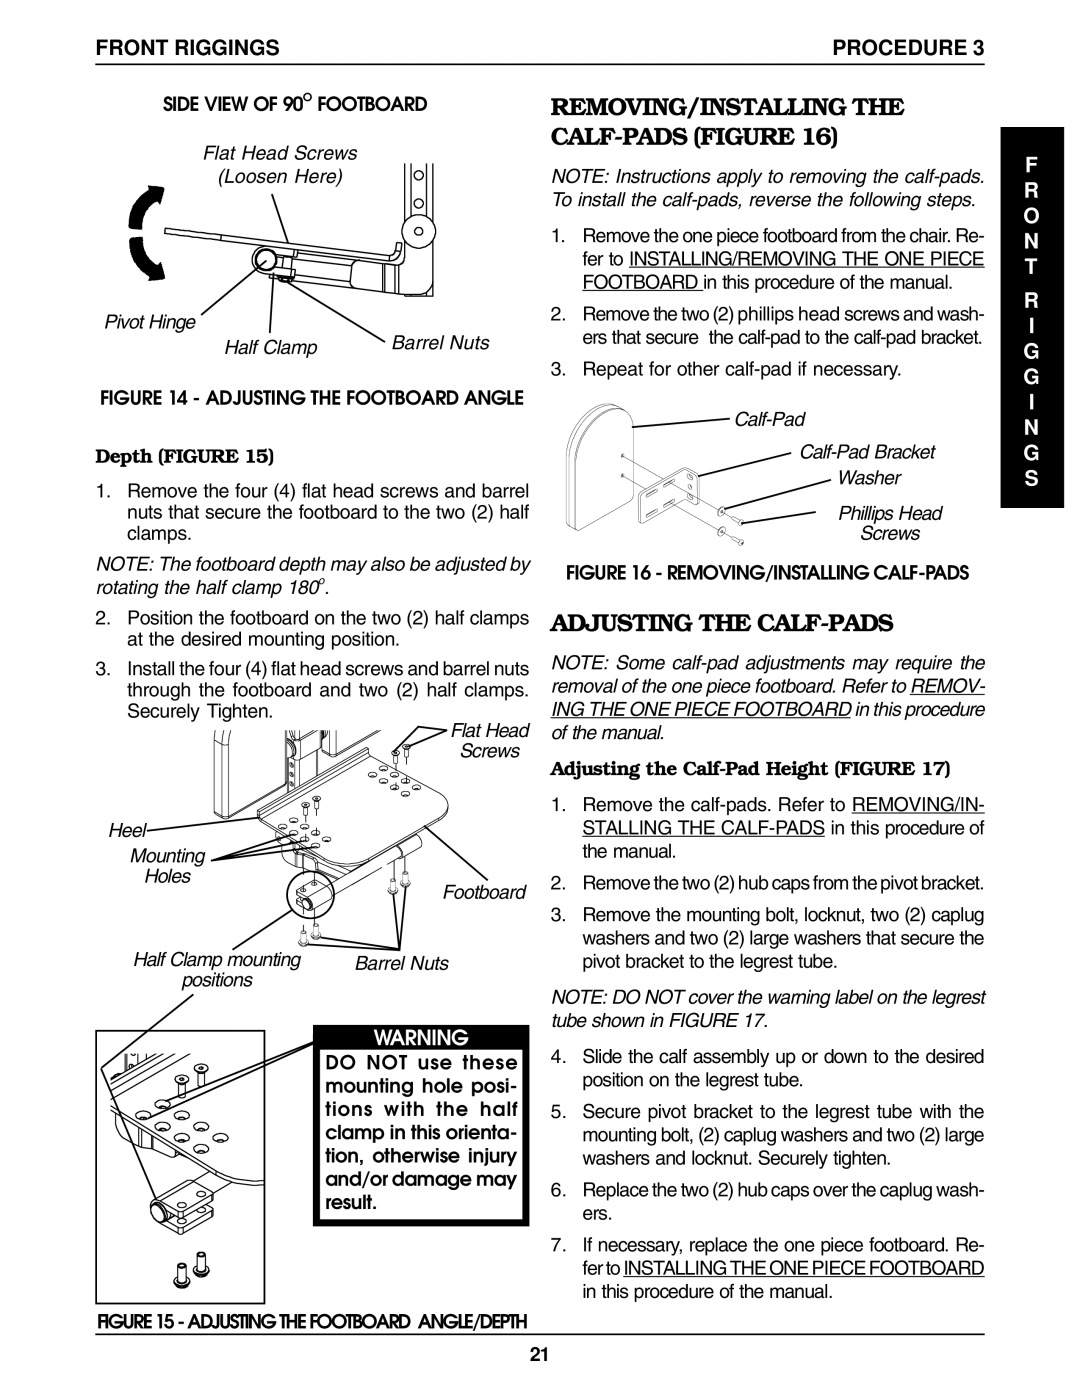
SIDE VIEW OF 90O FOOTBOARD
Flat Head Screws
(Loosen Here)
Pivot Hinge
Half Clamp | Barrel Nuts |
REMOVING/INSTALLING THE CALF-PADS (FIGURE 16)
NOTE: Instructions apply to removing the
1.Remove the one piece footboard from the chair. Re- fer to INSTALLING/REMOVING THE ONE PIECE FOOTBOARD in this procedure of the manual.
2.Remove the two (2) phillips head screws and wash- ers that secure the
3.Repeat for other
F R O N T
R
I
G G
FIGURE 14 - ADJUSTING THE FOOTBOARD ANGLE
Depth (FIGURE 15)
1.Remove the four (4) flat head screws and barrel nuts that secure the footboard to the two (2) half clamps.
NOTE: The footboard depth may also be adjusted by rotating the half clamp 180o.
2.Position the footboard on the two (2) half clamps at the desired mounting position.
3.Install the four (4) flat head screws and barrel nuts through the footboard and two (2) half clamps. Securely Tighten.
 Flat Head
Screws
Heel
Mounting
Holes
Footboard
Half Clamp mounting | Barrel Nuts |
positions |
|
WARNING
DO NOT use these mounting hole posi- tions with the half clamp in this orienta- tion, otherwise injury and/or damage may result.
Calf-Pad
Calf-Pad Bracket
Washer
Phillips Head
Screws
FIGURE 16 - REMOVING/INSTALLING CALF-PADS
ADJUSTING THE CALF-PADS
NOTE: Some
Adjusting the Calf-Pad Height (FIGURE 17)
1.Remove the
2.Remove the two (2) hub caps from the pivot bracket.
3.Remove the mounting bolt, locknut, two (2) caplug washers and two (2) large washers that secure the pivot bracket to the legrest tube.
NOTE: DO NOT cover the warning label on the legrest tube shown in FIGURE 17.
4.Slide the calf assembly up or down to the desired position on the legrest tube.
5.Secure pivot bracket to the legrest tube with the mounting bolt, (2) caplug washers and two (2) large washers and locknut. Securely tighten.
6.Replace the two (2) hub caps over the caplug wash- ers.
7.If necessary, replace the one piece footboard. Re- fer to INSTALLING THE ONE PIECE FOOTBOARD in this procedure of the manual.
I
N G S
FIGURE 15 - ADJUSTING THE FOOTBOARD ANGLE/DEPTH
21
