1

2

e

3

SECTION II

Machine Set-up

Attaching the Thread Guide Pole

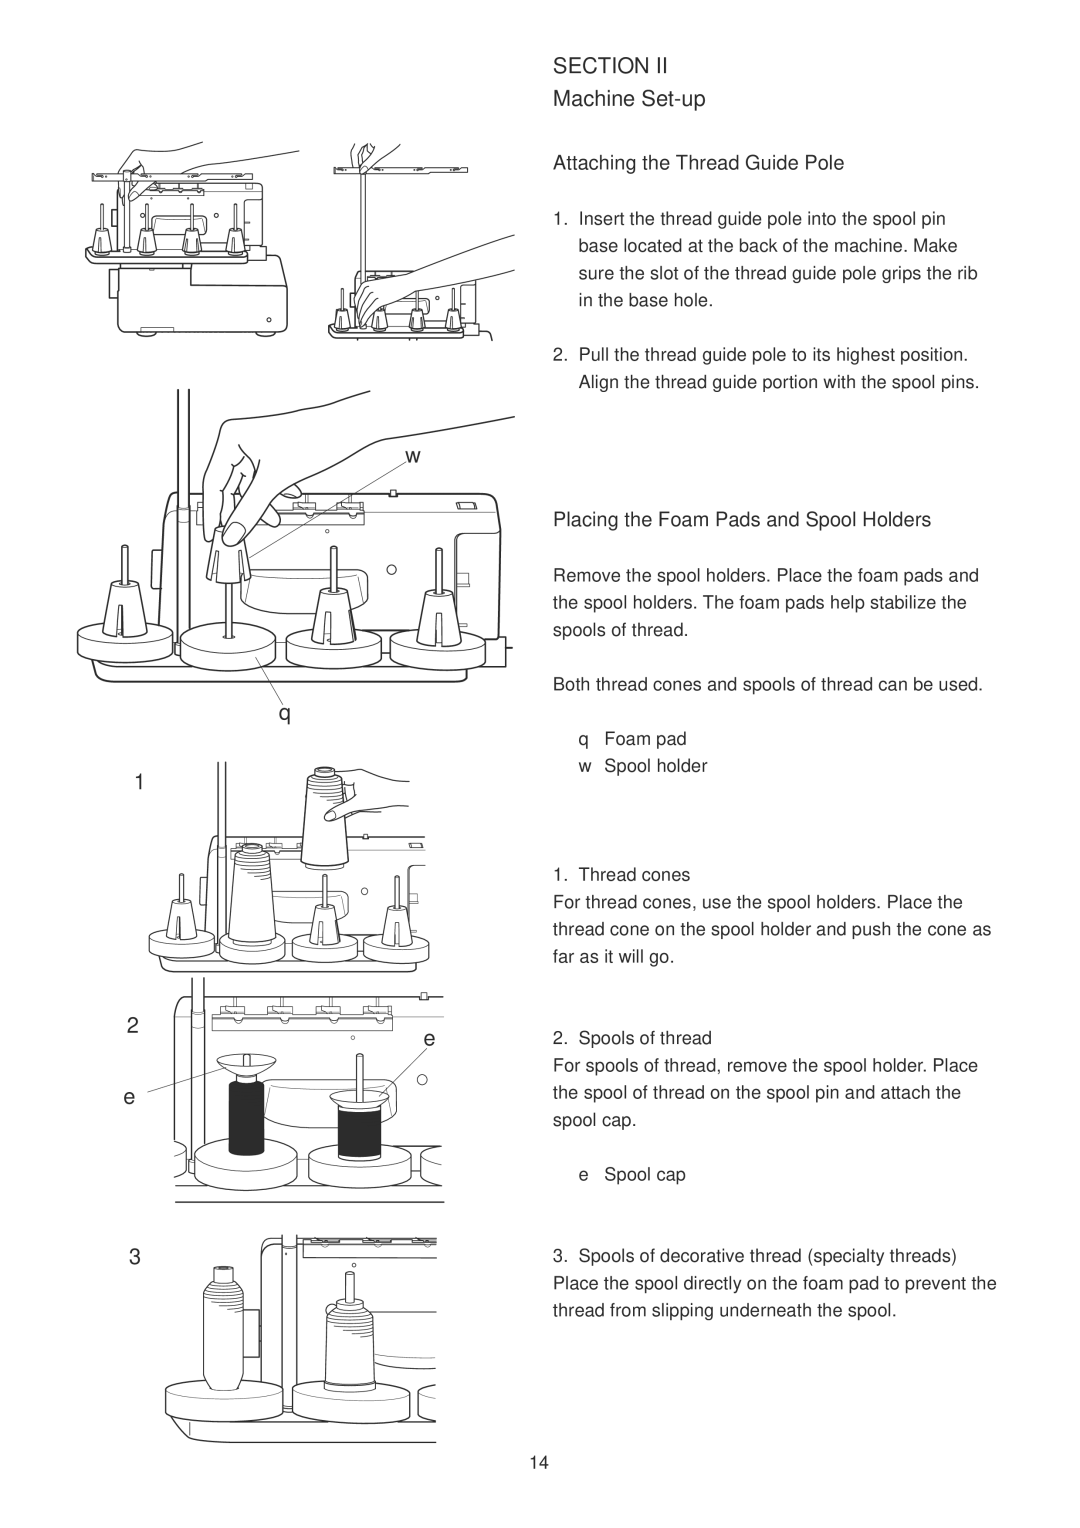
1. Insert the thread guide pole into the spool pin base located at the back of the machine. Make sure the slot of the thread guide pole grips the rib in the base hole.

2. Pull the thread guide pole to its highest position. Align the thread guide portion with the spool pins.

w

Placing the Foam Pads and Spool Holders

Remove the spool holders. Place the foam pads and the spool holders. The foam pads help stabilize the spools of thread.

Both thread cones and spools of thread can be used.

q


q Foam pad


w Spool holder


1.

Thread cones


For thread cones, use the spool holders. Place the


thread cone on the spool holder and push the cone as


far as it will go.


2.

Spools of thread


e


For spools of thread, remove the spool holder. Place


the spool of thread on the spool pin and attach the


spool cap.


e Spool cap


3.

Spools of decorative thread (specialty threads)


Place the spool directly on the foam pad to prevent the


thread from slipping underneath the spool.


14

Page 15
Image 15
Janome 1100D manual Machine Set-up, Attaching the Thread Guide Pole, Placing the Foam Pads and Spool Holders

1100D specifications

The Janome 1100D is a versatile and efficient serger that has gained popularity among sewists of all skill levels. Known for its reliability and ease of use, this machine is ideal for those looking to enhance their sewing experience, especially when it comes to finishing hems and seams with a professional touch.

One of the standout features of the Janome 1100D is its capability to perform a wide range of stitch types. It offers a 3-thread and 4-thread overlock stitch, along with a rolled hem, making it suitable for various fabric types and sewing techniques. This versatility allows users to create everything from delicate lace seams to sturdy knitwear finishes. The machine also includes a safety stitch for added durability, ensuring that garments stand the test of time.

In terms of technology, the Janome 1100D is equipped with a user-friendly interface, making it accessible for beginners. The color-coded threading system simplifies the process of re-threading, reducing downtime and frustration. The adjustable stitch length and differential feed mechanisms further enhance the machine's capabilities, allowing sewists to customize their settings according to the fabric being used. This feature is particularly beneficial for handling tricky fabrics like knits and stretch materials, as it helps prevent puckering.

The Janome 1100D also boasts a high-speed performance of up to 1,300 stitches per minute, enabling users to complete projects in less time without sacrificing quality. The machine's sturdy construction ensures stability during operation, providing smooth and precise stitching results. Its compact design makes it easy to store, which is a plus for those with limited workspace.

Another noteworthy characteristic of the Janome 1100D is its ability to create chains of stitches, perfect for sewing and finishing all in one step. This feature can save considerable time when working on larger projects or multiple items at once. The included accessories, such as a variety of presser feet and needle types, further expand the machine's functionality.

In conclusion, the Janome 1100D is an exceptional serger that combines ease of use with advanced features. Its reliability, versatility, and high-speed performance make it an excellent addition to any sewing enthusiast's toolkit. Whether you are a beginner or an experienced sewist, the Janome 1100D is designed to help you achieve professional results in your sewing projects.