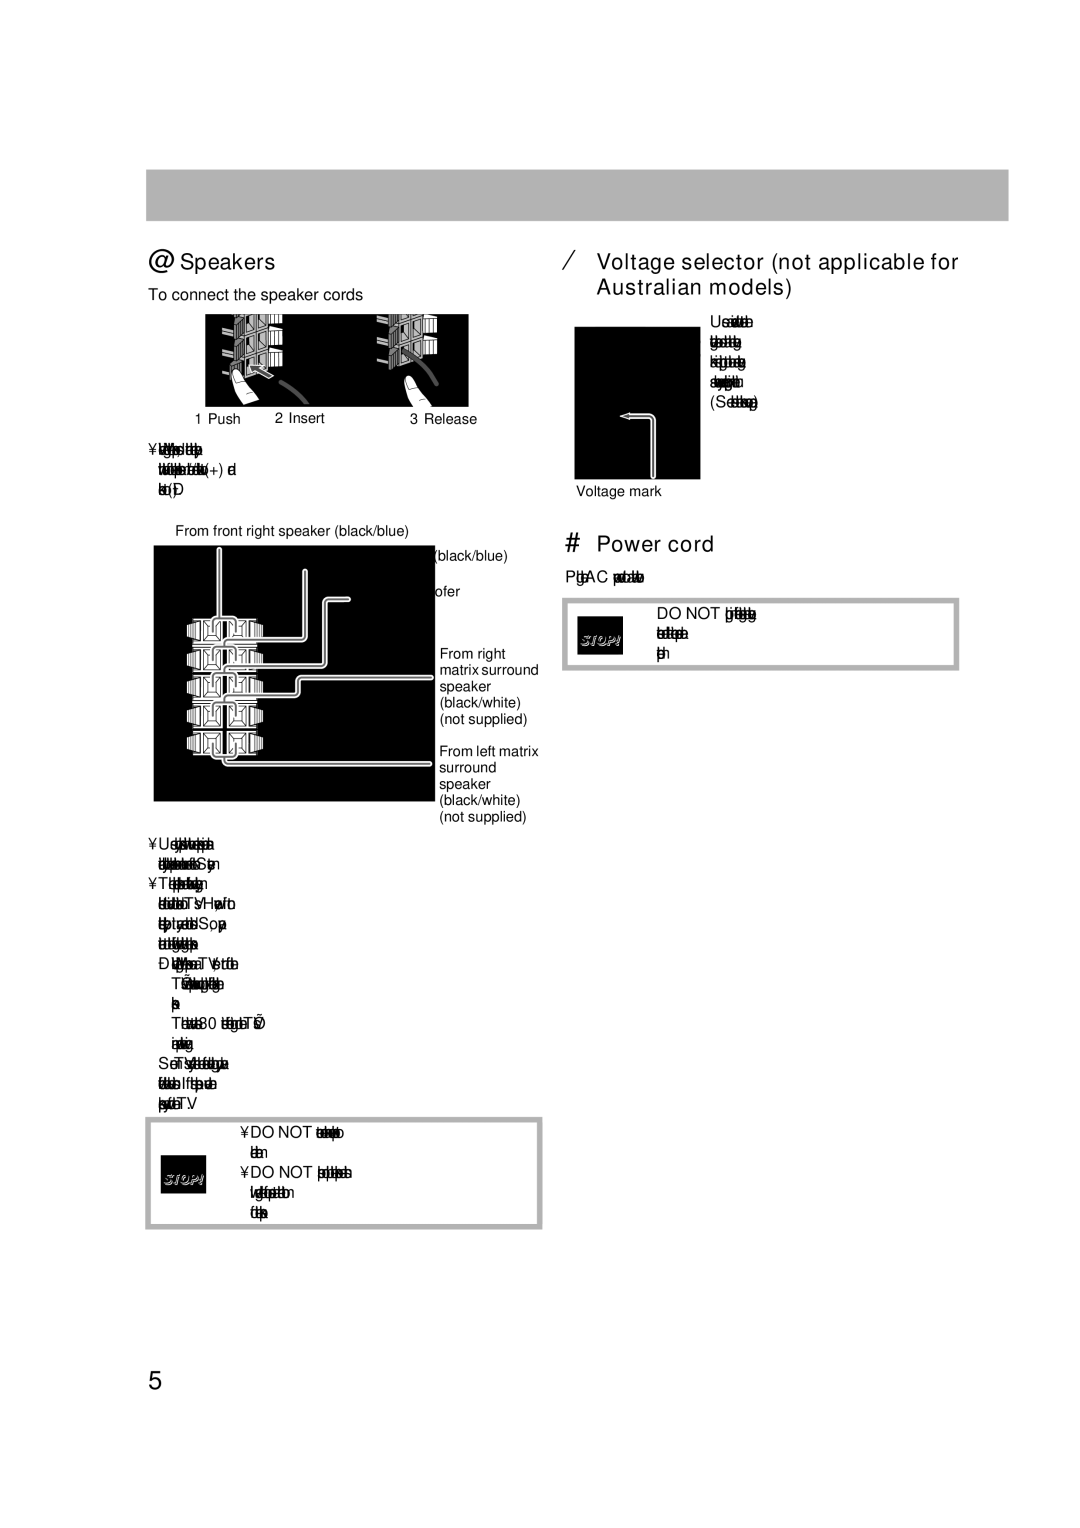
CA-DXU10 CA-DXU8
COMPACT COMPONENT SYSTEM
INSTRUCTIONS
CA-DXU10 CA-DXU8
Warnings, Cautions and Others
IMPORTANT FOR LASER PRODUCTS
European Union only
CA-DXU10 CA-DXU8
Caution Proper Ventilation
Front view
Side view
How to Read This Manual
Introduction
Playable Disc/File Types
Audio formats
Precautions
Contents
Installation
Power sources
Supplied accessories
Connections
The illustration is CA-DXU10
~ From the video input of TV/monitor See page
~ TV/monitor
Ÿ Digital audio component
Auxiliary equipment
⁄ AM/FM antenna
@ Speakers
To connect the speaker cords
For CA-DXU10
For CA-DXU8
Canceling the Demonstration
# Power cord
Preparing the Remote Control
Connecting a USB Mass Storage Class Device
Display Indication
¥ Turn on the power
π Adjust the volume
How to select a number
connecting or putting on the headphones
Adjusting the Volume
To preset stations
To drop the volume in a moment
To restore the stereo effect, press the
To tune in to a preset station
2 Select the preset number for the station you stored
If “” appears on the TV screen when you press a
Playing Back a Disc/USB Mass
To play back by using the disc menu
To select a disc
To select a chapter/track
To locate a particular portion
Playing Back a Tape
To insert a tape
To change the tape running direction
To reverse the tape automatically
Daily Operations-Sound & Other Adjustments
Adjusting the Speaker Output Level
1 Select the speaker you want to adjust
2 Adjust the output level while the display is showing speaker name
2 Select the SEA parameter you want to adjust
3 Adjust the parameter
To cancel the Sound Mode, select “FLAT.”
5 Store the setting
Presetting Automatic DVD Video
To select a preset picture tone
1 While playing, display VFP setting screen
2 Select a preset picture tone
Setting the Clock
To adjust the picture tone
2 Select a parameter you want to adjust
1 Activate clock setting mode
Unique Video Disc/File Operations
Selecting the Audio Track
While playing DVD Video
While playing a DVD Audio/DivX
Selecting the View Angle
Selecting Browsable Still Pictures Remote
Selecting the Subtitle Language
Reviewing the Playback Quickly
To cancel the key number entry, press
Special Picture Playback
Playing Back Bonus Group
Pause playback
Canceled
Advanced Playback Operations
Programming the Playing Order
Program Play
To check the programmed contents
Canceled
To modify the program
To exit from Program Play
To cancel the prohibition, repeat the same procedure
Playing Repeatedly-Repeat Play
Repeat Play
A-B Repeat
On-Screen Operations
On-screen Bar Information
On-screen bars
Remote control
Operations Using the
5 Repeat play setting for Video files See also page
5 Finish the setting
On-screen Bar
To change the time information
2 Make sure
is selected highlighted
3 Change the time indication
Time Search
Chapter/Track Search
6 Select the end point B
4 Enter the time
Operations Using the Control Screen
Control screen for DVD-VR
Control screen for AV files/JPEG files
To select playback type
To start playback
To stop playback To repeat chapter/program/play list for DVD-VR
To repeat slide-show for JPEG file
To repeat play for Video files
Recording Operations
Recording onto a Tape
3 forward 2 reverse
1 Insert a recordable cassette into deck B
To cancel while recording
Dubbing Tapes
Synchronized Recording
To record only your favorite track/file-One Track Recording
4 Sing into the microphone 5 Adjust the MIC LEVEL and VOLUME
To cancel Mic Mixing
Enjoying Karaoke
Singing Along Karaoke
Adjusting the Sound Track for Karaoke
Scoring Your Karaoke Skill
To return to normal playback temporarily
VOCAL MASK L CHANNEL
Changing the Karaoke Setting
To adjust the key
2 Adjust the echo level
4 Adjust the key
To change the mic volume
4 Select the scoring level setting
4 Select the fanfare setting
To change the scoring level
“How to select a number”
To cancel the procedure
PROGRAM indicator
To erase the entire program, repeat the procedure
Timer Operations
Setting the Timer
Canceled Clock setting ON
REC TIMER
Turning Off the Power Automatically Remote
Timer Priority
How Recording Timer works
Canceled 180 150
Setup Menu Operations
Basic Procedure
1 Press SET UP while playback is stopped
ENTER/SET To erase a preference display, press SET UP
SPK. SETTING menu
AUDIO menu
OTHERS menu
DELAY
Operating the TV
Operating the TV
To operate the TV
Manufacturer’s code
Additional Information
Learning More about This System
Daily Operations-Playback see pages 8 to
Changing the Color System and Scanning Mode
Daily Operations-Sound & Other Adjustments
Adjusting the Speaker Output Level
Setting the Clock
Unique Video Disc/File Operations see pages
Operations Using the On-screen Bar
Adjusting the Sound Track for Karaoke
On-Screen Operations see pages 23 to
Recording Operations see pages 29 to
Maintenance
Setup Menu Operations see pages 38 to
Cleaning the System
Setting the Timer
Troubleshooting
Timer Operations
Adjustments or settings are suddenly canceled before you finish
Operations are disabled
OPTICAL DIGITAL OUTPUT Signals
LanguageCode List
Output Signals
OUTPUT
Supplied Accessories
Tuner section
Disc/file player section
USB storage section
Remote control
Parts Index
Main unit
Remote control
Excluding Australian model
CA-DXU10/CA-DXU8 COMPACT COMPONENT SYSTEM
CA-DXU6
CA-DXU6
GVT0209-001A US, UN, UG, UX, A, UW
COMPACT COMPONENT SYSTEM
Warnings, Cautions and Others
IMPORTANT FOR LASER PRODUCTS
European Union only
CA-DXU6
CA-DXU6
Caution Proper Ventilation
Front view
Playable Disc/File Types
How to Read This Manual
Introduction
Audio formats
Precautions
Contents
Installation
Power sources
Supplied accessories
Connections
~ From the video input of TV/monitor See page
Ÿ From the digital input of digital audio component
~ TV/monitor
Ÿ Digital audio component
Auxiliary equipment
⁄ AM/FM antenna
# Power cord
@ Speakers
¤ Voltage selector not applicable for Australian models
To connect the speaker cords
Canceling the Demonstration
Preparing the Remote Control
Connecting a USB Mass Storage Class Device
When using the remote
lights when one of the Sound Modes with
Display Indication
7 8 9 p
w e r t
¥ Turn on the power
π Adjust the volume
How to select a number
connecting or putting on the headphones
Adjusting the Volume
To preset stations
To drop the volume in a moment
To restore the stereo effect, press the
To tune in to a preset station
2 Select the preset number for the station you stored
If “” appears on the TV screen when you press a
Playing Back a Disc/USB Mass
To play back by using the disc menu
To select a disc
To select a chapter/track
To locate a particular portion
Playing Back a Tape
To insert a tape
To change the tape running direction
To reverse the tape automatically
Adjusting the Speaker Output Balance
LITE.n.EASY
Daily Operations-Sound & Other Adjustments
Reinforcing the Bass Sound
User Mode
DANCE
USER1 USER2 USER3
To cancel the Sound Mode, select “FLAT.”
Creating 3-Dimensional Sound Field
3D Phonic
Presetting Automatic DVD Video
To select a preset picture tone
Setting the Clock
To adjust the picture tone
2 Select a parameter you want to adjust
3 Adjust the parameter
Unique Video Disc/File Operations
Selecting the Audio Track
While playing DVD Video
While playing a DVD Audio/DivX
Selecting the View Angle
Selecting Browsable Still Pictures Remote
Selecting the Subtitle Language
Reviewing the Playback Quickly
To cancel the key number entry, press
Special Picture Playback
Playing Back Bonus Group
Pause playback
Program Play
2 Select chapters/tracks/files you want for Program Play
3 Repeat step 2 above until you complete your program
Canceled
To check the programmed contents
Canceled
Canceled
Canceled
To cancel the prohibition, repeat the same procedure
Playing Repeatedly-Repeat Play
Repeat Play
A-B Repeat
Remote control
On-Screen Operations
On-screen Bar Information
On-screen bars
Operations Using the
5 Repeat play setting for Video files See also page
5 Finish the setting
On-screen Bar
5 Finish the setting
To change the time information
Repeat Play
A-B Repeat
5 Finish the setting
Time Search
Chapter/Track Search
Operations Using the Control Screen
Control screen for DVD-VR
Control screen for AV files/JPEG files
To select playback type
To start playback
To stop playback To repeat chapter/program/play list for DVD-VR
To repeat slide-show for JPEG file
To repeat play for Video files
Recording Operations
Recording onto a Tape
3 forward 2 reverse
1 Insert a recordable cassette into deck B
To cancel while recording
Dubbing Tapes
Synchronized Recording
To record only your favorite track/file-One Track Recording
4 Sing into the microphone 5 Adjust the MIC LEVEL and VOLUME
To cancel Mic Mixing
Enjoying Karaoke
Singing Along Karaoke
Adjusting the Sound Track for Karaoke
Scoring Your Karaoke Skill
To return to normal playback temporarily
VOCAL MASK L CHANNEL
Changing the Karaoke Setting
To adjust the key
2 Adjust the echo level
4 Adjust the key
To change the mic volume
4 Select the scoring level setting
4 Select the fanfare setting
To change the scoring level
To check the programmed contents
“How to select a number”
To cancel the procedure
PROGRAM indicator
4 Select an item you want to play or record as follows
Timer Operations
Setting the Timer
Canceled Clock setting ON
Turning Off the Power Automatically Remote
Timer Priority
How Recording Timer works
Canceled 180 150
Setup Menu Operations
Basic Procedure
1 Press SET UP while playback is stopped
ENTER/SET To erase a preference display, press SET UP
AUDIO menu
OTHERS menu
DIGITAL AUDIO OUTPUT
DOWN MIX
Operating the TV
Operating the TV
To operate the TV
Manufacturer’s code
Additional Information
Learning More about This System
Daily Operations-Playback see pages 8 to
Changing the Color System and Scanning Mode
Daily Operations-Sound & Other Adjustments
Creating 3-Dimensional Sound Field-3D Phonic
Setting the Clock
Unique Video Disc/File Operations see pages
Operations Using the On-screen Bar
Adjusting the Sound Track for Karaoke
On-Screen Operations see pages 23 to
Recording Operations see pages 29 to
To re-record on a protected tape, cover
Maintenance
Setup Menu Operations see pages 38 to
Cleaning the System
Troubleshooting
Timer Operations
Adjustments or settings are suddenly canceled before you finish
Operations are disabled
OPTICAL DIGITAL OUTPUT Signals
LanguageCode List
Output Signals
OUTPUT
Specifications
Amplifier section
Supplied Accessories
Design and specifications are subject to change without notice
Remote control
Remote control
Parts Index
Main unit
CA-DXU6 COMPACT COMPONENT SYSTEM
Excluding Australian model