7
8
9
RETURN TO NORMAL SCREEN
Press MENU.
If you are using a JVC Master Edit
If you are not using a JVC Master Edit
ACCESS MAIN MENU SCREEN
Press MENU.
ACCESS FUNCTION SET SCREEN
Press CH 5°or TIME SCAN %Þto move the highlight bar (arrow) to “FUNCTION SET”, then press OK or TIME SCAN %.
ENABLE REMOTE PAUSE
FUNCTION
![]()
![]()
![]()
![]()
![]()
![]()
![]()
![]()
![]()
![]()
![]()
![]()
![]()
![]()
![]()
![]()
![]()
![]()
![]()
![]()
![]()
![]()
![]()
![]()
![]()
![]()
![]()
![]()
![]()
![]()
![]()
![]()
![]()
![]()
![]()
![]()
![]()
![]()
![]()
![]()
![]()
![]()
![]()
![]()
![]()
![]() E
E![]() N
N![]()
![]() 55
55![]()
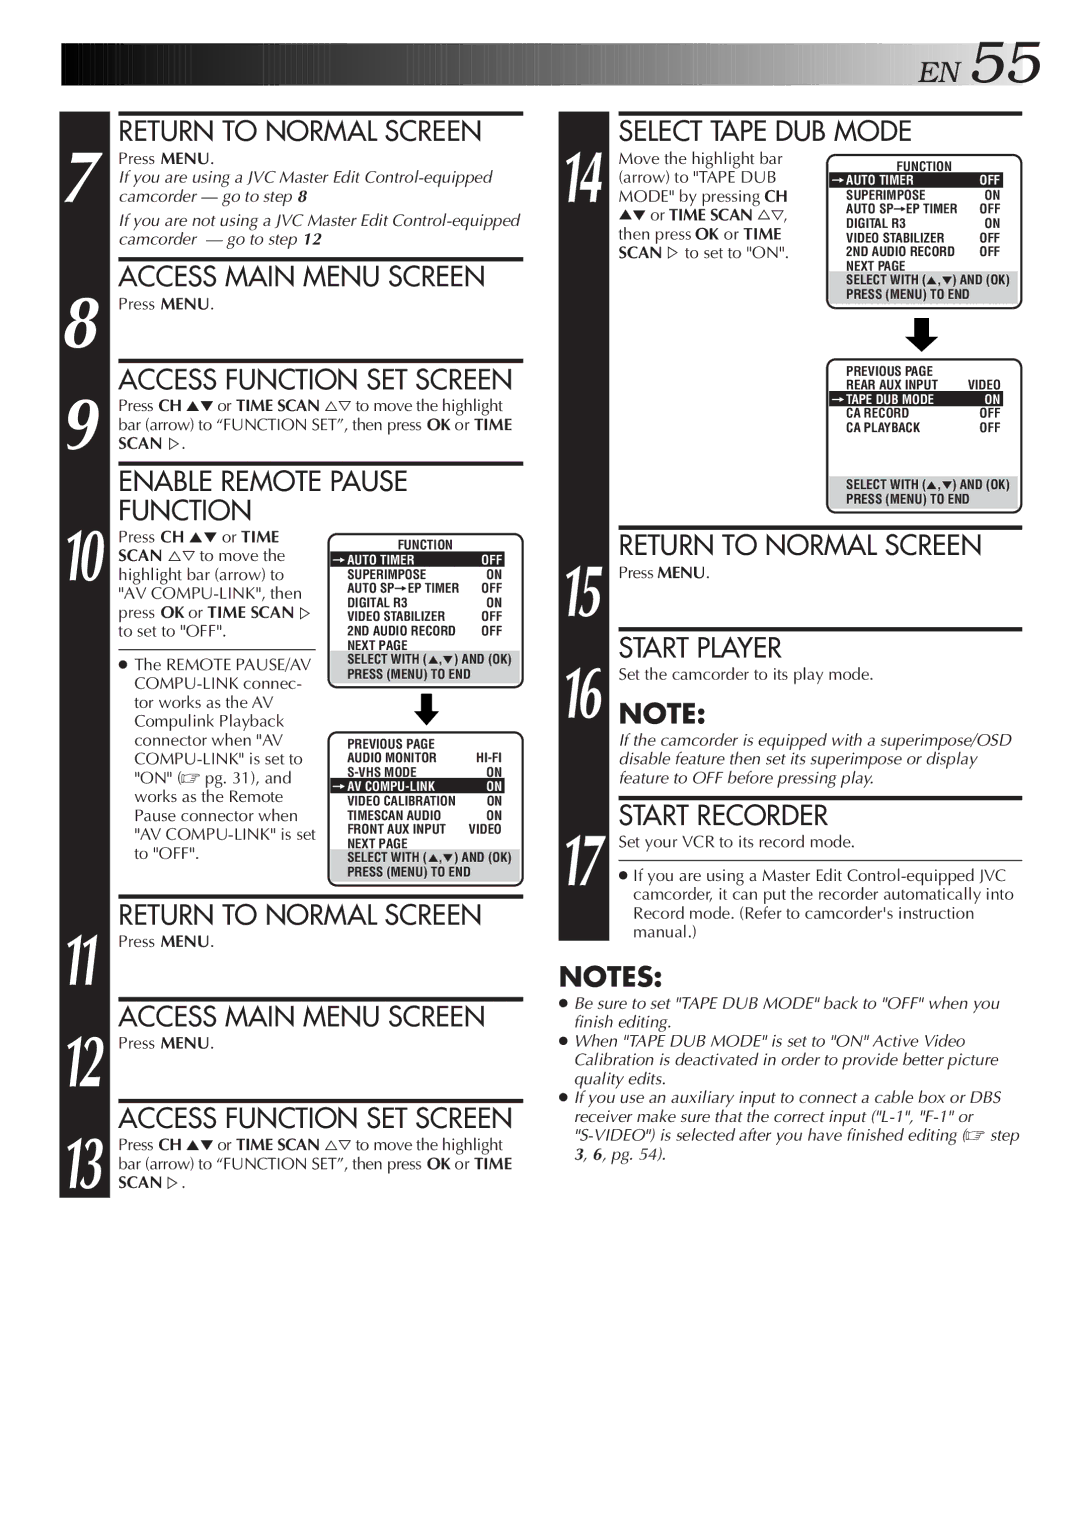
| SELECT TAPE DUB MODE |
|
|
| |
| Move the highlight bar | FUNCTION |
|
|
|
| (arrow) to "TAPE DUB |
|
|
| |
| =AUTO TIMER | OFF |
| ||
14 MODE" by pressing CH | SUPERIMPOSE | ON |
| ||
AUTO SP=EP TIMER | OFF | ||||
| 5°or TIME SCAN %Þ, | DIGITAL R3 | ON | ||
| then press OK or TIME | ||||
| VIDEO STABILIZER | OFF | |||
| SCAN%to set to "ON". | 2ND AUDIO RECORD | OFF | ||
|
| NEXT PAGE |
|
|
|
|
| SELECT WITH (5,°) AND (OK) |
| ||
|
| PRESS (MENU) TO END |
| ||
|
| PREVIOUS PAGE |
|
|
|
|
| REAR AUX INPUT | VIDEO | ||
|
| =TAPE DUB MODE | ON |
| |
|
| CA RECORD | OFF |
| |
|
| CA PLAYBACK | OFF | ||
|
|
|
|
| |
|
| SELECT WITH (5,°) AND (OK) | |||
|
| PRESS (MENU) TO END |
| ||
10
Press CH 5° or TIME SCAN %Þto move the highlight bar (arrow) to "AV
●The REMOTE PAUSE/AV
FUNCTION |
|
=AUTO TIMER | OFF |
SUPERIMPOSE | ON |
AUTO SP=EP TIMER | OFF |
DIGITAL R3 | ON |
VIDEO STABILIZER | OFF |
2ND AUDIO RECORD | OFF |
NEXT PAGE
SELECT WITH (5,°) AND (OK)
PRESS (MENU) TO END
PREVIOUS PAGE |
|
AUDIO MONITOR | |
ON | |
=AV | ON |
VIDEO CALIBRATION | ON |
TIMESCAN AUDIO | ON |
FRONT AUX INPUT | VIDEO |
NEXT PAGE
SELECT WITH (5,°) AND (OK)
PRESS (MENU) TO END
15 | RETURN TO NORMAL SCREEN |
Press MENU. | |
16 | START PLAYER |
NOTE:Set the camcorder to its play mode. | |
| If the camcorder is equipped with a superimpose/OSD |
| disable feature then set its superimpose or display |
| feature to OFF before pressing play. |
|
|
17 | START RECORDER |
Set your VCR to its record mode. | |
| |
● If you are using a Master Edit | |
camcorder, it can put the recorder automatically into |
11
12
13
RETURN TO NORMAL SCREEN
Press MENU.
ACCESS MAIN MENU SCREEN
Press MENU.
ACCESS FUNCTION SET SCREEN
Press CH 5°or TIME SCAN %Þto move the highlight bar (arrow) to “FUNCTION SET”, then press OK or TIME SCAN %.
Record mode. (Refer to camcorder's instruction |
manual.) |
NOTES:
● Be sure to set "TAPE DUB MODE" back to "OFF" when you finish editing.
● When "TAPE DUB MODE" is set to "ON" Active Video Calibration is deactivated in order to provide better picture quality edits.
● If you use an auxiliary input to connect a cable box or DBS receiver make sure that the correct input