HV-Z34L1 HV-Z29V1
S.T. demonstration
Fitting the woofer unit
Connecting the woofer unit only for HV-Z29V1
Connecting the aerial and VCR
If not connecting a VCR see Fig. a
Setup Tour
Connecting the power cord
Putting the batteries into the remote control
Making the initial settings
Now, setting up is complete. Please enjoy your new JVC TV
Remote control sensor 7 VIDEO-4 terminal
Turn the main power on
Turn the TV on from standby mode
Adjust the volume
Output terminal ~
VIDEO-1 terminal
VIDEO-2 Component terminal
VIDEO-3 Component terminal =
Press the # button
Remote control buttons and functions
Cinema Surround button
Watch images from an external device
Muting button
Zoom button
RETURN+ function
Sound Mode button
RETURN+ button
Bass button
Return function
Display button
Choose a TV channel or a Video terminal
Favorite channel registration
„ Showing the favorite channels
„ Setting the picture effect
Twin and PIP picture in picture function
„ Recalling the favorite channel
„ Swapping the pictures
„ Listening to the sound Sub-picture
„ TV channel selection
„ Input source selection TV, VIDEO-1, -2, -3 or
„ Setting the colour system Sub picture
„ Changing the sub picture Position in PIP mode only
Multi-picture function
Press the Strobe button
Set the PIP/TV/DVD switch to the PIP position
Freeze function
Strobe function
Viewing a teletext programme
Operating a JVC brand DVD player
Sub-page
Using the List mode
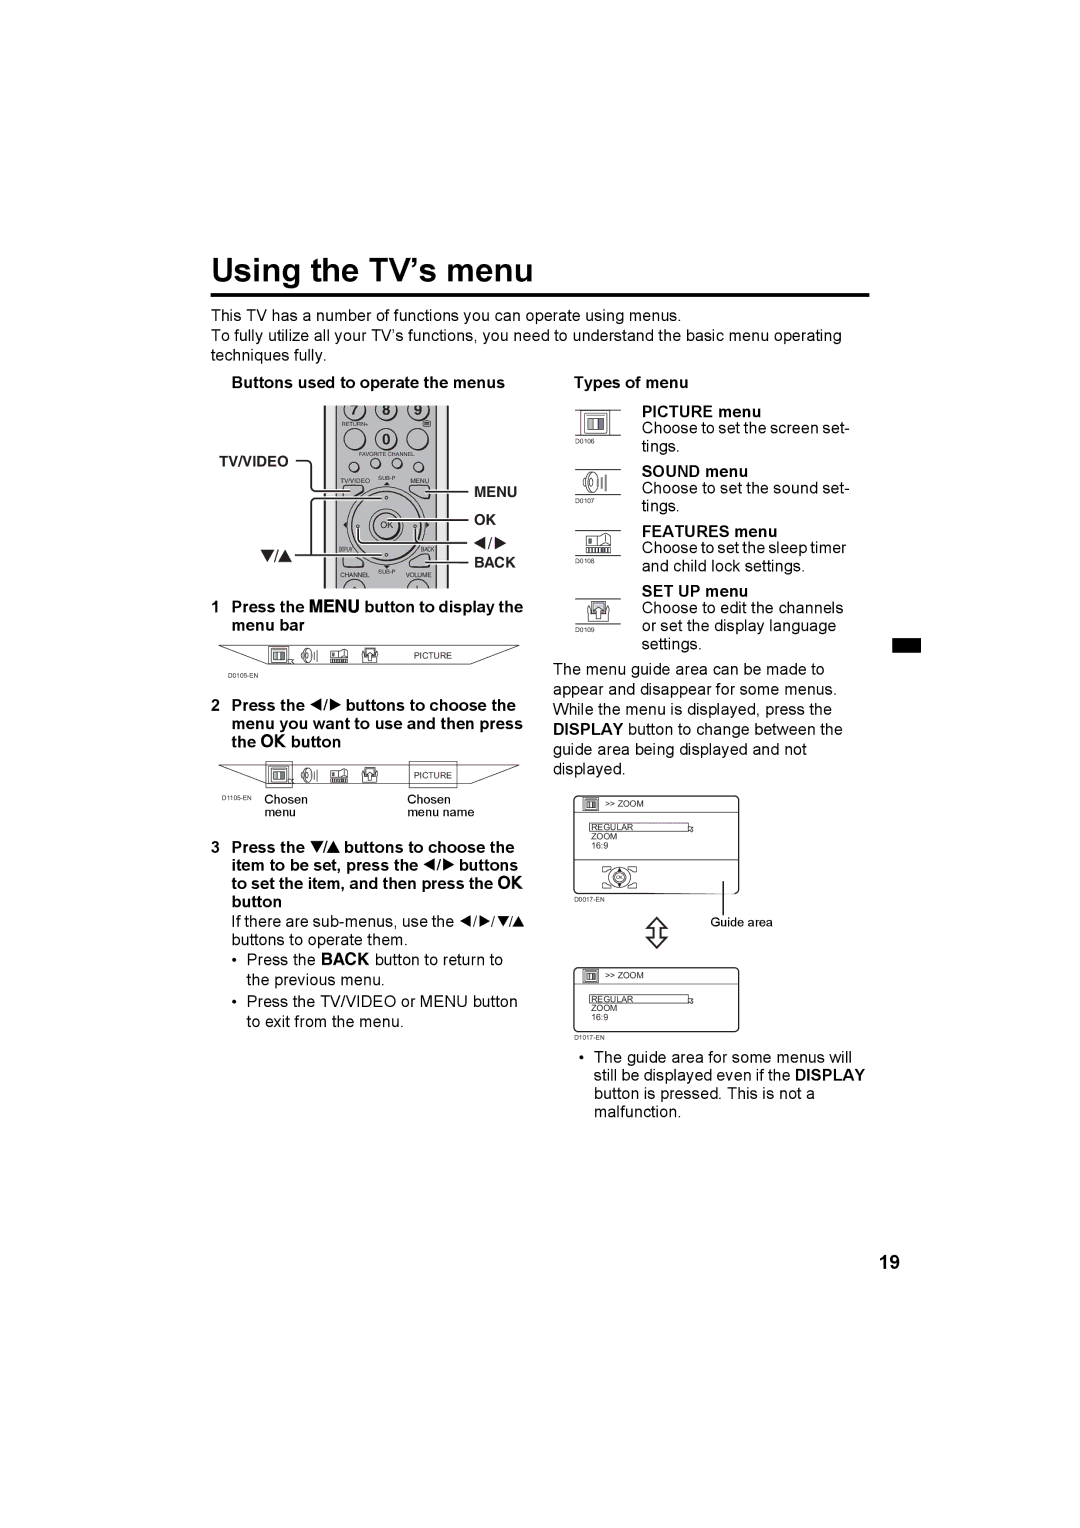
Buttons used to operate the menus Types of menu
SET UP menu
Press the Hbutton to display the menu bar
Operation with the buttons on
„ Picture Mode
„ Adjusting the picture
Picture menu
„ Digital VNR
Features menu
To return to the default settings in each
„ White Balance
„ Pull Down
„ Super DigiPure
DigiPure function
Press the 5 buttons to choose Main or SUB
Choose Colour SYSTEM. Then press the a or 3 button
Ntsc
„ Stereo
Sound menu
„ Zoom
„ Multi
„ Cinema Surround
„ Sound Mode
„ Headphone Volume
„ Balance
„ Channel Guard
„ Sleep Timer
„ Auto Shutoff
„ Appearance
„ Blue Back
„ Child Lock
„ Video Setting
„ Favorite Setting
„ Auto Program
Setup menu
Choose Auto PROGRAM, then press the OK button
Choose EDIT/MANUAL, then press the OK or 3 button
„ EDIT/MANUAL
Press the 6 buttons to choose a new programme number
Functions
Register a new TV channel
Preparation
Press the 6 buttons to choose a
Programme number for which you will
„ Picture Tilt
„ VIDEO-2 SETTING/VIDEO-3 Setting
„ AI Volume
„ Language
Choose Teletext LANGUAGE, then
Setting
„ Teletext Language
Press the OK button to complete
Channel
CH/CC number
Before connecting anything
„ Connecting the external Devices
Connecting devices to the Output terminal
Connecting methods
„ Connecting AV Compu Link Supported Devices
Connecting Headphones
Setting up the AV Compu Link remote control system
If a VCR is connected to the VIDEO-2 Component terminal
If a DVD player is connected to VIDEO-1 terminal
„ No picture/No sound
„ If you cannot turn on the TV
„ Poor picture
„ Poor sound
„ Operation disabled
„ Other concerns
Design and specifications subject to change without notice
Specifications
Victor Company of JAPAN, Limited
LCT1460-001A-H 1103-CR-JMT
S.T. demonstration
Setting up your TV
Setup Tour
Now, setting up is complete. Please enjoy your new JVC TV
TV buttons and functions
VIDEO-1 terminal
Remote control buttons and functions
Adjust the volume
RETURN+ button
Display button
Twin and PIP picture in picture function
„ Listening to the sound Sub-picture
Multi-picture function
Freeze function
Operating a JVC brand DVD player
Sub-page
Using the List mode
Using the TV’s menu
Picture menu
Features menu
„ Pull Down
„ Colour System
Sound menu
„ Sound Mode
Features menu
„ Appearance
„ Favorite Setting
Setup menu
„ EDIT/MANUAL
Functions
To cancel the Insert function
„ Language
„ Teletext Language
CH/CC number
Additional preparation
Connecting methods
Connecting Headphones
If a DVD player is connected to VIDEO-1 terminal
Troubleshooting
„ Poor sound
„ Other concerns
Specifications
Victor Company of JAPAN, Limited