JVC LVT1112-001A Turning off the power with the Sleep Timer, Changing the display brightness

Models: LVT1112-001A

1 45
Download 45 pages 60.07 Kb
Page 18
Image 18
Turning off the power with the Sleep Timer

Basic operations

Turning off the power with the Sleep Timer

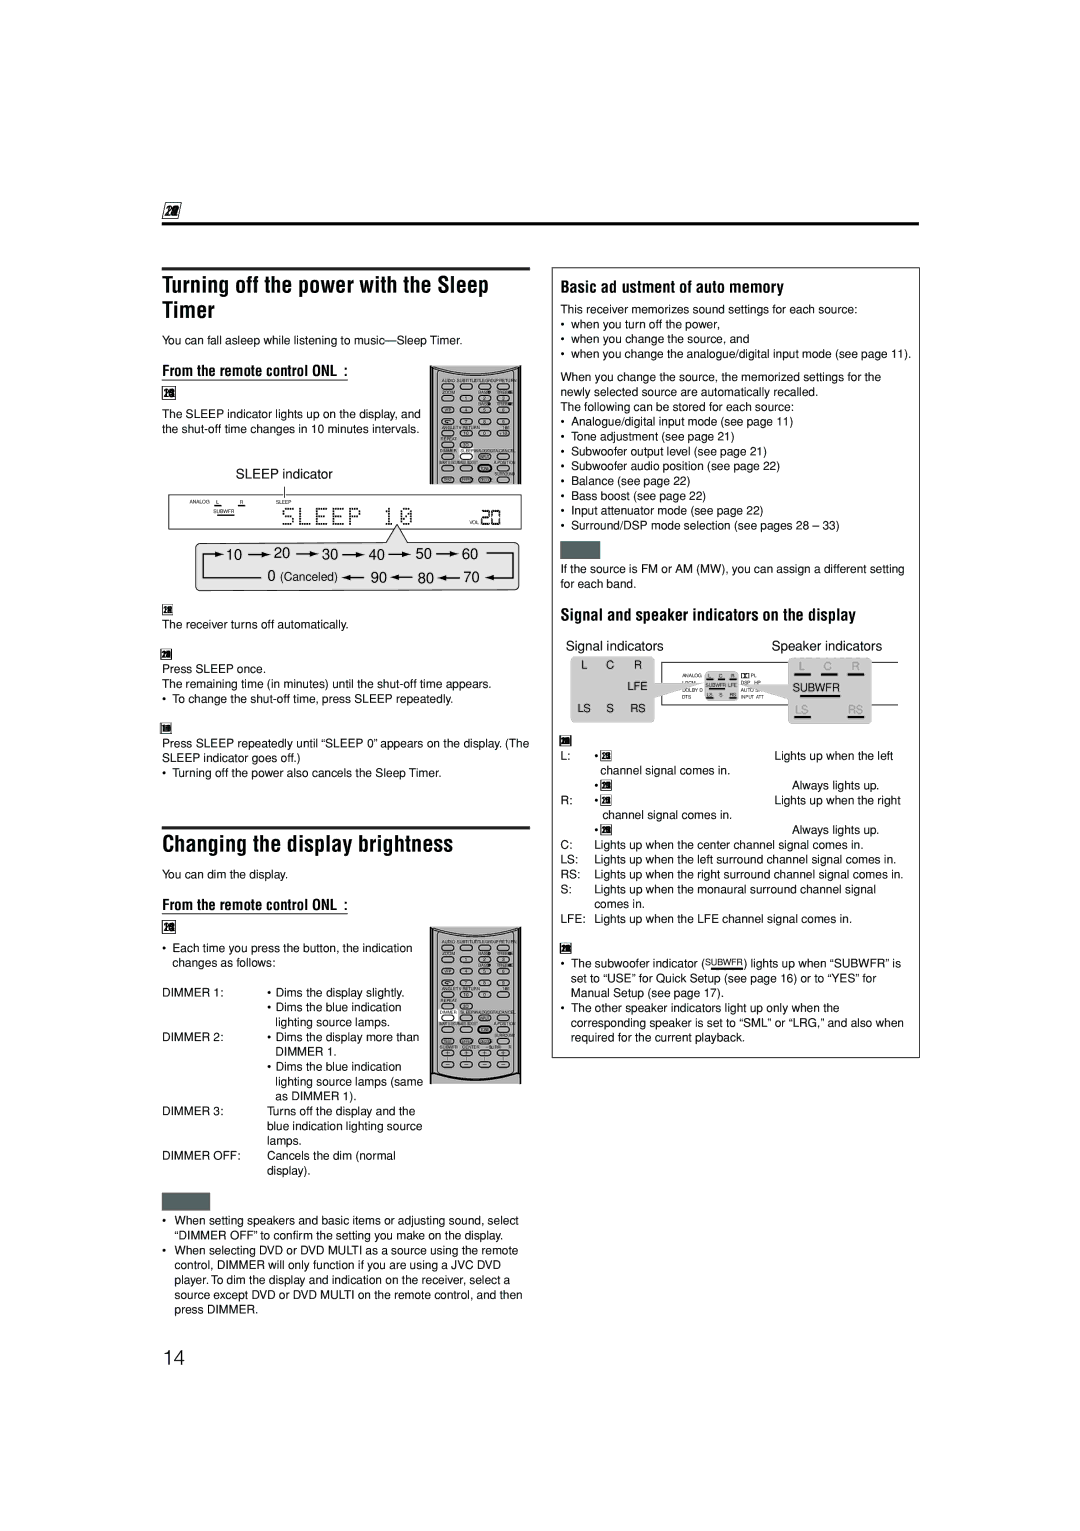
You can fall asleep while listening to music—Sleep Timer.

From the remote control ONLY:

Press SLEEP repeatedly.

AUDIO

SUBTITLE TITLE/GROUP RETURN

ZOOM

1

2

3


BASS

TREBLE


BASS

TREBLE

The SLEEP indicator lights up on the display, and

VFP

4

5

6


7

8

9

the shut-off time changes in 10 minutes intervals.


ANGLE

10

0

+10


TV RETURN


100+


REPEAT


3D


DIMMER

SLEEP ANALOG/DIGITAL CANCEL


INPUT


SMART S. SETUP BASS BOOST


A.POSITION


SLEEP indicator

TEST

EFFECT

TONE


DECODE


SURROUND


SUBWFR CENTER

L

SURR R

ANALOG L

R

SLEEP


SUBWFR

VOL

Press SLEEP repeatedly.10 10  20  30  40  50  60 20 When the shut-off time comes: 30 To cancel the Sleep Timer: 40 Changing the display brightness 50 Basic adjustment of auto memory 60

0 (Canceled) Signal and speaker indicators on the display 90The following signal indicators light up —: 80 Press DIMMER repeatedly. 70 The speaker indicators light up as follows:

When the shut-off time comes:

The receiver turns off automatically.

To check or change the remaining time until the shut-off time:

Press SLEEP once.

The remaining time (in minutes) until the shut-off time appears.

• To change the shut-off time, press SLEEP repeatedly.

To cancel the Sleep Timer:

Press SLEEP repeatedly until “SLEEP 0” appears on the display. (The SLEEP indicator goes off.)

• Turning off the power also cancels the Sleep Timer.

Changing the display brightness

Basic adjustment of auto memory

This receiver memorizes sound settings for each source:

when you turn off the power,

when you change the source, and

when you change the analogue/digital input mode (see page 11).

When you change the source, the memorized settings for the newly selected source are automatically recalled.

The following can be stored for each source:

Analogue/digital input mode (see page 11)

Tone adjustment (see page 21)

Subwoofer output level (see page 21)

Subwoofer audio position (see page 22)

Balance (see page 22)

Bass boost (see page 22)

Input attenuator mode (see page 22)

Surround/DSP mode selection (see pages 28 – 33)

NOTE

If the source is FM or AM (MW), you can assign a different setting for each band.

Signal and speaker indicators on the display

Signal indicators


Speaker indicators

L

C

R


R PL ΙΙ


L C

R


LFE


ANALOG

L


C


LPCM


SUBWFR LFE DSP HP

SUBWFR


DOLBY D

LS


S


RS

AUTO SR


LS

S

RS


DTS


INPUT ATT


LS


RS


The following signal indicators light up —:

L:When digital input is selected: Lights up when the left channel signal comes in.

When analogue input is selected: Always lights up.

R:When digital input is selected: Lights up when the right channel signal comes in.

When analogue input is selected: Always lights up.

C:Lights up when the center channel signal comes in.

LS: Lights up when the left surround channel signal comes in.

You can dim the display.

From the remote control ONLY:

Press DIMMER repeatedly.

Each time you press the button, the indication changes as follows:

DIMMER 1: • Dims the display slightly.

• Dims the blue indication lighting source lamps.

DIMMER 2: • Dims the display more than DIMMER 1.

Dims the blue indication lighting source lamps (same as DIMMER 1).

DIMMER 3: Turns off the display and the blue indication lighting source lamps.

DIMMER OFF: Cancels the dim (normal display).

NOTES

AUDIO

SUBTITLE TITLE/GROUP RETURN

ZOOM


BASS

TREBLE


1

2

3


BASS

TREBLE

VFP

4

5

6


7

8

9

ANGLE

TV RETURN


100+


10

0


REPEAT


3D


DIMMER

SLEEP ANALOG/DIGITAL CANCEL


INPUT

SMART S. SETUP

BASS BOOST


A.POSITION


TONE


SURROUND

TEST

EFFECT

DECODE

SUBWFR

CENTER

L

SURR R

RS: Lights up when the right surround channel signal comes in.

S:Lights up when the monaural surround channel signal comes in.

LFE: Lights up when the LFE channel signal comes in.

The speaker indicators light up as follows:

The subwoofer indicator (SUBWFR) lights up when “SUBWFR” is set to “USE” for Quick Setup (see page 16) or to “YES” for Manual Setup (see page 17).

The other speaker indicators light up only when the corresponding speaker is set to “SML” or “LRG,” and also when required for the current playback.

When setting speakers and basic items or adjusting sound, select “DIMMER OFF” to confirm the setting you make on the display.

When selecting DVD or DVD MULTI as a source using the remote control, DIMMER will only function if you are using a JVC DVD player. To dim the display and indication on the receiver, select a source except DVD or DVD MULTI on the remote control, and then press DIMMER.

14

Page 18
Image 18
JVC LVT1112-001A manual Turning off the power with the Sleep Timer, Changing the display brightness, Press SLEEP repeatedly