Compact Component HDD System
LVT0859-001A
Mises en garde, précautions et indications diverses
For U.S.A
For Canada/pour le Canada
Precautions
Introduction
Contents
Inside of Front Door Display Window
Location of the Buttons
Front Panel
Become familiar with the buttons on your unit
Front Panel
How to open the front door
See pages in the parentheses for details
Front door t CD tray Keyboard terminal 9 u Phones jack
Remote Control
Unpacking
Connecting Antennas
Getting Started
FM antenna
AM antenna
Connecting Speakers
You can connect the speakers using the speaker cords
To connect an outdoor AM antenna
To remove the speaker grille
Connecting Other Equipment
Ex. When connecting a cassette deck
Speaker grilles are removable as shown below
Putting the Batteries into the Remote Control
Connecting a keyboard
Front panel
Basic Settings
Remote control
Turning On the Power
Setting the Clock
Changing the Display Contrast
To adjust the clock again
Changing the Display Brightness
To turn on/off the clock indication
Remote control
Basic and Common Operations
To stop playback, press
FM AM Line
To select the CD player as the source, press CD 3/8
For more detailed operations, see pages 23 to
Source indication canceled
Adjusting the Bass and Treble Sounds
AHB 1 AHB AHB OFF canceled
Bass Treble
What is AAC?
Using the AAC Sounds
AAC Sound OFF Mono Film canceled
Hall MID Night Head Phones
Listening to FM and AM Broadcasts
To change the information shown in the main display
Tuning in to a Station
To change the FM reception mode
To record a broadcast program automatically
Presetting Stations
Tuning in to a Preset Station
Playing Back the External Component
FM AM
Adjusting the Input Level
Selecting the External Component
Press SET to finish changing the source name
To cancel the setting, press Cancel
Changing the Source Name
Selected source name appears in the main display
Playing Back CDs CD/CD-R/CD-RW
Precautions on CD Playback
Playing Back the Entire CD-Normal Play
Program Play
To go to another track directly using the number buttons
Basic CD Operations
To stop playback for a moment
To modify the program
To check the program contents
Playing at Random-Random Play
Repeat 1TRK
Repeating Tracks or CD-Repeat Play
Prohibiting Disc Ejection-Disc Lock
Repeat OFF
Playing Back the HDD Hard Disk Drive
Mark
Libraries
Playing Back the Entire HDD Continuous Play
How tracks are recorded into the HDD
Press HDD 3/8
Basic HDD Operations
To locate a particular point in a track during play
To select another library
Playing Tracks in an Album-Album Play
To select another album
HDD Album HDD Library
To go to another album in the same library, press
Library indicator lights up on the display
To go to another track in the same album, press ¢ or
Album or Album repeatedly
Repeating Tracks-Repeat Play
Random and indicators light up on the display
You cannot cancel Repeat play during Random play
All tracks in the HDD are played repeatedly and endlessly
Album T.?
Canceled Last 10? Track title?
Searching for Albums and Tracks to Play- Search Modes
Track T.?
Canceled Last 10?
Press Enter
Available symbols are as follows
Repeat steps 4 1 and 4 2 to enter other characters
For Album Title Search
Album No.?
To search for one of the last 10 albums recently
Played or recorded-LAST
Recording into the HDD
How the HDD separates the recorded tracks?
Before You Start Recording
About the digital formats used for recordings
About the maximum recording length for one track
Smart COMP. CD Auto REC
Using Automatic Recording Functions
Canceled TU Auto REC
CD Auto Recording will be automatically canceled if
CD and Auto indicators light up on the display
CD and Auto indicators go off
To automatically record CDs-CD Auto Recording
TU Auto REC
Canceled
Smart Comp CD Auto REC
How Tuner Auto Recording actually works?
AAC128kbps AAC 96kbps PCM x1 REC PCM x4 REC PCM x2 REC
Press REC Mode on the unit to select the recording mode
Recording CDs
Prepare a CD
Entry flashes in the main display for a while
To record a single track during playback
Press SET to finish the recording
To stop while recording, press
AAC128kbps AAC 96kbps
When the broadcast program ends, press 7 to stop recording
Recording FM/AM Broadcasts
To assign track numbers manually while recording
Start playback on the external equipment
When playback ends, press 7 to stop recording
Recording the External Component
To assign track numbers manually while recording
To record CD into the HDD using analog recording mode
When no sound comes in for more than 30 seconds
Press CD 3/8, then press 7 after loading a CD
Making Your Own Titles
HDD
To assign a title to an album
Canceled Track EDIT?
Assigning Titles to Albums and Tracks
TITLE? LIB. EDIT? Album EDIT?
To assign titles to tracks
Press TITLE/EDIT again to exit from the title entry mode
On the remote control only Press HDD 3/8
First track of the selected album now starts playing
Editing the HDD
Album Editing
Introducing HDD Editing Functions
Library Editing
Track Editing
Unit enters the library name entry mode
Library name entry screen appears in the main display
TITLE?
Restoring the Libraries-RESTORE
Copying an Album-COPY Album
LIB. EDIT? Album EDIT?
Press Select ¢or Select 4to select
Moving an Album-LIB. Change
Making a New Album-MAKE Album
LIB.CHANGE?, then press SET
Erasing an Album-ERASE
To make your best album later
Press Enter again
Erasing All Albums-ALL Erase
Copying a Track-COPY Track
Press SET Press SET again
Currently selected track starts playing
Press SET when you find the start point POSI.A for Copy
Album selection screen appears
Playback continues
11Press Enter
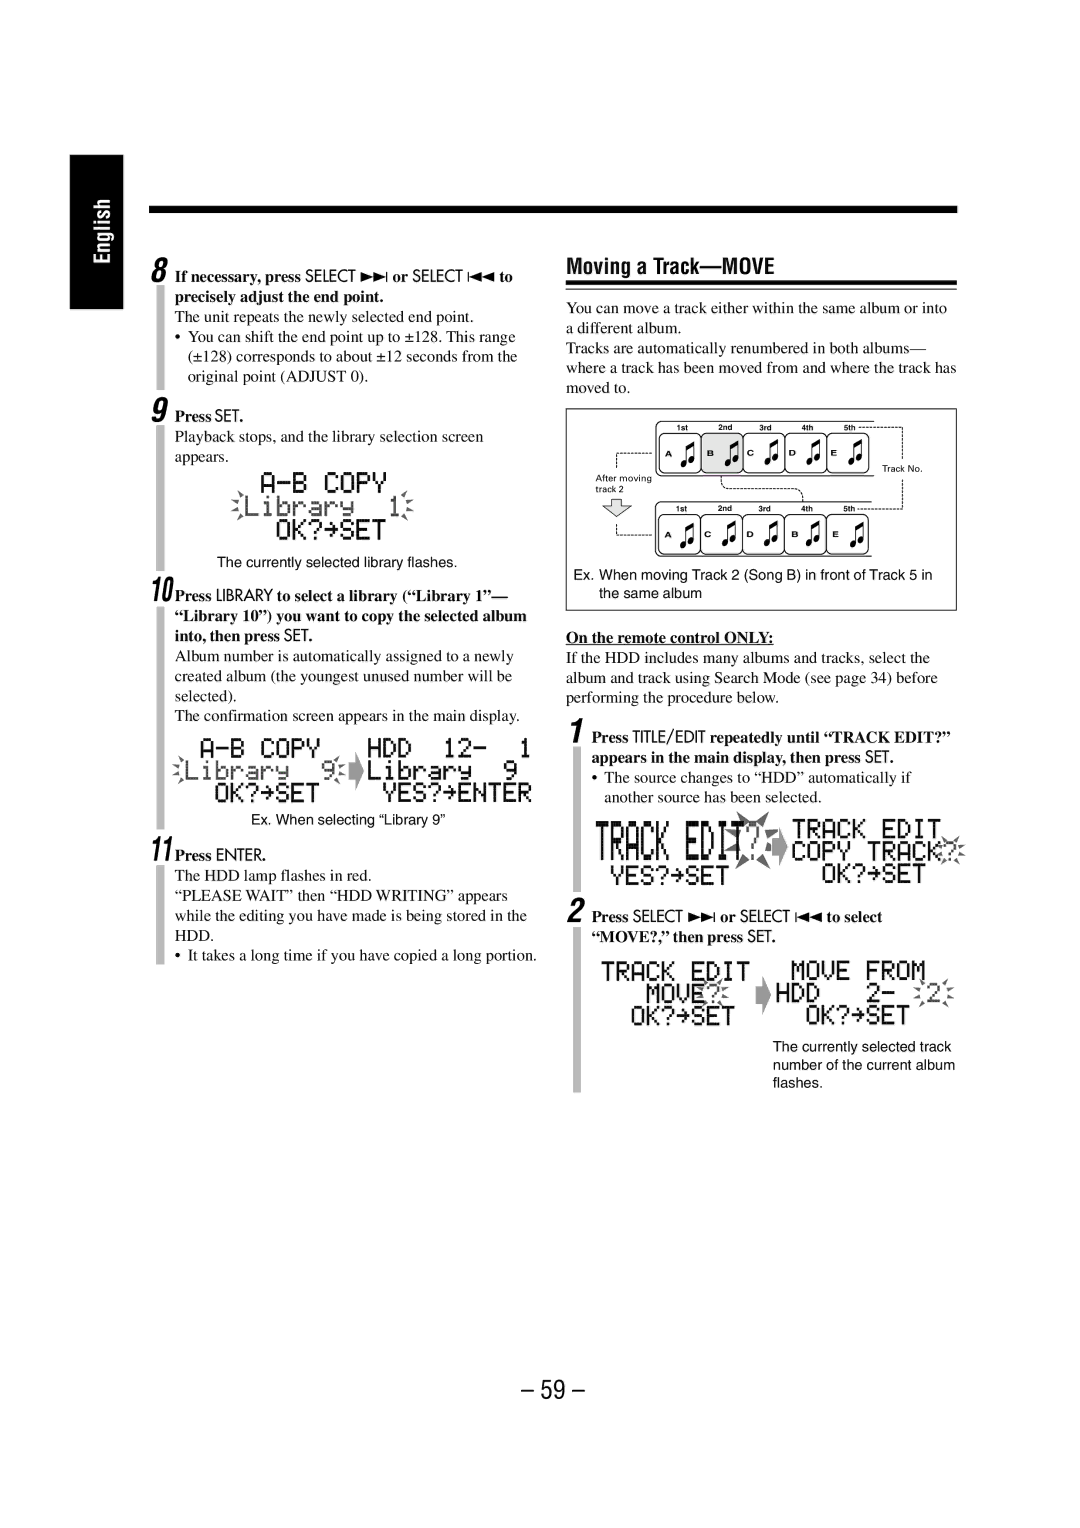
Moving a Track-MOVE
Playback stops, and the library selection screen appears
Press Select ¢or Select 4to select MOVE?, then press SET
If Cannot Entry LIB. appears in the main display
Dividing a Track-DIVIDE
Press Select ¢or Select 4to select DIVIDE?, then press SET
To join the divided tracks, see the Join function that
Press SET when you find the dividing point
Joining Tracks-JOIN
Press Select ¢or Select 4to select JOIN?, then press SET
Press SET Press Enter
Erasing a Track-ERASE TRK
Press Select ¢or Select 4to select tracks
To divide the joined tracks, see the Divide function on
Using the Timers
Sleep
Using Recording Timer
FM? AM?
LINE?
FM? AM? CD?
Using Daily Timer
How Daily Timer actually works
LINE?* HDD?
To turn on the Daily Timer, repeat , and press SET in step
Using Sleep Timer
How Sleep Timer actually works
120
To sleep with Sleep Timer and wake up with Daily Timer
Using Auto Power Off
Timer Priority
To deactivate Auto Power Off, press A.P.off
Keys Used for Operating This Unit
Using an Optional Keyboard
Same way as the / buttons on the remote control
While selecting a library, used to select
To assign a track title-F2
Operating Procedures Using the Keyboard
To assign an album title-F1
To search for an album by entering its title-F6
To change a library name-F3
To search for an album by its number-F5
To search for a track by entering its title-F7
General Notes
Maintenance
Cleaning the unit
Handling CDs
Message
Signification Solution
Messages
Signification
How to rebuild the HDD
Cannot
Possible Cause
Troubleshooting
CD playback Symptom
Action
HDD recording HDD editing
If Level OVER! appears in the main display
Symptom Possible Cause Action HDD editing
General
Specifications
Authorized Service Centers
Limited Warranty
EN, FR JVC 0602NSMMDWJEM