MONITOR screen
(example showing camera ID as “05”)

CONNECTION/INSTALLATION

RM-P2580 System

System with up to 8 cameras

L

L

Av Pk

ALC

Camera 1

Camera


TK-C1460

Control signal cable


Video signal cable

MACHINE ID:1

(Menu screen)

RX TERM: OFF

(switch) LH

LEVEL

Av Pk

ALC

Camera 2

MACHINE ID:2 (Menu screen)

RX TERM: OFF (switch)

Camera TK-C1460

AC24V

Power or

cable DC12V

AC24V or DC12V

L H

LEVEL

AvPk

ALC

Camera 8

MACHINE ID:8 (Menu screen)

RX TERM: ON (switch)

Camera

TK-C1460

AC24V


MONITOR

• • • • CAM

SW Time lapse VCR

or

OUT

SR-L910

DC12V


VIDEO IN


TO


CAMERA


CAMERA


SW COM


MONITOR


Remote Control Unit


TO CAMERA


COM 9/1

DATA I / O


UNIT CAMERA

COM


MONITOR


RX RX TX TX COM


10/2 11/3 12/4 13/5 14/6 15/7 16/8

COM AUTO ALARM COM SW


POWER


RM-P2580

ON

OFF


VIDEO INPUT


OUTPUT 2


TO CAMERA


DATA I / O


SERIAL-1

SERIAL-2


RX+ RX- TX+ TX-


AC INPUT


MONITOR MONITOR


OUTPUT OUTPUT


VIDEO INPUT


1

2

3

4

5

6

7

8


MONITOR MONITOR


ON


OUTPUT OUTPUT


VIDEO OUTPUT


MONITOR


1

2


ON

1

2

3

VIDEO OUTPUT

6

7

OUTPUT 1


4

5

8


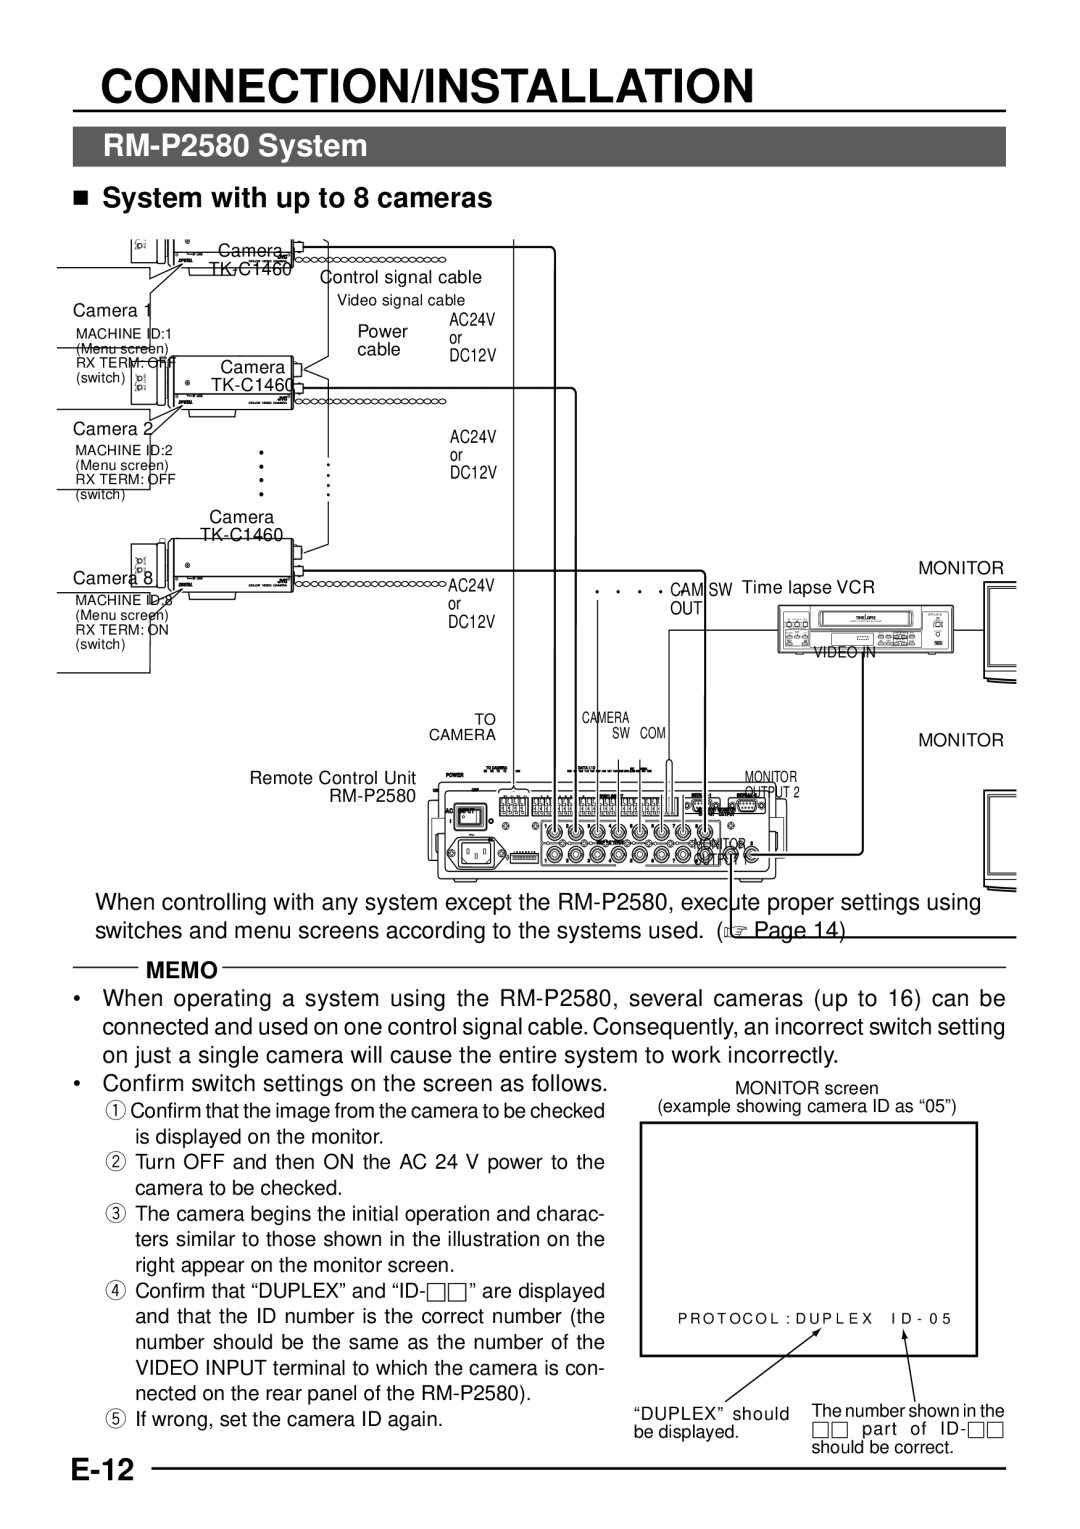
When controlling with any system except the RM-P2580, execute proper settings using switches and menu screens according to the systems used. ( Page 14)

MEMO

When operating a system using the RM-P2580, several cameras (up to 16) can be connected and used on one control signal cable. Consequently, an incorrect switch setting on just a single camera will cause the entire system to work incorrectly.

Confirm switch settings on the screen as follows.

qConfirm that the image from the camera to be checked

is displayed on the monitor.

wTurn OFF and then ON the AC 24 V power to the camera to be checked.

eThe camera begins the initial operation and charac- ters similar to those shown in the illustration on the right appear on the monitor screen.

rConfirm that “DUPLEX” and “ID-□□ are displayed and that the ID number is the correct number (the number should be the same as the number of the

VIDEO INPUT terminal to which the camera is con- nected on the rear panel of the RM-P2580).

tIf wrong, set the camera ID again.

P R O T O C O L : D U P L E X I D - 0 5

“DUPLEX” should

The number shown in the

be displayed.

□□ part of ID-□□


should be correct.

E-12

Page 12
Image 12
JVC TK-C1460 manual Connection/Installation, RM-P2580 System,  System with up to 8 cameras

TK-C1460 specifications

The JVC TK-C1460 is a robust and reliable surveillance camera designed for various security and monitoring applications. Renowned for its high-quality imaging capabilities, this camera is favored by professionals in different fields, including retail, transportation, and public safety.

One of the standout features of the TK-C1460 is its 1/3-inch CCD (Charge-Coupled Device) sensor, which ensures outstanding picture quality. This sensor enables the camera to capture clear and vivid images, even in low-light conditions. With a horizontal resolution of 570 TV lines, it delivers sharp and detailed visuals, making it ideal for identifying individuals and objects in monitored areas.

The TK-C1460 incorporates advanced automatic gain control (AGC) technology, which enhances its performance in varying lighting conditions. This feature automatically adjusts the camera's sensitivity, allowing it to function optimally during both day and night. Additionally, the camera offers a wide dynamic range (WDR) which effectively balances bright and dark areas in the frame, ensuring that crucial details are not lost in challenging lighting environments.

Another significant characteristic of the TK-C1460 is its versatile lens options. The camera is compatible with a variety of C/CS mount lenses, providing users the flexibility to choose the appropriate focal length based on specific surveillance needs. This versatility is particularly beneficial in environments where distances and angles may vary.

The TK-C1460 also supports multiple video output formats, including composite video and S-video, making it compatible with a range of recording devices and display systems. Its low power consumption design enhances its efficiency, making it a cost-effective choice for long-term surveillance installations.

With a durable housing and weather-resistant features, the TK-C1460 can be used in various indoor and outdoor environments. Its robust build ensures longevity and resilience against the elements, which is a crucial factor for surveillance cameras placed in exposed locations.

Overall, the JVC TK-C1460 stands out for its exceptional image quality, advanced features, and user-friendly design. Coupled with its compatibility with multiple lenses and video formats, it remains a favored choice for those seeking reliable and high-performing surveillance solutions. Whether for commercial, industrial, or residential use, the TK-C1460 proves to be a versatile asset in the realm of security technology.