Setting Up the Camera Using an
CAMERA FUNCTION Screen
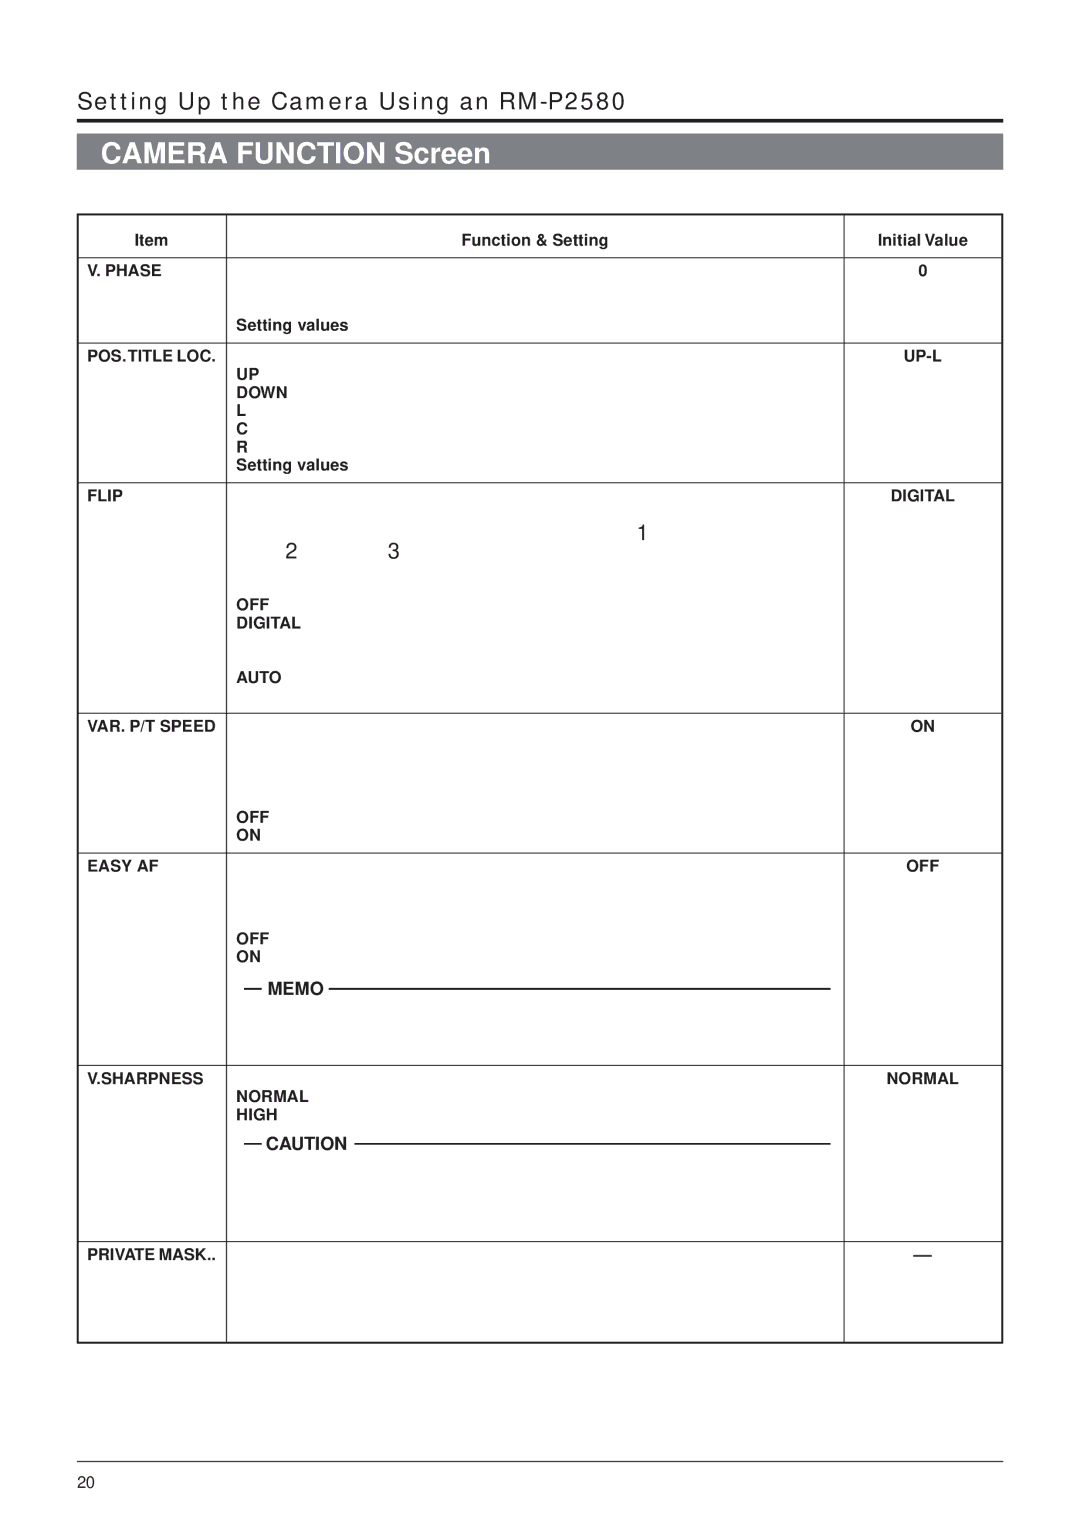
This screen sets up the functions of the camera itself.
Item |
|
|
|
|
| Function & Setting | Initial Value | |
|
|
|
|
|
|
|
| |
V. PHASE | This adjusts the vertical synchronization to those of other cameras when a selector | 0 | ||||||
| switch for the synchronizing system on the Ceilling Mount is at LL. (50 Hz power |
| ||||||
| region only.) |
| ||||||
| Setting values : |
| ||||||
|
|
|
|
|
|
|
| |
POS.TITLE LOC. | Sets the location of the position title and area title in the monitor. | |||||||
| UP | : At the top of the screen. |
| |||||
| DOWN | : At the bottom of the screen. |
| |||||
| L | : In the left half of the screen. |
| |||||
| C | : In the centre of the screen. |
| |||||
| R | : In the right half of the screen |
| |||||
| Setting values : |
| ||||||
|
|
|
|
|
|
|
| |
FLIP | When a tilting operation is started while this item is OFF, the camera will stop at the | DIGITAL | ||||||
| position where it is pointing straight downwards. When an object moves directly |
| ||||||
| below the camera, the camera makes three movements 1points the straight down- |
| ||||||
| wards 2 pans 180° 3 points upwards. |
| ||||||
| The FLIP function makes it possible to reduce these operations. Use this function |
| ||||||
| when monitoring an object passing directly below the camera. |
| ||||||
| OFF | : Turns the FLIP function off. |
| |||||
| DIGITAL : Once the camera reaches a tilt of 135˚ from horizontal after passing a |
| ||||||
|
|
|
| position facing directly downwards, a picture is inverted both vertically |
| |||
| AUTO | and horizontally. |
| |||||
| : When the camera reaches a position facing directly downwards, it pans |
| ||||||
|
|
|
| by 180° then stops. |
| |||
|
|
|
|
|
|
|
| |
VAR. P/T SPEED | Under this function, the panning and tilting speeds are adjusted automatically rela- | ON | ||||||
| tive to the zoom ratio of the lens. Setting the zoom lens towards TELE decreases |
| ||||||
| the pan and tilting speeds. |
| ||||||
| Setting the zoom lens towards WIDE end increases the pan and tilting speeds. |
| ||||||
| Use this function when monitoring objects at differing zoom ratios. |
| ||||||
| OFF : Turns this function off. |
| ||||||
| ON : Turns this function on. |
| ||||||
|
|
|
|
|
|
|
| |
EASY AF | When this item is set to ON, the auto focusing (AF) is activated automatically dur- | OFF | ||||||
| ing manual pan/tilt and zoom operations. |
| ||||||
| This function is convenient when frequent manual operations are expected as it |
| ||||||
| eliminates the need to focus manually after every manual operation. |
| ||||||
| OFF : Turns this function off. |
| ||||||
| ON : Turns this function on. |
| ||||||
|
|
|
|
|
|
|
| |
|
|
| MEMO |
|
|
|
| |
|
|
|
|
|
| |||
|
| Auto focusing may sometimes be incapable of bringing certain objects into accurate focus. |
| |||||
|
| (☞ P. 5) |
| |||||
|
| In this case, use the manual focusing facility. |
| |||||
|
|
|
|
|
|
|
| |
V.SHARPNESS | This function sets sharpness in the vertical direction of the image. | NORMAL | ||||||
| NORMAL : Normal sharpness. |
| ||||||
| HIGH | : High sharpness. |
| |||||
|
|
|
|
|
|
| ||
|
|
| CAUTION |
|
|
| ||
|
|
|
|
| ||||
|
| The following phenomena may be observed when HIGH is selected. This is not a malfunc- |
| |||||
|
| tion. |
|
|
|
|
| |
|
| • Horizontal stripes are observed on bright objects. |
| |||||
|
| • Vague horizontal stripes are observed under low light conditions. |
| |||||
|
|
|
|
|
|
|
| |
PRIVATE MASK.. | This function grays out sections that are not to be displayed in the monitored pic- | – | ||||||
| ture area. |
| ||||||
| The grayed out section moves accordingly when the camera is panned, tilted or |
| ||||||
| when the zoom is adjusted. |
| ||||||
| ☞ P.26, “PRIVATE MASK Setup” |
| ||||||
20