Please pay special attention to these hazard alert boxes, and follow any instruc- tions given. WARNING statements alert you to such dangers as fire, electric shock, burns and personal injury. CAUTION statements alert you to such dan- gers as personal injury and/or property damage.
CAMBIO DE LA BOMBILLA
ASSEMBLY INSTRUCTIONS
 ADVERTENCIA
Peligro de choque eléctrico o lesión cor- poral
3.Quite la bombilla vieja del portalámparas
jalando derecho hacia
![]() WARNING
WARNING
Electrical Shock Hazard
DO NOT plug into electrical supply until assembly is complete. Failure to do so could result in electrical shock or injury.
Before assembling vacuum cleaner, check the PACKING LIST (page 2). Use this list to verify that you have received and identified all the components of your new Kenmore vacuum cleaner.
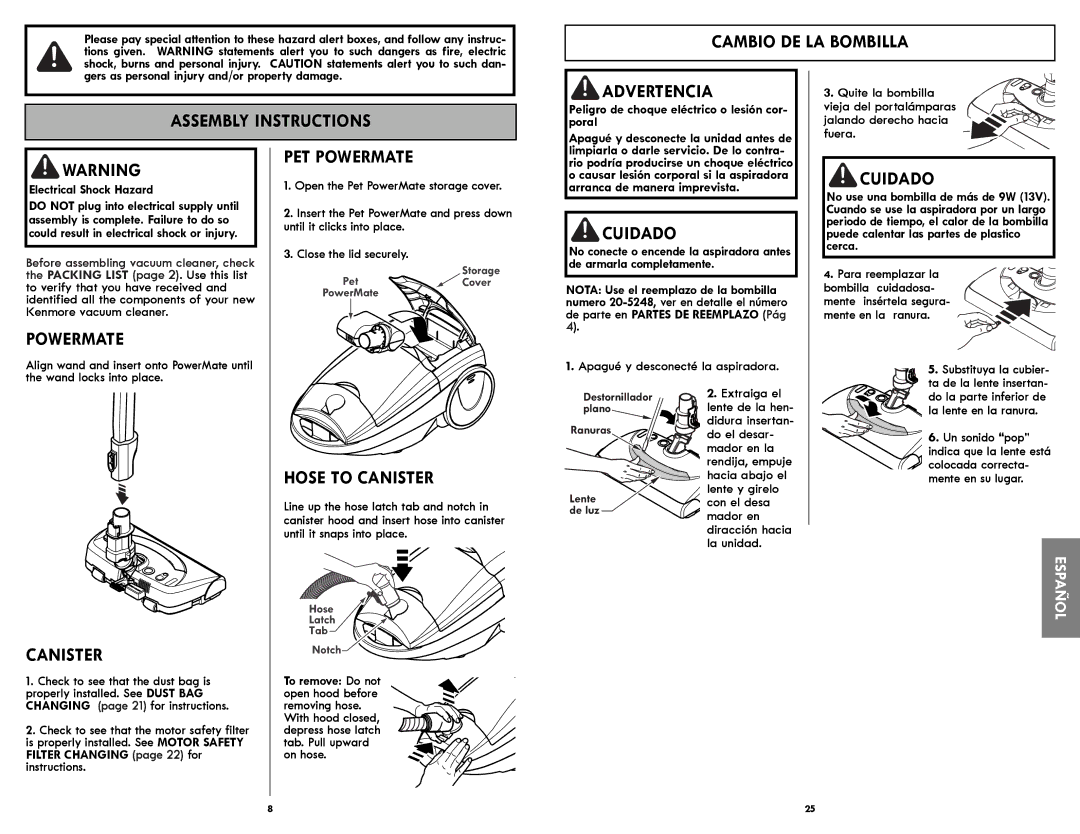
POWERMATE
Align wand and insert onto PowerMate until
PET POWERMATE
1.Open the Pet PowerMate storage cover.
2.Insert the Pet PowerMate and press down until it clicks into place.
3.Close the lid securely.
Storage
Pet  Cover
Cover
PowerMate
Apagué y desconecte la unidad antes de limpiarla o darle servicio. De lo contra- rio podría producirse un choque eléctrico o causar lesión corporal si la aspiradora arranca de manera imprevista.
 CUIDADO
No conecte o encende la aspiradora antes de armarla completamente.
NOTA: Use el reemplazo de la bombilla numero
1.Apagué y desconecté la aspiradora.
fuera.
 CUIDADO
No use una bombilla de más de 9W (13V). Cuando se use la aspiradora por un largo periodo de tiempo, el calor de la bombilla puede calentar las partes de plastico cerca.
4. Para reemplazar la bombilla cuidadosa- mente insértela segura- mente en la ranura.
5. Substituya la cubier-
the wand locks into place.
CANISTER
1.Check to see that the dust bag is properly installed. See DUST BAG CHANGING (page 21) for instructions.
2.Check to see that the motor safety filter is properly installed. See MOTOR SAFETY FILTER CHANGING (page 22) for instructions.
HOSE TO CANISTER
Line up the hose latch tab and notch in canister hood and insert hose into canister until it snaps into place.
 Hose
Hose
Latch
Tab
Notch
To remove: Do not open hood before removing hose.
With hood closed, depress hose latch tab. Pull upward on hose.
Destornillador plano
Ranuras
Lente de luz
2.Extraiga el
lente de la hen- didura insertan- do el desar- mador en la rendija, empuje hacia abajo el lente y girelo ![]() con el desa mador en diracción hacia la unidad.
con el desa mador en diracción hacia la unidad.
ta de la lente insertan- do la parte inferior de la lente en la ranura.
6.Un sonido “pop” indica que la lente está
colocada correcta- mente en su lugar.
ESPAÑOL
8 | 25 |