Manuals
/
Kodak
/
Computer Equipment
/
Projector
Kodak
DP2000
manual
Using the On-Screen Menus
Models:
DP2000
1
31
76
76
Download
76 pages
18.53 Kb
28
29
30
31
32
33
34
35
Troubleshooting
Specs
Safety Symbols
Connecting the Projector
Warranty
Problem Image is out of focus
Reset All
Key command
Battery Use
Basic Image Adjustment
Page 31
Image 31
Page 30
Page 32
Page 31
Image 31
Page 30
Page 32
Contents
User’s Guide KODAK DP2000 Digital Projector
with KODAK Image Manager Software
Page
EN 55022 Warning
Safety Certifications
FCC Warning
Canada
Page
Using the Projector
Table of Contents
Safety Instructions
Setting up the Projector
Appendix D
Appendix A
Appendix B
Appendix C
Safety Definitions
Safety Instructions
Safety Symbols
Important Operating Considerations
Safety Terms
Battery Use
Page
Introduction
Image Resolution
Compatibility
User’s Guide , Quick Start Guide
Unpacking the Projector
and Online User Guide CD
Usage Guidelines
Projector Features
If You Need Assistance
Online Services
Faxed Information
Customer Support
Warranty
Positioning the Projector
Setting up the Projector
Connecting to a Computer
Connecting the Projector
Do you want to play your computer’s audio on the projector?
To connect to a computer
If your computer has a PS/2 connector, use the PS/2 mouse cable
To connect to a video player
Connecting to a Video Player
4. Plug the other end of the audio adapter into the audio cable
Starting the Projector
Turning Off the Projector
Basic Image Adjustment
Using the Projector
Adjusting the Projector
simulates the left mouse button
The Remote Control
Using the Projector
disk mouse simulates the right mouse button
Press anywhere on the edge of the disk mouse to move the cursor on the screen. You can move the cursor at any angle by pressing the corresponding edge of the disk. The mouse button on the top of the remote simulates your computer’s right mouse button the button on the bottom simulates your computer’s left mouse button. See “Using the Keypad and Remote Control” starting on page 23 for a description of the four function buttons
The Remote Control Buttons
Using the Keypad and Remote Control
The Keypad Buttons
or Computer and Video
Volume keypad only
Lamp on/off keypad only
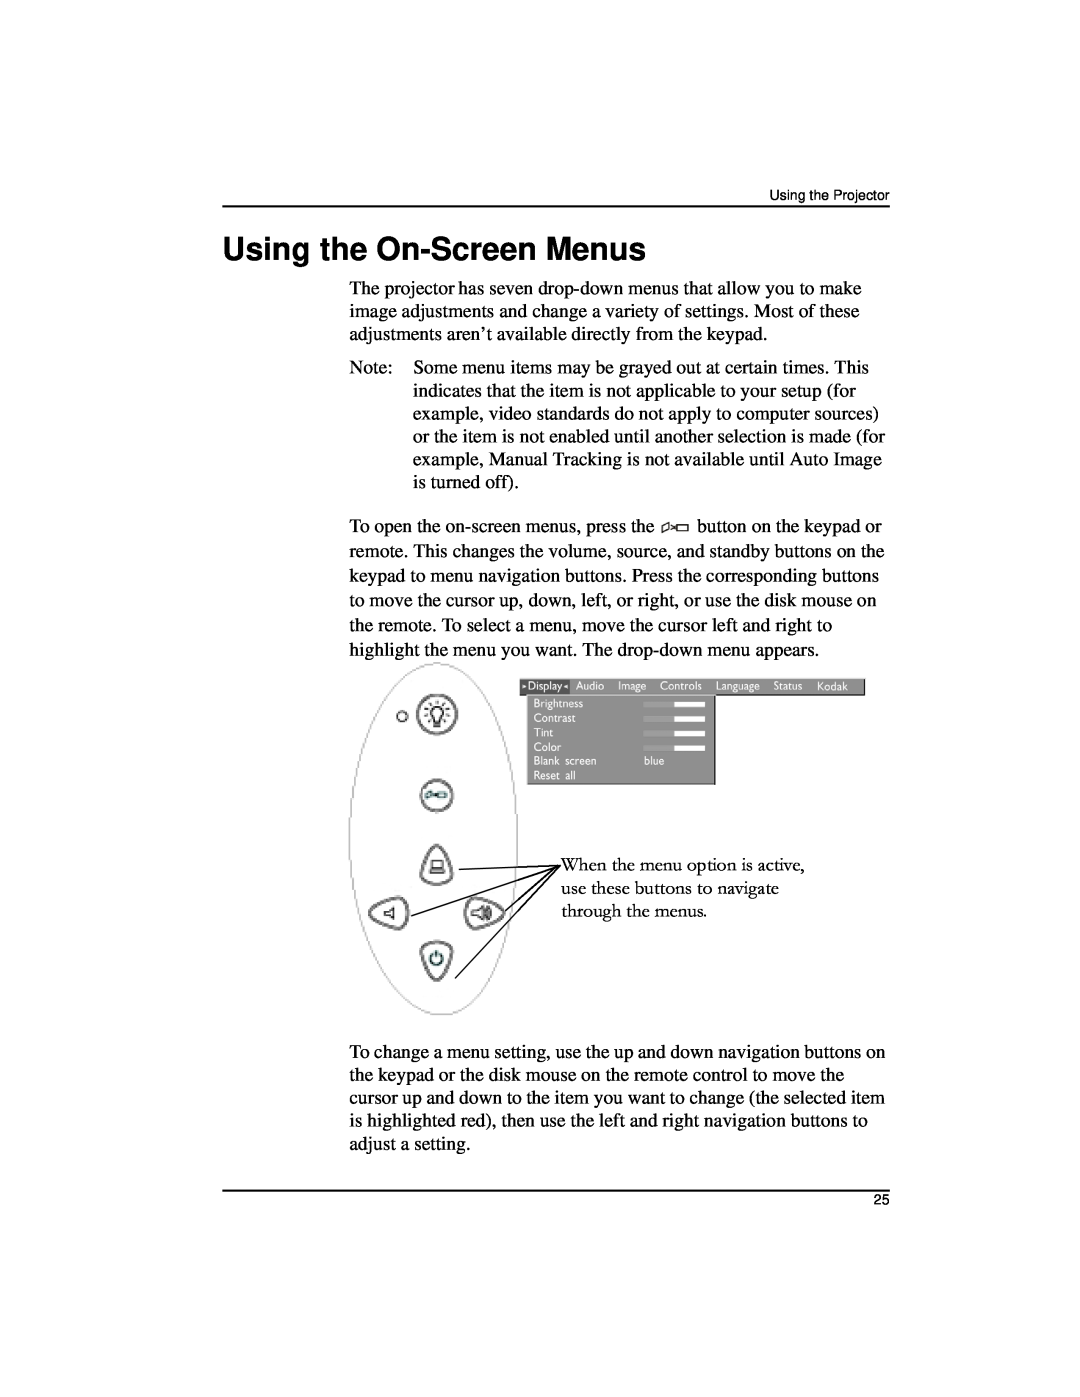
Menu
KHQWKHPHQXRSWLRQLVDFWLYH XVHWKHVHEXWWRQVWRQDYLJDWH WKURXJKWKHPHQXV
Using the On-Screen Menus
Brightness
Display Menu
Contrast
Tint
Audio Menu
Reset All
Volume
Auto Image
Image Menu
Auto Resize
Manual Tracking
Manual Sync
Horizontal position
Vertical position
Controls Menu
Video Standard
Auto Source Select
Default Source
Standby Time
Rear Projection
Display Messages
Plug and Play
Display Startup Screen
Status Menu
Language Menu
Vertical refresh rate
Computer resolution
Lamp hours used
Horizontal refresh rate
Image Manager Settings
Kodak Menu
The new contrast setting is immediately applied to the image
Using the Image Manager
1. Click the Kodak menu
Cleaning the Lens
Maintenance Troubleshooting
SURMHFWRUWRRYHUKHDW
Replacing the Projection Lamp
6. Grasp the pull tab and lift out the lamp module
Be careful when removing the lamp module so that it does not break
Maintenance & Troubleshooting
5. Loosen the two non-removable screws on the outside of the module
7RUHVHWWKHODPSKRXUFRXQWHULQWKH6WDWXVZLQGRZSUHVVDQG
9. Tighten the screws on the outside of the module
3OXJLQWKHSRZHUFRUGWRWXUQWKHSURMHFWRUEDFNRQ
5HSODFHWKHODPSGRRUE\LQVHUWLQJWKHKRRNVRQWKHUHDURIWKH
Using the Kensington Lock
Replacing the Batteries in the Remote Control
Problem The screen resolution is not right
Troubleshooting
Problem Nothing on projection screen
Problem Color or text not being projected
Problem Image is too wide or narrow for screen
Problem Only the start-up screen displays
Problem Image is out of focus
Problem Image is “noisy” or streaked
Problem Image and menus are reversed left to right
Problem the projector displays vertical lines, “bleeding” or spots
Problem no sound
Problem Lamp shuts off
Problem Lamp seems to be getting dimmer
Page
Appendix A
Specifications
Dimensions
Weight
Audio Input
Input Power Requirements
Optics
Lamp
Computer
Portable and Laptop Activation Chart
Key command
Appendix B
de-activate
Key command
Key command
Computer
de-activate
Key command
Key command
Computer
de-activate
Key command
Key command
Computer
de-activate
Key command
Key command
Computer
de-activate
Key command
Key command
Computer
de-activate
Key command
Key command
Computer
de-activate
Key command
Key command
Computer
de-activate
Key command
Key command
Computer
Page
Appendix C
Using Video Mirroring with a PowerBook Computer
Using SimulScan
Projected Image Size
Appendix D
Image Size, Width and Height for DP2000-minimum image size
Image Size, Width and Height for DP2000-maximum image size
Index
L lamp
H help
Page
Page
APPLICATION SUPPORT
WARRANTY TIME PERIOD
WARRANTY REPAIR COVERAGE
LIMITATIONS
HOW TO OBTAIN SERVICE
Page
9/99
Eastman Kodak Company 343 State Street Rochester, New York
Kodak is a trademark of Eastman Kodak Company
PN 3H7969
Top
Page
Image
Contents