Page
CE mark for European Harmonized Standards
FCC Regulation Warning for U.S.A
Contents
Directly sampling the sound of the ES-1 Resampling
Pattern mode
Appendices
Song mode
Global mode
Data you create on the ES-1
Main features
Introduction
Preparing to play
Adapter cable holder Power switch AC Local Voltage
Make connections and play
Example connections
Common section
Connector section
Front and rear panel
Front and rear panel
Effect section
Part Edit section
Sequence Control section
Part Select section
Select key
Step Key section
Power switch
Connector section
Listening to a Song
Conceptual diagram of the ES-1
What is a Song?
Basic operation Quick Start
Listening to a Sample
What is a Pattern?
What is a Sample?
Listening to a Pattern
Changing the tempo of a song or pattern
Using the dial to change the tempo
Using the Tap Tempo key to change the tempo
Trying out the functions
Striking the part keys along with a song or pattern
Editing the effect and delay settings
What is the Part Edit section?
Modifying editing the sound
Basic operation Quick Start
Modifying editing a rhythm pattern
Using the step keys to edit the rhythm Step Recording
What is a Rhythm Pattern?
What is Length?
Erase
Using the part keys to edit the rhythm Realtime Recording
Saving a pattern you create Write
What is a Motion Sequence?
Using a Motion Sequence
Sound heard from Audio In line output
Connecting various sources to the audio inputs
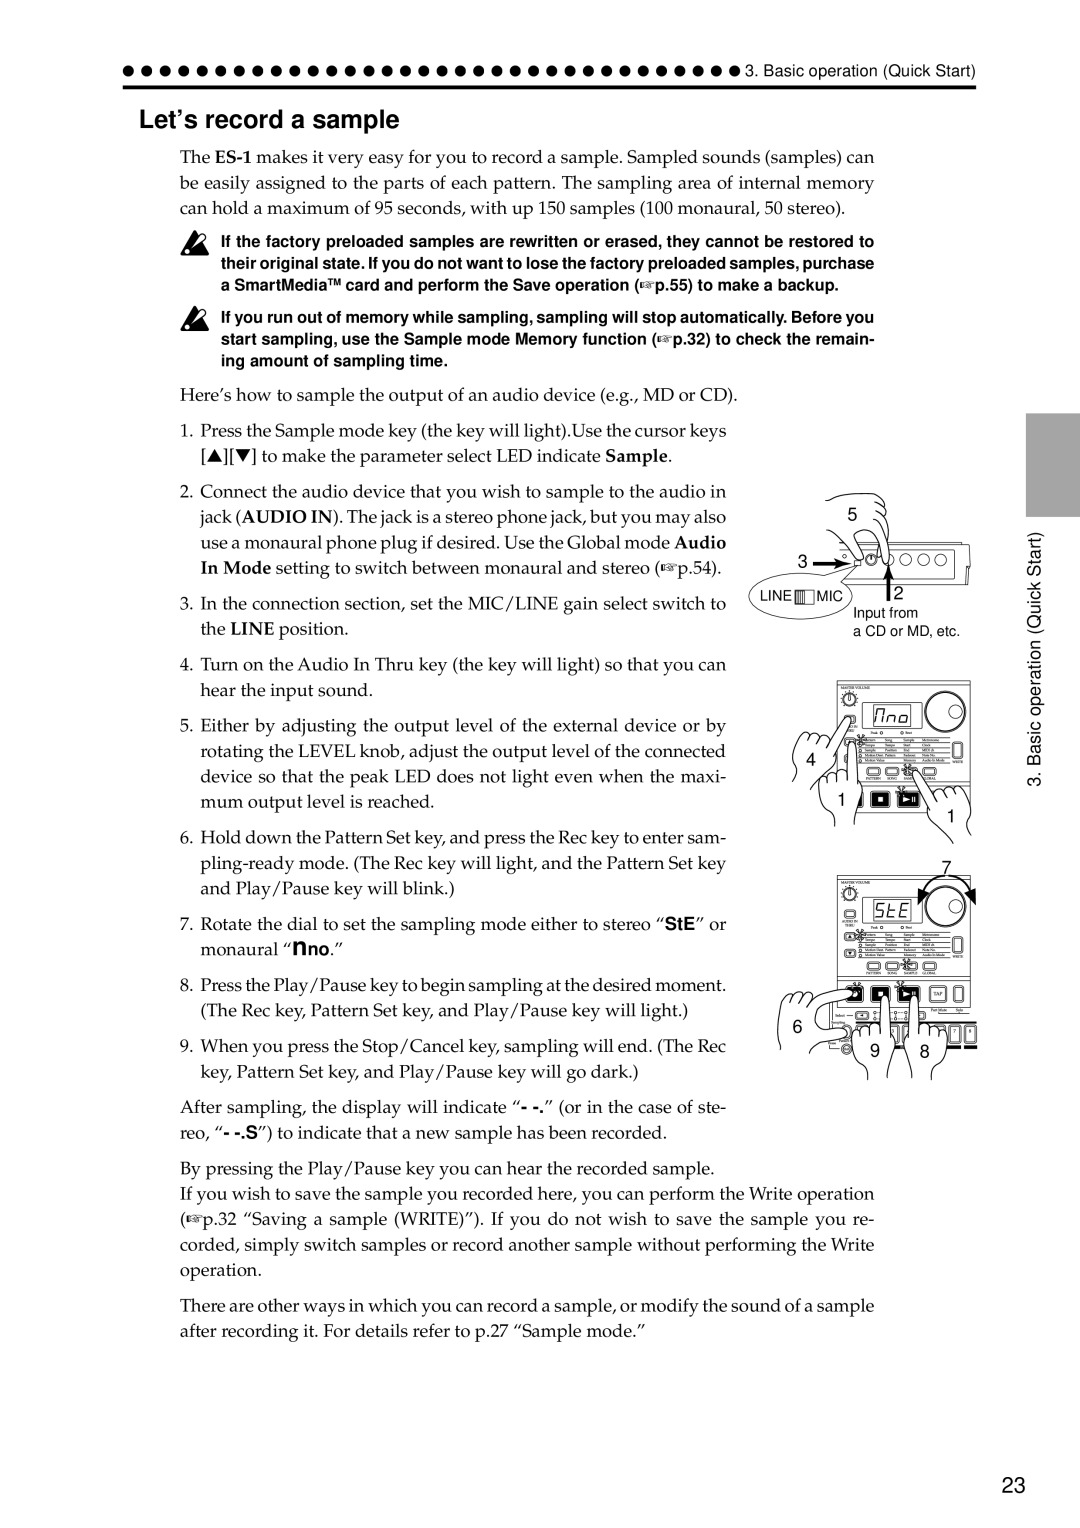
Input from CD or MD, etc Peak LED
Sound input from Audio
Input from CD or MD, etc
Let’s record a sample
Sample sound
Assigning a sample sound to a sample part
About the Slice function
About the Resample function
Midi keyboard etc
Using the ES-1 as a tone generator module
What is Pattern Set?
Playing with Pattern Set
Synchronizing with an EA-1 or ER-1
Recording a sample
Sample mode
Selecting a sample
Playing a sample
Directly sampling the sound ES-1 Resampling
Specifying the start location
Specifying the end location
Specifying the fade-out Length
Resampling just one note of a part
Resampling from the middle of a Pattern or song
Scale/Beat
Slice
Creating a slice sample Time Slice
Normalize
End Start Before Truncate After Truncate Sample mode
Other functions for editing Sample
Tips for achieving good results With Time Slice
Checking the remaining Amount of sampling area Memory
Once a sample has been deleted, it cannot be recovered
Deleting a sample Delete Sample
Saving a sample Write
Pattern Play
Pattern mode
Setting the playback tempo
Playing a pattern
Part Solo function
Display when no parts are soloed Solo one part
Selecting parts
Part Mute function
Assigning a sample
Creating a pattern
Editing effect and delay
Decimator
Ring Mod. ring modulation
Pitch Shifter
Compressor
BPM Sync
Length, Scale/Beat settings
Time delay time Msec .. sec For BPM Sync 1/4...8
Motion Seq motion sequence
Pattern mode
Swing settings
Setting the Length
Setting the Scale/Beat 16, 32, tri, tr2
Creating a Rhythm Pattern
Setting the Roll Type
Using the step keys Step Recording
Using the part keys Realtime Recording
Playing an effect motion sequence
Motion sequence
Playing a motion sequence
Recording a motion sequence
Checking motion data
Playing a delay motion sequence
Recording a delay motion Sequence
There will be no effect if the delay Motion Seq is off dark
Erasing data during playback or recording Erase
Convenient functions for Editing patterns
Erasing rhythm pattern data from Copying a part Copy Part
Part
Copy Pattern data
Data Copy within a pattern
Editing the parameter values of a Motion sequence
Editing motion sequence Data
Selecting a motion sequence
Pattern set
Using Pattern Set to perform Pattern Set Play
Pattern Set
Registering a pattern for Pattern Set
Saving a pattern Write
Playing a song Song Play
Song mode
Selecting a song
Erasing song data Clear Song
Song mode
Creating a song
Creating a song from scratch
Changing the pattern for a specific position
Editing a song
Inserting a pattern at a specified posi Tion Insert Pattern
Deleting a pattern from a specified Position Delete Pattern
Checking for song event data
Deleting event data from a song
Saving a song Write
Metronome OFF, r-0, r-1, r-2, on
Global mode
Metronome settings
Global mode
Midi ch
Setting the Midi note num Ber for each part Note No
Audio In Mode Monaural, St. stereo
Saving data to SmartMedia Save
Using SmartMediaTM
Formatting Smart Media Format
Loading all data from SmartMedia To the ES-1 All Load
Loading only a single sample From SmartMedia Sample Load
Saving your changes Global mode Write
With the factory settings, this is turned on
Memory Protect Protect
About Midi
Appendices
Editing sounds etc
Troubleshooting
Transmitting sound settings Other data Data Dump
Specifications
Error messages
Index
Pattern Set Play
Troubleshooting
Pattern
Play Rhythm Set 11, 25 Write
Bank
Pattern Name List
Sample Name List
Song Name List
Transmitted Recognized Remarks Function
Midi Implementation Chart
Sampler
2000.5.15
Korg INC