INSTALLATION

INSTALLING YOUR FREESTANDING PELLET STOVE

Standard Horizontal Vent Installation

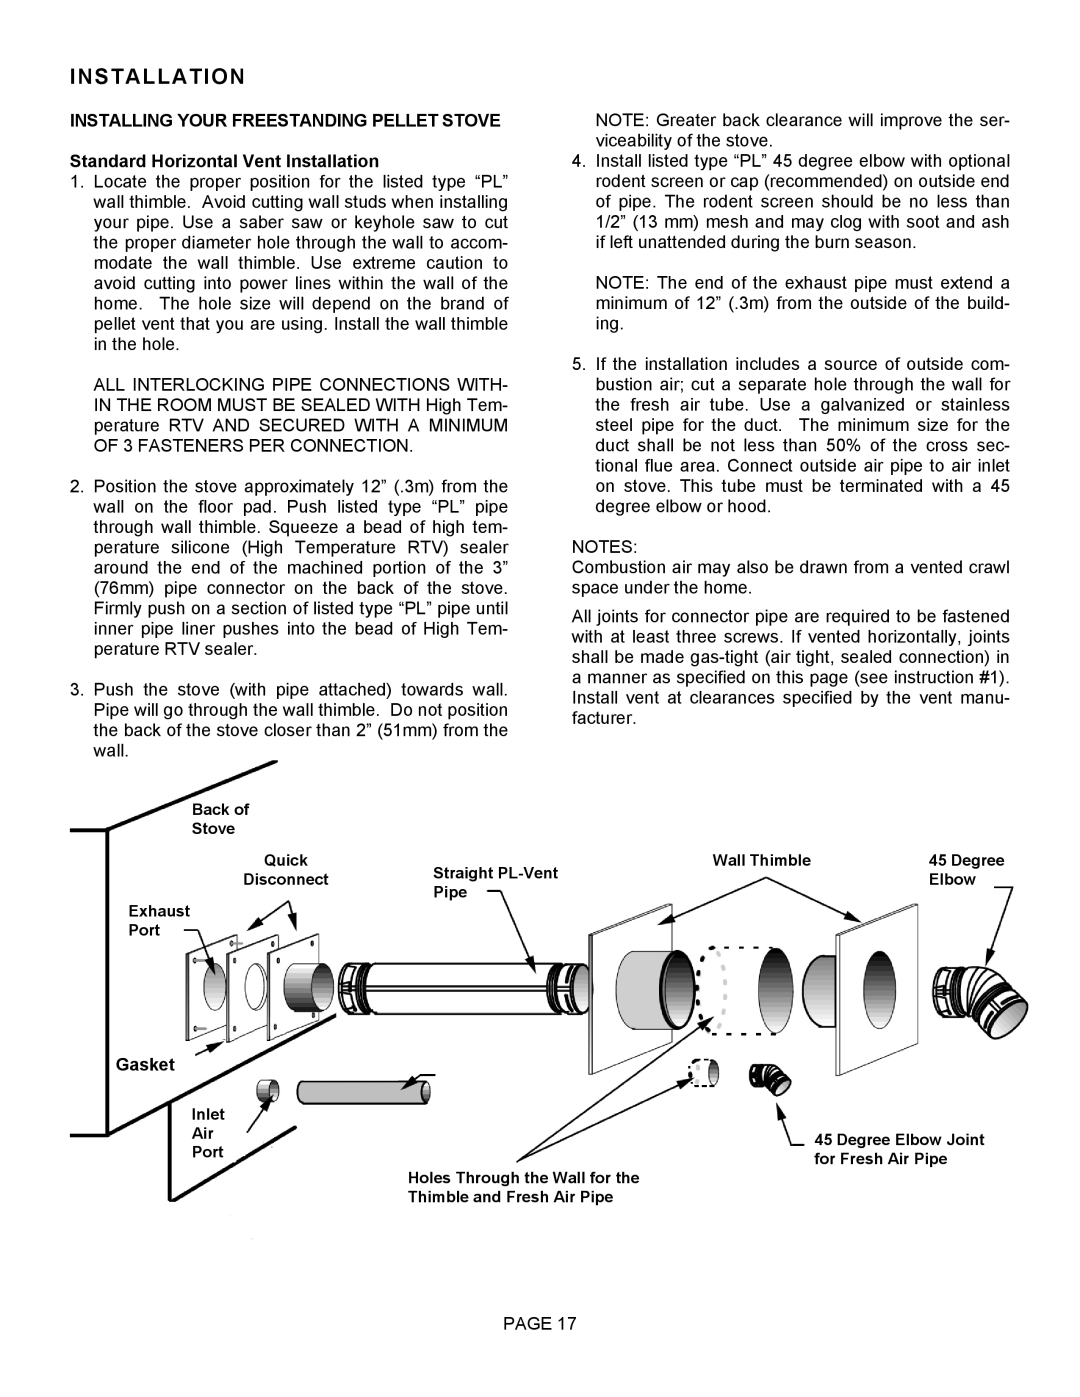
1.Locate the proper position for the listed type “PL” wall thimble. Avoid cutting wall studs when installing your pipe. Use a saber saw or keyhole saw to cut the proper diameter hole through the wall to accom- modate the wall thimble. Use extreme caution to avoid cutting into power lines within the wall of the home. The hole size will depend on the brand of pellet vent that you are using. Install the wall thimble in the hole.

ALL INTERLOCKING PIPE CONNECTIONS WITH- IN THE ROOM MUST BE SEALED WITH High Tem- perature RTV AND SECURED WITH A MINIMUM OF 3 FASTENERS PER CONNECTION.

2.Position the stove approximately 12” (.3m) from the wall on the floor pad. Push listed type “PL” pipe through wall thimble. Squeeze a bead of high tem- perature silicone (High Temperature RTV) sealer around the end of the machined portion of the 3” (76mm) pipe connector on the back of the stove. Firmly push on a section of listed type “PL” pipe until inner pipe liner pushes into the bead of High Tem- perature RTV sealer.

3.Push the stove (with pipe attached) towards wall. Pipe will go through the wall thimble. Do not position the back of the stove closer than 2” (51mm) from the wall.

NOTE: Greater back clearance will improve the ser- viceability of the stove.

4.Install listed type “PL” 45 degree elbow with optional rodent screen or cap (recommended) on outside end of pipe. The rodent screen should be no less than 1/2” (13 mm) mesh and may clog with soot and ash if left unattended during the burn season.

NOTE: The end of the exhaust pipe must extend a minimum of 12” (.3m) from the outside of the build- ing.

5.If the installation includes a source of outside com- bustion air; cut a separate hole through the wall for the fresh air tube. Use a galvanized or stainless steel pipe for the duct. The minimum size for the duct shall be not less than 50% of the cross sec- tional flue area. Connect outside air pipe to air inlet on stove. This tube must be terminated with a 45 degree elbow or hood.

NOTES:

Combustion air may also be drawn from a vented crawl space under the home.

All joints for connector pipe are required to be fastened with at least three screws. If vented horizontally, joints shall be made gas-tight (air tight, sealed connection) in a manner as specified on this page (see instruction #1). Install vent at clearances specified by the vent manu- facturer.

Back of

Stove

Quick

Straight PL-Vent

Wall Thimble

45 Degree

Disconnect


Elbow

Pipe


Exhaust

Port

Gasket

Inlet


Air

45 Degree Elbow Joint

Port

for Fresh Air Pipe


Holes Through the Wall for the


Thimble and Fresh Air Pipe

PAGE 17

Page 17
Image 17
Lenoxx Electronics Optima 3 FS Installing Your Freestanding Pellet Stove, Standard Horizontal Vent Installation, Gasket

Optima 3 FS specifications

Lenoxx Electronics has established itself as a reputable brand in the audio equipment industry, and their Optima 3 FS model is a perfect illustration of their commitment to quality and innovation. Designed for both casual listeners and audiophiles alike, the Optima 3 FS combines advanced technology with user-friendly features, making it a compelling choice for anyone looking to enhance their audio experience.

One of the standout features of the Optima 3 FS is its outstanding sound reproduction capabilities. The speakers are engineered with high-quality drivers that deliver clear and balanced audio across a wide frequency range. Whether you’re listening to music, watching movies, or playing video games, the Optima 3 FS promises an immersive auditory experience that captures the essence of sound.

The model also boasts Bluetooth connectivity, allowing users to pair their smartphones and other devices effortlessly. This wireless feature provides convenience, enabling you to play music from your playlists or streaming services without the hassle of tangled cords. Additionally, the Optima 3 FS is equipped with USB and AUX inputs, ensuring compatibility with various audio devices.

Another significant characteristic of the Optima 3 FS is its compact and stylish design. The sleek finish and modern aesthetics make it an attractive addition to any home décor. Its compact size doesn’t compromise sound quality, making it perfect for smaller spaces where traditional large speakers might not fit.

The user interface is designed to be intuitive, featuring easy-to-use buttons and a clear display that allows for seamless navigation through functions and settings. Furthermore, the Optima 3 FS incorporates a remote control, providing added convenience to adjust volume, skip tracks, or change modes from a distance.

In terms of energy efficiency, the Optima 3 FS is designed to consume less power without sacrificing performance, making it an environmentally friendly choice. This model is also built with durability in mind, featuring robust components that ensure long-lasting use.

In summary, the Lenoxx Electronics Optima 3 FS stands out with its exceptional sound quality, versatile connectivity options, stylish design, and user-friendly features. It caters to a broad audience, from casual listeners to sound enthusiasts, making it a noteworthy addition to the realm of home audio solutions.