Eagle 10,000
ISAFETYi
Eagle 10,000
Safety
Electric Shock can kill ARC Rays can burn
Fumes and Gases
Can be dangerous
Powered equipment
Welding Cutting
Cylinder may explode
Sparks can cause fire or If damaged Explosion
Précautions DE Sûreté
Sûreté Pour Soudage a L’Arc
Master Table of Contents for ALL Sections
Table of Contents Installation Section
Technical Specifications Eagle 10,000 K2343-1,K2343-2
Installation
Height Width Depth Weight
Safety Precautions
Machine Grounding
Spark Arrester
Towing
Vehicle Mounting
Fuel Gasoline Fuel only
Follow vehicle manufacturer’s instructions
Do not overfill tank, fuel expansion may cause overflow
Additional Safety Precautions High Altitude Operation
Angle of Operation
Lifting
Location / Ventilation
Connection of Lincoln Electric Wire Feeders
Additional Safety Precautions
Instructions
Welder Operation
Auxiliary Power
120/240 Volt Dual Voltage Receptacle
Duplex Receptacles
Motor Starting
Electrical Device USE with the Eagle 10,000
These Devices Without
Additional Resistive
Type Loads
Auxiliary Power While Welding
Simultaneous Welding and Power
Standby Power Connections
Connection diagram shown Eagle 10,000
Connection of Eagle 10,000 to Premises Wiring
Figure A.1
Table of Contents Operation Section
Engine Switch
Operation
General Description
Welder Controls Function and Operation
Range Switch
OPERATIONB-3
Eagle 10,000 Approximate Fuel Consumption
Control Dial
STARTING/SHUTDOWN Instructions
BREAK-IN Period
Starting the Engine
Stopping the Engine
Wire Feed Welding Processes
Welding Process
TIG Constant Current Welding
ARC Gouging
Typical Current Ranges 1 for Tungsten ELECTRODES2
Summary of Welding Processes
Table of Contents Accessories Section
Optional Equipment Field Installed
Accessories
K1745-1 GAS Cylinder Holder
Wire Feed
Recommended Equipment
Plasma Cutting Stick
TIG Welding
Eagle 10,000
Table of Contents Maintenance Section
Maintenance
Safety Precautions
Engine OIL Change
Engine OIL Refill Capacities
AIR Cleaner and Other Maintenance
OIL Filter Change
Engine Adjustments
Figure D.1 Major Component Locations
Eagle 10,000
1TABLE of CONTENTS-THEORY of Operation Section E-1
BATTERY, STARTER, ENGINE, ROTOR, STATOR, and Idler Solenoid
Theory of Operation
Rotor Field Feedback Auxiliary Power
Figure E.3 Rotor Field Feedback and Auxiliary Power
Weld WINDING, REACTOR, and Range Switch
Output BRIDGE, CHOKE, and Output Terminals
1TABLE of Contents Troubleshooting and Repair F-1
2TROUBLESHOOTING and REPAIRF-2
HOW to USE Troubleshooting Guide
Troubleshooting and Repair
PC Board Troubleshooting Procedures
Perform the Rotor Voltage Test
Problems Possible Areas Symptoms Misadjustments
Recommended Course of Action
Problems Symptoms
Possible Areas Misadjustments
Rotor Voltage2. PTestrform
Engine Problems
Wiring
Charging Circuit Test
BridgePerformTestthe. Output Rectifier
Eagle 10,000
Test Description
Rotor Voltage Test
Materials Needed
Remove the case top, then reinstall the fuel cap
Test Procedure
Rotor Voltage Test
Rotor Resistance Test
Rotor Resistance Test
Remove the case top, then replace the fuel cap
Troubleshooting and Repair
Eagle 10,000
Auxiliary and Field Winding Test
To test the 115 VAC winding
Auxiliary and Field Winding Test
To test the 230 VAC winding
To test the field winding
Eagle 10,000
Output Rectifier Bridge Test
Output Rectifier Bridge Test
Figure F.4 Location of Output Rectifier Leads
Charging Circuit Test
Charging Circuit Test
Figure F.5 Location of Voltage Regulator
Engine Throttle Adjustment Test
Engine Throttle Adjustment Test
Strobe-tach Method
Figure F.7
Frequency Counter Method
Engine Throttle Adjustment Test
Oscilloscope Method Vibratach Method
Normal Open Circuit Voltage Waveform 115VAC Supply
Scope Settings
High Idle no Load Output Control AT Maximum
Machine Loaded
Typical DC Weld Output Waveform CC Mode
Machine Loaded to 200 Amps AT 26 VDC
Abnormal Open Circuit DC Weld Voltage Waveform
Normal Open Circuit DC Weld Voltage Waveform CC Mode
Brush Removal and Replacement
Brush Removal and Replacement
Procedure
Slip Rings
Figure F.9 Brush LEADS/BRUSHES Retained with Cable TIE
Eagle 10,000
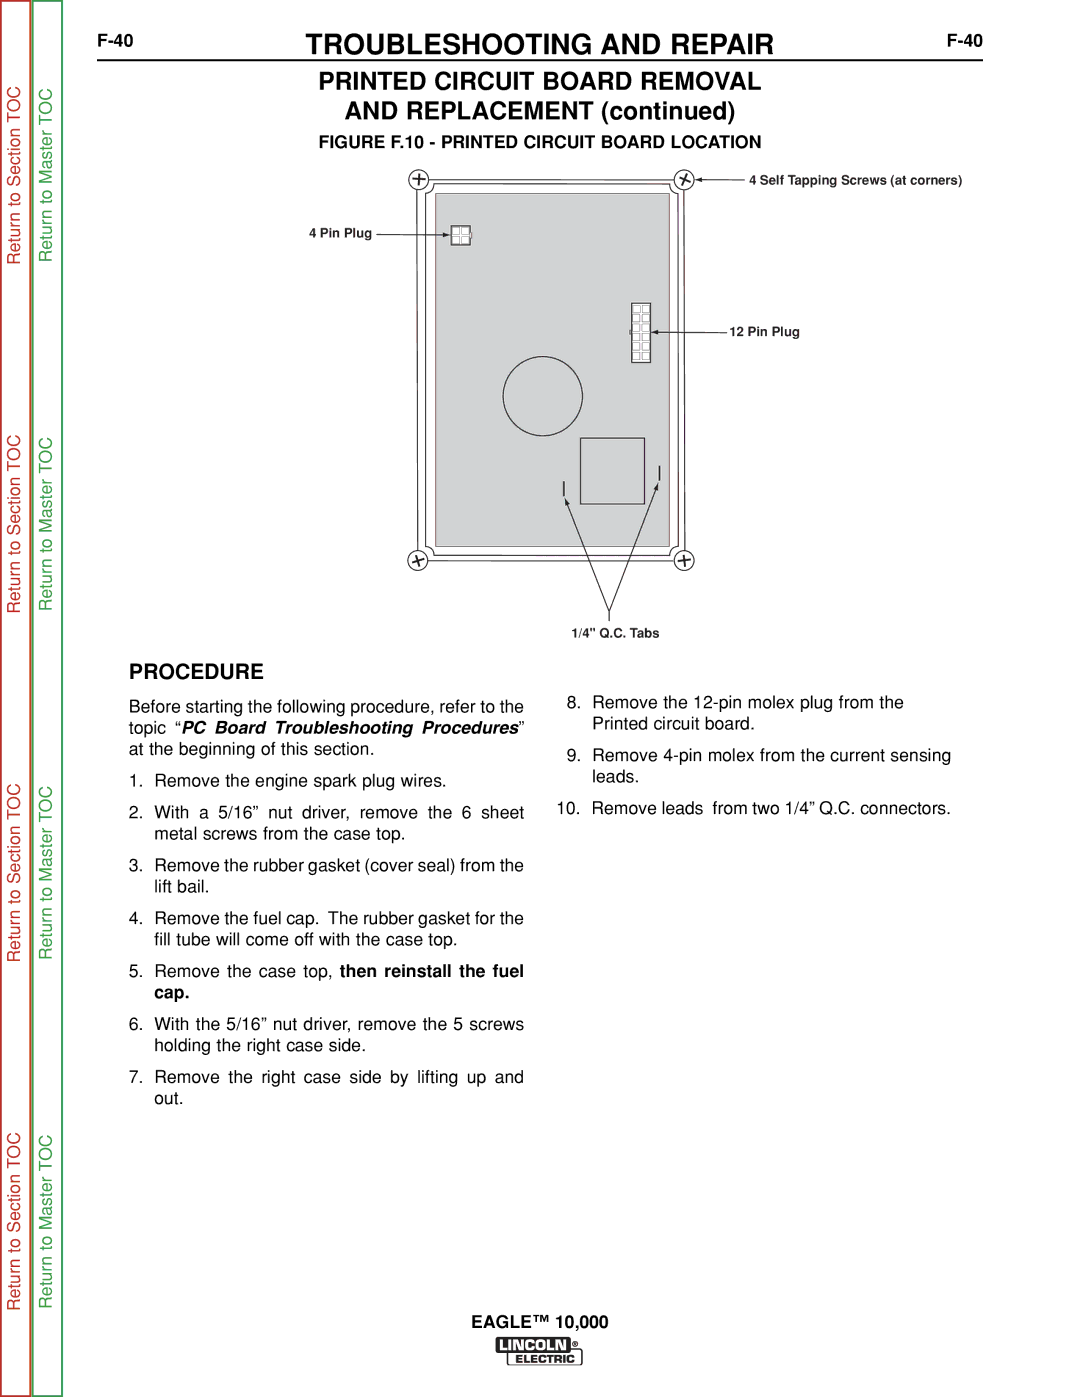
Printed Circuit Board Removal Replacement
Replacement
Printed Circuit Board Removal
Troubleshooting and Repair
Eagle 10,000
43TROUBLESHOOTING and REPAIRF-43
Output Rectifier Bridge Removal Replacement
44TROUBLESHOOTING and REPAIRF-44
Output Rectifier Bridge Removal
45TROUBLESHOOTING and REPAIRF-45
Eagle 10,000
ENGINE/ROTOR Removal and Replacement
Instructions
ENGINE/ROTOR Removal and Replacement
Figure F.12 Component LOCATIONS, ENGINE/ROTOR Removal
Engine and Rotor Removal Procedure
Rotor Removal Procedure
Figure F.13 Engine and Rotor Removed from Stator THRU-BOLT
Reassembly Procedure
Replacement KIT S20788
ENGINE/ROTOR Removal
Auxiliary Power Receptacle OUTPUT1
Retest After Repair
Engine Output
Welder DC OUTPUT1
Table of Contents Diagram Section
Electrical Diagrams
Eagle 10,000 Kohler
Wiring Diagram Code 11397 M21271
Schematic Complete Machine Code 11096 L12259
Terminal
Schematic Complete Machine Code 11397 L13104
Torroid Core located on
Schematic IDLER/FIELD Control P.C. Board L12197

