CT270MW8 a
Important note is located on the rear of the cabinet
Introduction
Laser Safety
Precautions
RADIO-TV Interference
Important Copyright Information
5Symbols Used in this Manual
5Supplied Accessories
Location
To Avoid the Hazards of Electrical Shock and Fire
Introduction
Contents
DTV/TV/CATV
Features
Accessing from Mode button
5Installing the Batteries
5Remote Control Function
5Rear Panel
5Control Panel
5Basic Connection
Preparation
Antenna Cable Connection
Connection to Cable Box or Satellite Box
Video Cable Connection
5External Device Connection
RCA audio cable
Digital Audio Output Connection
TV Functions
Initial Setting
5Main Menu
5Language Selection
5Auto Clock Setting
5Manual Clock Setting
You may have to reset the clock after a power failure
Likewise, set the DAY, YEAR, and Hour
Daylight-Saving Time D.S.T
Adjust +1 hour Adjust -1 hour
OFF
On MAR-NOV
5Auto Channel Scan
Channel setting will be saved even if the power fails
5Channel Add/Delete
Make sure if the unit is connected to antenna or cable
5Channel Selection
5Switching Each Mode
Watching TV
Counter Display
5Screen Information
Clock Display
Analog TV/VCR Information
5TV Screen Display Mode
5Switching Audio Mode
Stereo
SAP
5Picture Adjustment
5Sleep Timer
Sleep
Bright Contrast Color Tint Sharpness
Press SET-UPto display the main menu
5Closed Caption
OFF CAPTION1 CAPTION2 TEXT1 TEXT2
CAPTION1 and TEXT1
Dtvcc
DTV Closed Caption
Use Cursor K/L to select DTVCC, then press Enter
Use Cursor K /L to select DTVCC, then press Enter
5V-chip
To Set the Sub Ratings
TV Rating
Use Cursor K/L to select Change PASSWORD, then press Enter
Change Password
Mpaa Rating
Space
Operating VCR
Rental Playback
5VCR User Setting
Auto Repeat Playback
Auto Return
5Time Search
5Zero Return
Basic Recording & OTR
5Index Search
Length simply by pressing REC/OTR .,I on the unit
Or the Number buttons to select
To set another program, repeat steps 3 to
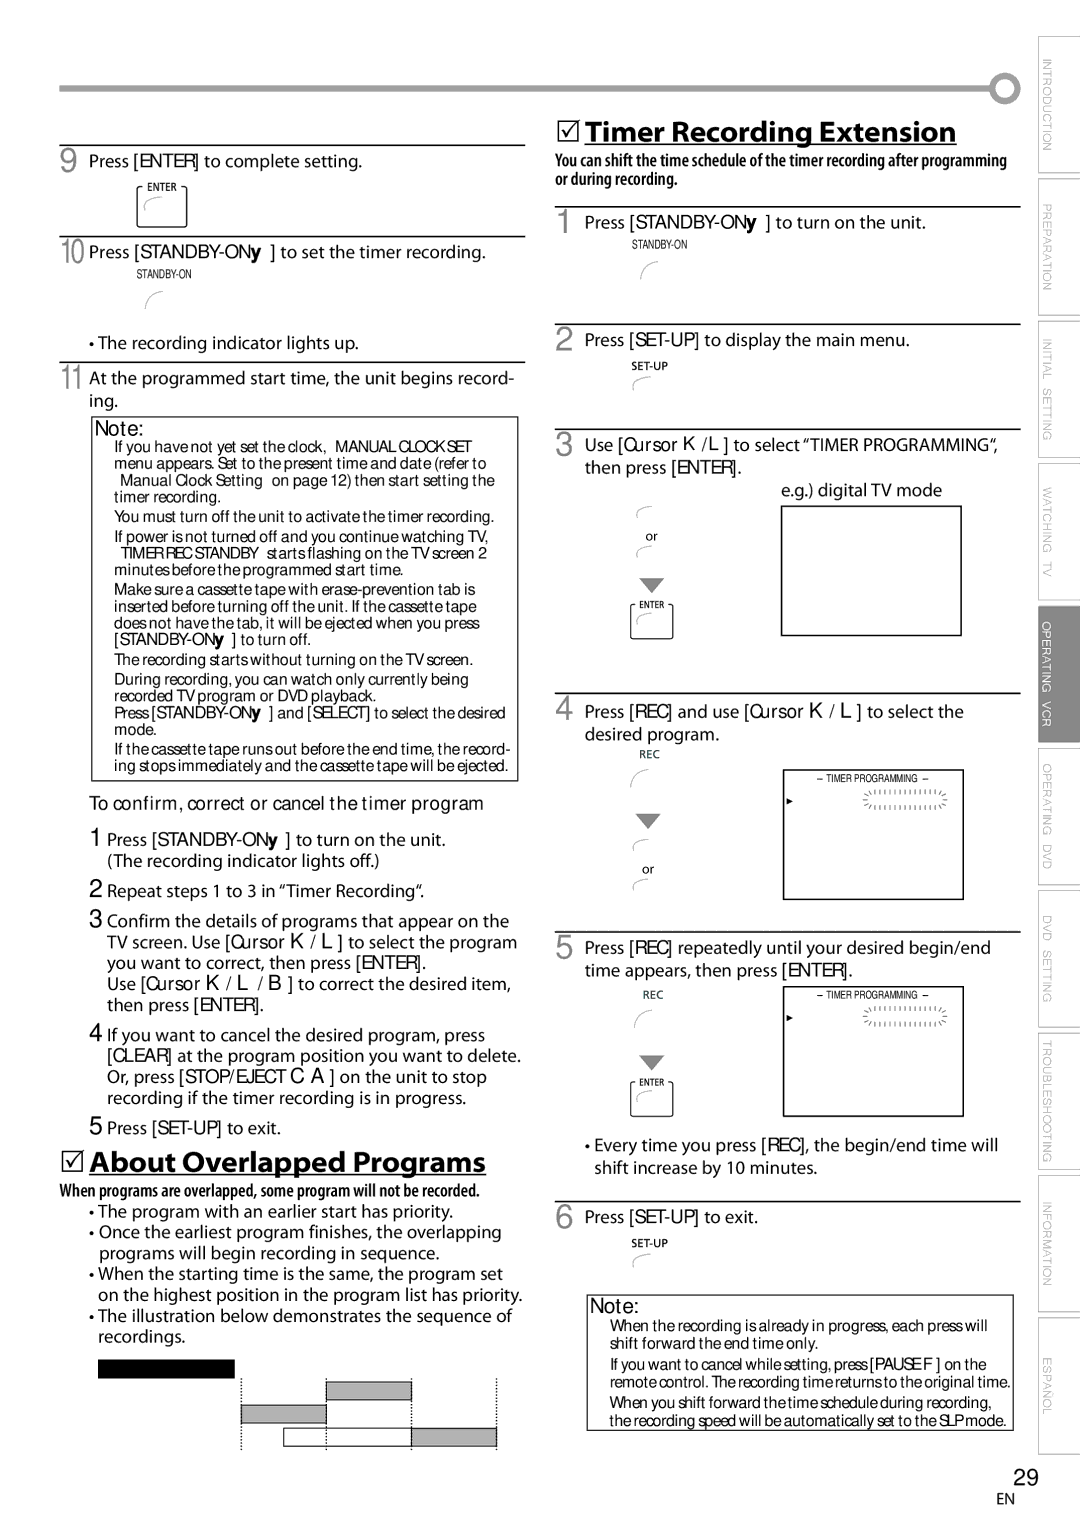
5Timer Recording
For once recording
5About Overlapped Programs
To confirm, correct or cancel the timer program
Press REC/OTR I on the unit
5Copying a Cassette Tape from External Device
DVD Functions 5Playable Media
Operating DVD
5Unplayable Media
Any other discs without compatibility indications
5DVD Menu
Playback
5Resume Playback
Pause
5Slow Forward / Slow Reverse
Step-by-step Playback
5Fast Forward / Fast Reverse
Chapter / Title Search
During playback, press Mode repeatedly until appears
5Search Functions
5Repeat A-B Playback
Time Search
5Repeat Playback
5Random Playback
Stop mode, press Mode repeatedly until Random menu appears
5Programmed Playback
Press Play B to start random playback
Program or Random will be displayed Instead
5On-screen Display
Opening the disc tray will cancel your subtitle setting
5Special Settings
Subtitle Language
Camera Angles
Stereo Sound Mode
Black Level Setting
Virtual Surround
Chleft channel sound only Chright channel sound only
During playback, press Mode repeatedly until / appears DVD
Marker Setup
5DVD Language Setting
DVD Setting
Subtitle *1, *2
Disc Menu *1
Use Cursor K/L to select DISPLAY, then press Enter
5Display Setting
Use Cursor K/L to select AUDIO, then press Enter
5DVD Audio Setting
Parental Level
5Parental Setting
Use Cursor K/L to select OTHERS, then press Enter
Others
You can change the other functions
Use Cursor K/L to select INITIALIZE, then press Enter
5Reset to the Default Setting 5Language Code List
Use Cursor K/L to select YES, then press Enter
Language Code
5Troubleshooting Guide
Troubleshooting
Behind the dialogue
Problems with Closed Caption Feature
Information
Maintenance
Glossary
Atsc
5Electrical Specification
5General Specifications
5Other Specifications
5Cable Channel Designations
5Instalación de las Pilas
Español
5Función de Mando a Distancia
5Panel Trasero
5Panel de Control
5Conexión de Dispositivo Externo
5Conexión Básica
Conexión de Cable de Antena
Conexión de Cable de Vídeo
5Selección de Canal
5Menú Principal
5Selección de Idioma
5Reproducción Básica
5Ajuste de Seguimiento
Imagen Fija y Cámara Lenta
5Grabación Básica y OTR
Ej. el temporizador está ajustado para grabar
5Grabación con Temporizador Automático
Presione Stop C para interrumpir la grabación
Para ajustar otro programa, repita los pasos 3 a
Ajuste la fecha de inicio
Presione OPEN/CLOSE a para expulsar el disco
Reproducción
Presione STANDBY-ON y para encender la unidad
Deseado y presione Enter
5Ajuste de Idioma en DVD
Utilice Cursor K/L para seleccionar el elemento
Limited Warranty
Manual del Usuario
Introducción
Importante para su Seguridad
Precauciones
5Símbolos Utilizados en este Manual
5Accesorios Suministrados
Ubicación
Para Evitar LOS Riesgos DE Descarga Eléctrica E Incendio
Contenido
Introducción
Características
Acceso desde el botón Mode
Botones REV E / Skip H p33
5Función del Mando a Distancia
Bandeja de Disco DVD
Conexión a Caja de Cable o Caja de Satélite
Conexión
Conexión de Salida de Audio Digital
Funciones del TV 5Menú Principal
Ajuste Inicial
Como Programar
Ajuste DE User
Haga igual para configurar DIA, AÑO y Hora
5Configuración Manual del Reloj
Ajustar +1 hora Ajustar -1 hora
OFF On MAR-NOV
On ABR-OCT
Utilice Cursor / B para seleccionar Agregar o Borrar
5Agregar/Borrar Canales
Conectados a la unidad
¿Qué es el canal menor?
Modo Analógico Modo Digital
Modo DVD
5Información de Pantalla
Para VER LA Televisión
Pantalla DEL Contador
Pantalla DE Reloj
5Modo de Visualización de Pantalla del Televisor
5Para Cambiar el Modo de Audio
Estéreo SAP Mono
Zoom
5Ajuste de Imagen
5Temporizador de Apagado
Presione PICTURE/SLEEP una vez
Claridad Contraste Color Matiz Agudeza
OFF SUBTÍT1 SUBTÍT2 TEXTO1 TEXTO2
Subtítulos
SUBTÍT1 y TEXTO1
SUBTÍT2 y TEXTO2
Presione SET-UPpara visualizar el menú principal
Subtítulos en DTV
Estilo Fuente
Tamaño Titulo
Borde Caracter
Color ADELANTE, Color Fondo
Ej. TV-PG
Clase de TV
Para Ajustar las Subcategorías
Presione los botones numéricos del mando a
Clase de Mpaa
Cambiar Contraseña
Utilización DEL VCR
Para cancelar el modo devolución automática
5Configuración del Usuario del Vídeo
Devolución Automática
Temporizador
5Búsqueda por Tiempo
5Devolución Cero
Los botones numéricos para
5Búsqueda por Índice
Utilice CH
Para una única grabación
Ej. El temporizador está ajustado para grabar
Para grabar todos los días el mismo canal a la misma hora
Para grabar semanalmente el mismo canal a la misma hora
Temporizador
Ampliación de Grabación con
Presione REC/OTR I de la unidad
5Copiar una Cinta de Vídeo desde un Dispositivo Externo
Funciones del DVD
Utilización DEL DVD
5Medios que se Pueden Reproducir
5Medios que no se Pueden Reproducir
5Reanudación de la Reproducción
5Menú del Disco
Pausa
Si la reproducción permanece detenida durante
Mantenga presionado repetidamente REV h o
5Reproducción Paso a Paso
Zoom
Búsqueda de Capítulos / Títulos
5Funciones de Búsqueda
5Repetición de Reproducción
Búsqueda por Tiempo
Dirija la Búsqueda
Presione Play B para iniciar la reproducción aleatoria
5Reproducción Aleatoria
5Reproducción Programada
Introducción
5Visualización en Pantalla
Ángulos de la Cámara
5Ajustes Especiales
Idioma de Subtítulos
Modo de Sonido Estéreo
Ajuste del Nivel del Negro
Utilice Cursor K / L para ajustar el nivel del negro
Efecto realzado
Para establecer un marcador
Puesta de Marcador
Seleccione el idioma de sonido deseado
Configurar EL DVD
Audio *1, *2
Modo TV
5Ajuste de la Pantalla
SUB Muestreo
5Ajuste de Audio de DVD
Seleccione DRC
Nivel Paterno
5Ajuste Paterno
Si ya ha puesto la contraseña, utilice
Puede cambiar otras funciones
Otros
Idioma Código
5Reposición de los Ajustes Predeterminados
5Lista de Códigos de Idiomas
Algunas funciones están prohibidas en algunos discos
Solución DE Problemas
5Guía de Solución de Problemas
Aparecen subtítulos con faltas de
Problemas con la Función de Subtítulos
Mantenimiento
Información
Glosario
5Especificaciones Generales
5Denominaciones de Canales de Cable
5Especificación Eléctrica
5Otras Especificaciones
Garantía Limitada