Super Audio CD/DVD Player
Model DV9600 User Guide
CLASS 1 LASER PRODUCT LUOKAN 1 LASERLAITE KLASS 1 LASERAPPARAT
Additional Safety Information
Important Safety Instructions
Copy protection
CONGRATULATIONS ON YOUR PURCHASE OF THIS FINE MARANTZ PRODUCT
CAUTIONS
Precautions
English
FCC NOTE for U. S. A
Disc Storage
Maintenance of Cabinet
Handling Cautions
Operating Environment
DVD Setup Menu
Table Of Contents
Connecting Up
Before You Start
High quality 14-bit/216MHz Video D/ A converter*2
Features
Before You Start
dts 96kHz/24 bit compatibility
1 Open the battery com
remote control
Using the remote control
What’s in the box
DVD-Audio compatibility
Discs compatible with this player
DVD-Video compatibility
DVD-R compatibility
MP3 compatibility information
DVD-Video regions
JPEG compatibility information
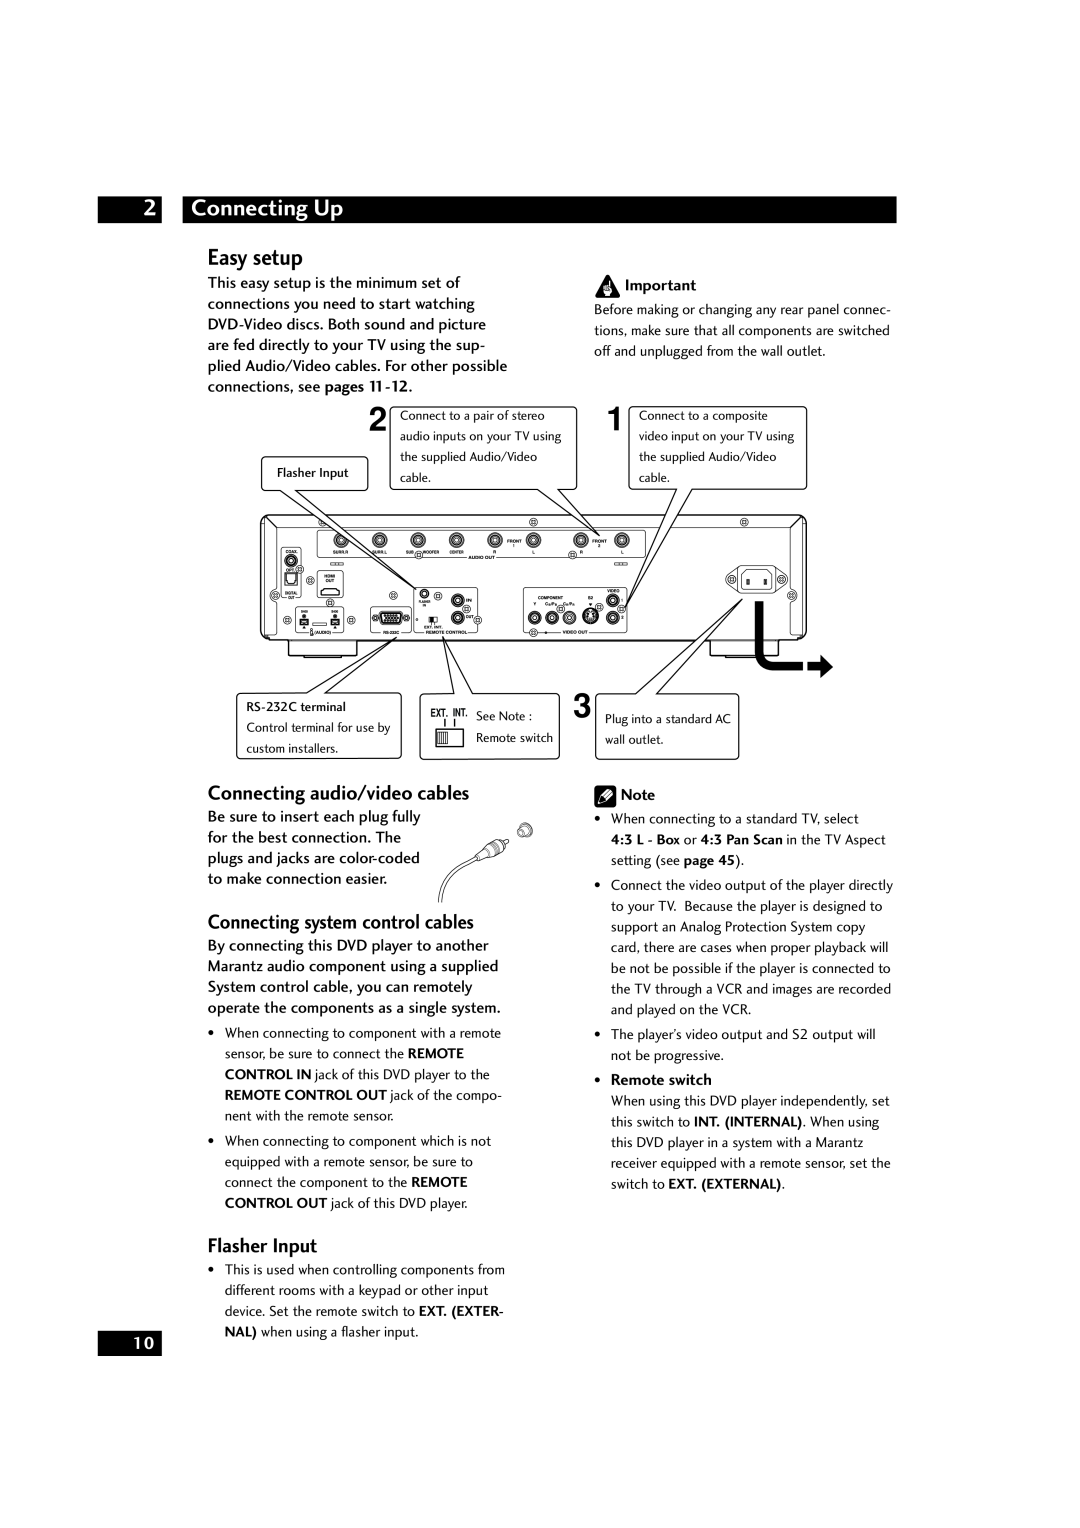
Connecting audio/video cables
Connecting Up
Easy setup
Connecting system control cables
Home theater video connections
Connecting S-Video cables
Connecting HDMI cables
S-Video or composite video?
Connecting coaxial cables
Connecting analog audio cables
Connecting optical cables
Connecting i.LINK cables
7 HDMI/DVI RESOLUTION
1 STANDBY indicator
6 POWER ON/OFF
Controls & Displays
i.LINK
Display
GRP TITLE
27 Character display
VIDEO ON/OFF - press to turn video
Remote control
OPEN/CLOSE - Disc tray open/close
output off and on
Playing discs
1 Switch the player on
Getting Started
Basic playback controls
And also select Disc Menu using the MENU button on the remote control
Using the Disc Menu
Using the Title Menu
Navigating DVD disc menus
Playing Discs
Using the Function Menu
1 Press the SET UP button during playback
Introduction
Finding what you want on a disc
Using the INFO menu
1 During play, press the DISPLAY button on the remote control
2 Use the cursor buttons 5/∞ to select the desired item
Viewing slow playback
Viewing a Pausing Picture
Still Frame/Slow Play/Frame Advance Playback
Step Motion playback Viewing one frame at a time
Memorizing disc settings CONDITION MEMORY
Using the Page
To recall memorized settings, just load the disc
2 Press 3 PLAY to start random play
Using the Random Play
1 Press RANDOM during the Stop mode
Return to normal playback
1 Press REPEAT during playback
Using the Repeat Play
Looping a section of a disc
3 Press ENTER
Bookmarking a place in a disc
Using the Bookmark Function
1 During play, press the MARKER button on the remote control
Recalling a Marked Scene
3 Press 3 PLAY button
Making a program list
1 Press PROGRAM during the Stop mode
1 Delete all selections from program list
To display the camera angle, press ANGLE
Switching Camera Angles
Switching Subtitle Language
To display the subtitle language, press SUBTITLE
Switching audio channel DVD-Audio
Switching Audio Language
Using the Zoom Function
Switching audio channel Video CD
MP3/JPEG Play
Using Random Play
Using Repeat Play
Playing MP3s
Playing JPEG
Capture
Creating your own setting
Video Adjust
Selecting a preset
2 Select Memory Select 3 Select a preset
5 Press ENTER to save your changes. Note
HP PROLOGIC setting
DVD Setup Menu
Using the FL menu
REMOT CODE setting
3 Press the ENTER button to access the sub features
Using the Setup Menu
ENTER button
Audio Setup 1 page
Language Setup page
Video Setup page
Parental Setup page
Using the DVD Menu Language
Setting up the Language Setup
Using the OSD Language
Using the Audio Language
Using the Subtitle Language
5 Press the cursor buttons 5/∞ to select English
Dolby Digital Out
Setting up the Audio Setup
Digital Out
DTS Out
PCM Down Sample
PCM Down Sample
Audio Out
About source audio output
Default setting Front L/R Large Center
Speaker Size
Distance
Default setting Unit Feet Distance 10 feet
Press ENTER Press ENTER
Level
Remember
Cursor buttons 2/3 Speaker Change at manual test tone
Replay DVD Audio as DVD Video? DVD replay method
Super Audio CD Mode
Player Mode
either DVD Audio or DVD Video
DTS Down Mix
Replay DTS CD? CD replay settings
CD Play Back
either Stereo or Lt/Rt
Super Audio CD Play
Audio DRC
TruSurround
SRS TruSurround
Setting up the Video Setup
TV Aspect
The picture is squashed. Set to either Pan & Scan or Letter Box
When viewing on a widescreen TV or monitor
This setting only has any effect withFull progressive output
The picture is squashed. Set your TV to ‘Full’
Components Out
Pause Mode
TV System
Back Ground
Screen Saver
MOD. Modulation PAL Shrink
Change Password
Setting up the Parental Setup
Use Password
Enter your password again The Parental Control screen appears
Angle Mark
Setting up the Others Setup
On Screen Display
Bonus Group
Economy Mode
Auto Power Off
Pure Mode
Pure Mode, Mode1 or Mode2 is selected
HDMI
1 Select Resolution
2 Select Format
3 Select TV Aspect
Setup Examples
43 L - Box 43 Pan Scan 169 Wide 169 Squeeze
Multi PCM
4 Select Audio
HDMI Audio Output
2ch PCM
5 Select DVI Output
i.LINK
1 Select Audio Out
3 Select Output Format
2 Select Connections Select
4 Select Auto Play
About i.LINK
To the Vieo input
1. Daisy-chain connection
i.LINK Network
Copyright Protection System
2. Tree tower connection
Resetting the Player
To reset the player, press and hold
Additional Information
Cleaning the pickup lens
Problems with condensation
Handling discs
Moving the player
Hints on installation
Power cord caution
Don’t
The disc is ejected automatically after loading
Troubleshooting
Settings are canceled
Playback is not possible
Cannot listen to high-sampling rate audio through the digital output
The remote control doesnt seem to work
Noticeable difference in DVD and CD volume
No audio, or audio is distorted
No video appears on the connected HDMI/DVI component
The disc containing the MP3 tracks won’t play
Some MP3 tracks appear to be missing from a disc
No audio is coming from the connected HDMI component
Additional Information
Meaning
Correction
i.LINK related display messages
Specifications
Additional Information
Marantz America, Inc
is a registered trademark
U.S.A
1100 Maplewood Drive, Itasca, IL 60143, U.S.A