Manuals
/
Miele
/
Kitchen Appliance
/
Coffeemaker
Miele
manual
4.22.2CPU Electronic, CVA615 Coffee System Technical Information
Models:
CVA615
1
46
104
104
Download
104 pages
36.29 Kb
43
44
45
46
47
48
49
50
Page 46
Image 46
Page 45
Page 47
Page 46
Image 46
Page 45
Page 47
Contents
TECHNICAL INFORMATION CVA615 Coffee System
2007 Miele USA
CVA615 Coffee System – Table of Contents
Service and Maintenance
Fault Diagnosis
CVA615 Coffee System – List of Figures
CVA615 Coffee System – List of Figures continued
Figure 5-43:Beans Container Guide
CVA615 Coffee System
CVA615 Coffee System – List of Tables
Table 6-2:Service Mode Navigation
Technical Information
2Coffee Dispensers Height-Adjustable
1.0Construction and Design
1.1Appliance Overview
1Hot Water Dispenser
1.1.3Interior Front of Appliance Opened
1.1.2Controls
Figure 1-2: CVA Controls
Product Dimensions
1.2Technical Data
Electrical Information
7Drive Assembly Cover 8Hot Water / Coffee Heater
1.3Layout of Components
6Drive Assembly Mounted to Wall
12Steam Solenoid Valve 13Power Electronic Board
2.0Installation
Figure 2-1: Operating Manual
3.0Commission and Operation
3.1General Operation
3.1.3Steam Control
3.1.2Canceling the Preparation
Figure 3-4: Canceling the Preparation Process
Figure 3-5: Steam Selector
3.1.4Hot Water
3.1.5Adjusting the Coffee Grinder
Controls
3.1.6Filling the Coffee Beans Container
3.1.7Filling the Water Tank
4.2Overflow Reed Switch
4.1Door Switch
4.0Description of Function
4.4Brew Unit Removal from the Appliance
4.3Brew Unit – Cleaning and Care
Figure 4-2: Brew Unit in “Home” Position
4.5Connection of Brew Unit to Drive Mechanism
Operation
4.6Brewing Procedure
1Outlet 2Top Filter 3Compressed Coffee
Figure 4-5: Brew Unit Components
4Water Nozzle Socket 5Bottom Filter
Refer to Figure 4-6– Brew Unit, Showing Compressed Coffee “Puck”
4.7Grounds Container
4.8Waste Unit Present Switch
Figure 4-7: Waste Unit Present Switch
1 Magnet for Present Switch Actuation
Figure 4-8: Waste Unit
4.9Water Tank
Figure 4-10: Water Level Switch
4.10Water Level Switch
Figure 4-11: Water Level Switch Float
When the water tank is installed, and contains at least 30-33ounces of water; the Water Level Switch is activated and its contacts close
4.11Grinder Assembly
Figure 4-12: Grinder Assembly
Refer to Figure 4-12– Grinder Assembly
1Grinder Motor 2Carrier 3Mounting 4Spring 5Ball
4.12Grinder – Overload Protection
6Grinding Cone 7Washer 8Intake Worm Gear
ANormal Operation BOverload Protection Activated
CForce Transfer Interrupted
4.13Ground Coffee Dispensing
Figure 4-15: Coffee Dispensing Components
4.14Dispenser Switch
4Switch – Brew Unit Present Switch
4.15Brew Unit Drives
3Locking Mechanism Switch Lug
1Brew Unit Drive Shaft Socket 2Socket
Refer to Figure 4-18– Brew Unit Drive Assembly
4.18Heaters
4.16Water Pump
4.17Flow Meter
Coffee / Hot Water Heater 1R1 & 1R2
4.19Flow Through Heaters
Figure 4-19: Hot Water / Coffee Heater
1Heater Element 2Thermal Fuse 3Thermostat
Figure 4-20: Steam Heater
4Temperature Sensor PTC
4.20Water Path
Figure 4-21: Water Path
4.20.3Water Path – Hot Water
4.20.1Water Intake
4.20.2Water Path - Coffee
4.20.4Water Path – Steam
4.21Water Valve
Figure 4-22: Water Valve Disassembled
4.22Electronic Assemblies
4.22.1Power Electronic
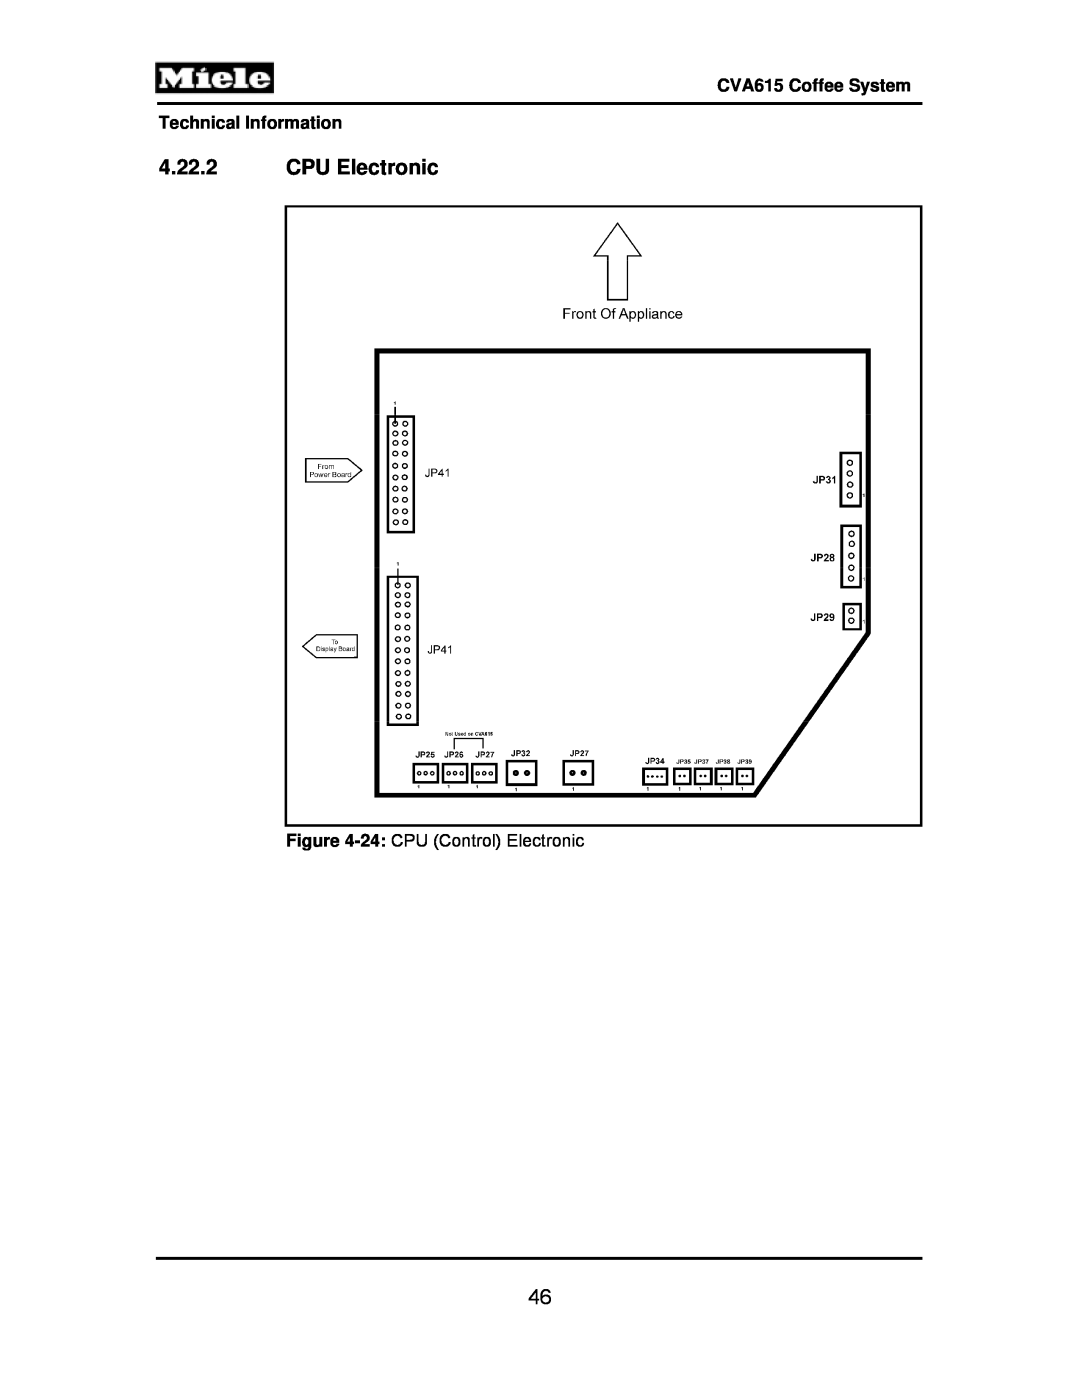
4.22.2CPU Electronic
Figure 4-24: CPU Control Electronic
5.0Service and Maintenance
5.1Lid - Removal
5.2Interference Suppression Filter Z1 - Removal
5.3Rear Panel - Removal
1.Open the door 2.Pull off the slide switch knobs
5.4Adjustment Slide Switch Frame - Removal
4.Remove the frame
3.Disconnect the Door Switch Connections
5.5Door Contact Switch S24 - Removal
Refer to Figure 5-5– Door Switch
5.Remove the Door Switch to the front
5.6Base Plate - Removal
2.Remove the Base Plate – Refer to Section
5.7Drip Tray - Removal
3.Remove the Drip Tray - Refer to Figure
3. Remove the float
5.8Overflow Switch Actuator Float - Removal
1Overflow Switch Float
2Magnet Inside of the Float
2.Remove the Overflow Switch Fixing Screw Item
5.9Overflow Switch B8/3 - Removal
3.Remove the Overflow Switch
2.Remove the Upper Rear Panel Fixing Screws Item
5.10Rear Door Panel - Removal
1.Open the door
3.Remove the Lower Rear Panel Fixing Screws Item
3.Remove the Cover Fixing Screws Item
5.11Fascia Panel Cover - Removal
2.Remove the Rear Door Panel – Refer to Section
4.Remove the cover
5.12Selector Switch - Removal
5.13Display Module Electronic - Removal
5.14Coffee Dispensing Nozzle - Removal
5.15Coffee Dispensing Nozzle - Installation
1.Open the door
5.17Hot Water Nozzle - Removal
5.18Hot Water Valve Y12 - Removal
5.19Checking Temperature at Coffee Dispenser
5.20Brew Unit – Removal in Start/Home Position
5.21Brew Unit – Removal NOTin Start/Home Position
Figure 5-17: Brew Unit
1Connection Socket 2Retaining Screw
5.22Brew Unit - Installation
5.23Brew Unit – Cleaning Procedure
5.24Brew Unit – Filter Cleaning
5.25Brew Unit – Degreasing via the Rinse Cycle
RINSING RINSING CYCLE
RINSING CYCLE
SELECT PRODUCT READY FOR USE
5.26Brew Unit - Lubrication
Refer to Figure
5.28Brew Unit Creamer Valve - Removal
5.29Brew Unit Handle - Removal
5.30Brew Unit Funnel - Removal
5.31Brew Unit Ram - Service
Figure 5-31: Ram Assembly
1Filter Screw 2Filter 3Lubrication Points
5.32Brew Unit Drives - Service
16.Refer to Figure 5-32– Front Plate Assembly with Retaining Screws Locations. Remove the two Hot Water / Coffee Heater Screws; Separate the Heater from its mounting position
Figure 5-33: Grinder Retaining Screws
Figure 5-34: Grinder Retaining Nuts
21.Remove the Adjustment Slide Switch Frame
Service Tip
3.Remove the cap from the Water Tank
5.33Water Tank Float - Removal
1.Open the door 2.Remove the Water Tank
4.Remove the Water Tank Float
3.Lever off the Lip Seal Cap
5.34Water Tank Lip Seal - Removal
2.Remove the Water Tank – Refer to Section
4.Remove the Lip Seal
5.35Lower Section of Tank Valve - Removal
3.Remove the Lip Seal Refer to Figure
5.Remove the Bottom Plate and Drip Tray
7.Remove the lower part of the valve
5.36Beans Container - Removal
5.37Beans Container Guide - Removal
5.38Grinder - Disassembly
10.Remove the bracket Figure 5-45,Item
Refer to Figure 5-46– Grinder – Apart
5.39Grinder Assembly – Basic Setting
5.40Grinder Unit - Removal
5.42Dispenser Switch - Removal
5.41Dispensing Solenoid - Removal
5.43Waterpath & Flowmeter - Testing
5678 34
4.Release all three coffee buttons
5.44Water Path Leakage Test
5.45Water Path Connections - Opening
5.46Water Path Connections - Closing
6.0Fault Diagnosis
6.1Programming Mode
Acknowledgement Indicator
6.2Service Mode
Access
Initial requirements
Service Mode - Navigation
Displayed Message
6.3Displayed Messages
Information
The level switch has been actuated by water being
Brew Unit cannot be installed
6.4Fault Diagnosis
Brew Unit cannot be removed from the appliance
Perform the following
Top
Page
Image
Contents