<TIMER PROGRAM SETTINGS>
■TIMER PROGRAM SETTINGS
Up to 3 most used operation patterns can be set in ad- vance. By individually setting the camera, recording inter- vals and recording picture quality for normal recording/ alarm recording to A ~ D, settings can be changed in- stantly by switching operations and is very convenient.
![]() Before recording, accurately set the date and cur-
Before recording, accurately set the date and cur-
rent time (for setting the date and time, ![]() see pages 20,21).
see pages 20,21).
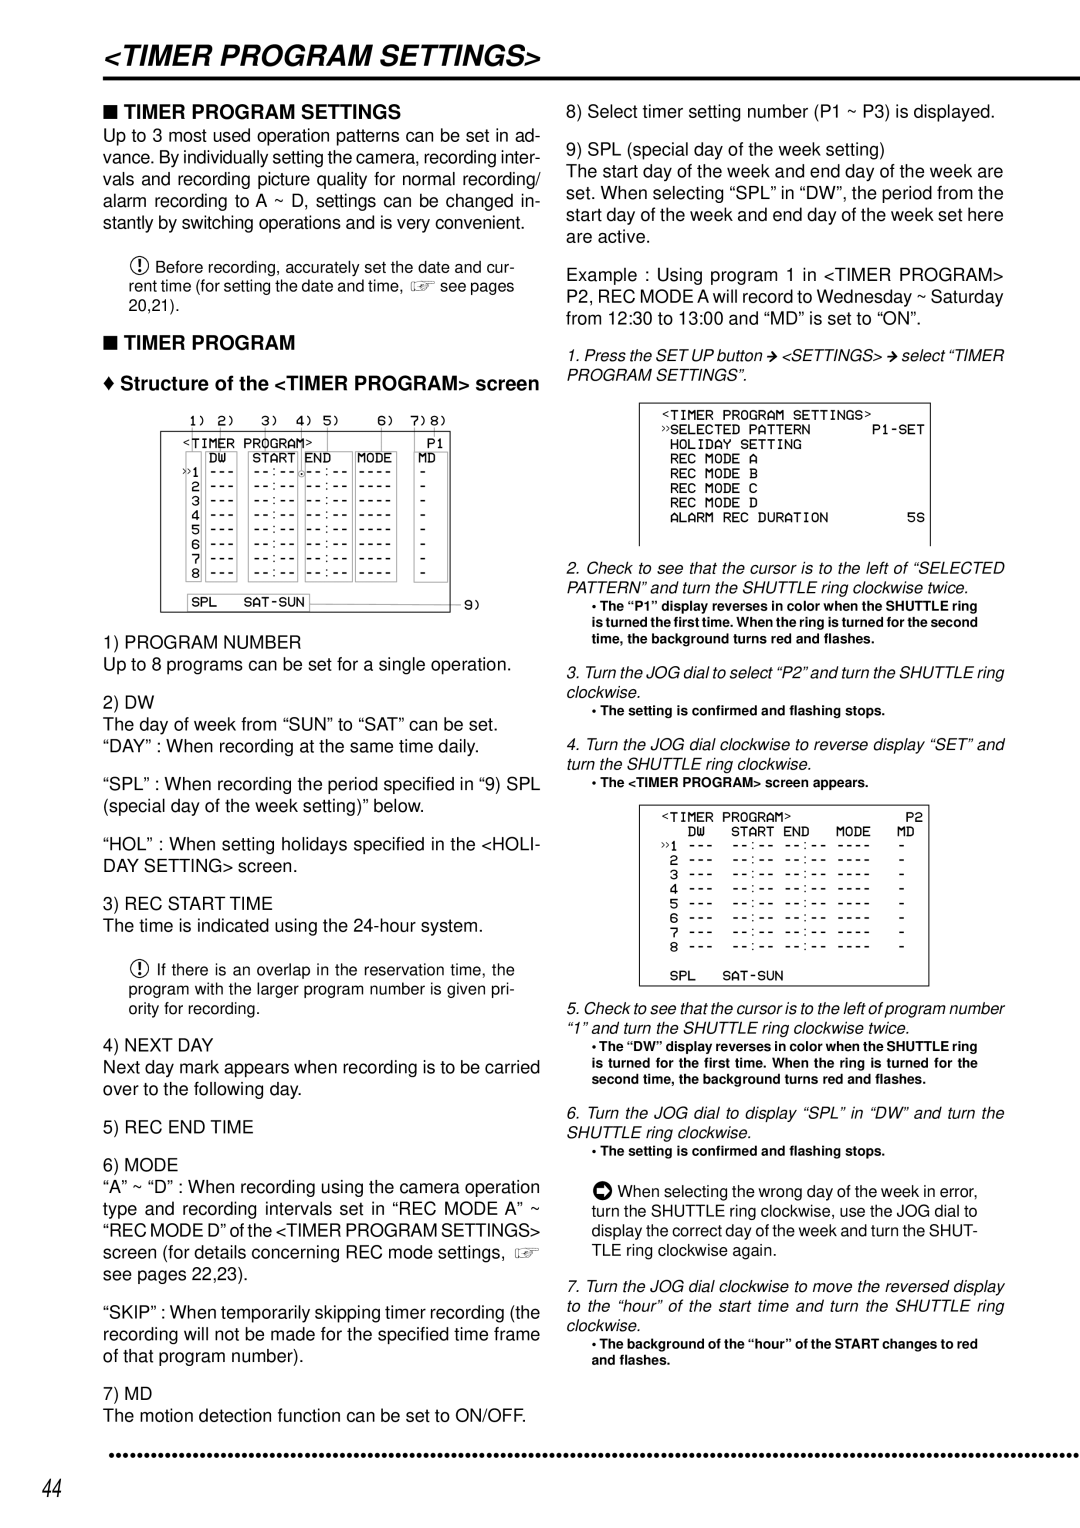
■TIMER PROGRAM
♦Structure of the <TIMER PROGRAM> screen
1) | 2) | 3) | 4) | 5) | 6) | 7) 8) |
| ||||||
| <TIMER PROGRAM> |
|
|
|
|
|
|
|
|
| |||
|
|
|
|
|
| P1 |
| ||||||
|
| DW | START | END | MODE |
| MD |
| |||||
>>1 |
|
|
| : |
|
| - |
|
| ||||
|
|
| |||||||||||
2 |
| - |
|
| |||||||||
3 |
| - |
|
| |||||||||
4 |
| - |
|
| |||||||||
5 |
| - |
|
| |||||||||
6 |
| - |
|
| |||||||||
7 |
| - |
|
| |||||||||
8 |
| - |
|
| |||||||||
SPL |
|
|
|
|
| 9) | |||||||
1) PROGRAM NUMBER
Up to 8 programs can be set for a single operation.
2) DW
The day of week from “SUN” to “SAT” can be set. “DAY” : When recording at the same time daily.
“SPL” : When recording the period specified in “9) SPL (special day of the week setting)” below.
“HOL” : When setting holidays specified in the <HOLI- DAY SETTING> screen.
3) REC START TIME
The time is indicated using the 24-hour system.
![]() If there is an overlap in the reservation time, the program with the larger program number is given pri- ority for recording.
If there is an overlap in the reservation time, the program with the larger program number is given pri- ority for recording.
4) NEXT DAY
Next day mark appears when recording is to be carried over to the following day.
5)REC END TIME
6)MODE
“A” ~ “D” : When recording using the camera operation type and recording intervals set in “REC MODE A” ~ “REC MODE D” of the <TIMER PROGRAM SETTINGS> screen (for details concerning REC mode settings, ![]() see pages 22,23).
see pages 22,23).
“SKIP” : When temporarily skipping timer recording (the recording will not be made for the specified time frame of that program number).
7) MD
The motion detection function can be set to ON/OFF.
8)Select timer setting number (P1 ~ P3) is displayed.
9)SPL (special day of the week setting)
The start day of the week and end day of the week are set. When selecting “SPL” in “DW”, the period from the start day of the week and end day of the week set here are active.
Example : Using program 1 in <TIMER PROGRAM> P2, REC MODE A will record to Wednesday ~ Saturday from 12:30 to 13:00 and “MD” is set to “ON”.
1.Press the SET UP button } <SETTINGS> } select “TIMER PROGRAM SETTINGS”.
<TIMER PROGRAM SETTINGS> | ||
>>SELECTED | PATTERN | |
HOLIDAY SETTING |
| |
REC MODE | A |
|
REC MODE | B |
|
REC MODE | C |
|
REC MODE | D | 5S |
ALARM REC DURATION | ||
2.Check to see that the cursor is to the left of “SELECTED PATTERN” and turn the SHUTTLE ring clockwise twice.
•The “P1” display reverses in color when the SHUTTLE ring is turned the first time. When the ring is turned for the second time, the background turns red and flashes.
3.Turn the JOG dial to select “P2” and turn the SHUTTLE ring clockwise.
•The setting is confirmed and flashing stops.
4.Turn the JOG dial clockwise to reverse display “SET” and turn the SHUTTLE ring clockwise.
•The <TIMER PROGRAM> screen appears.
<TIMER PROGRAM> |
| MODE | P2 | |
DW | START END | MD | ||
>>1 | - | |||
2 | - | |||
3 | - | |||
4 | - | |||
5 | - | |||
6 | - | |||
7 | - | |||
8 | - | |||
SPL |
|
|
| |
5.Check to see that the cursor is to the left of program number “1” and turn the SHUTTLE ring clockwise twice.
•The “DW” display reverses in color when the SHUTTLE ring is turned for the first time. When the ring is turned for the second time, the background turns red and flashes.
6.Turn the JOG dial to display “SPL” in “DW” and turn the SHUTTLE ring clockwise.
•The setting is confirmed and flashing stops.
![]() When selecting the wrong day of the week in error, turn the SHUTTLE ring clockwise, use the JOG dial to display the correct day of the week and turn the SHUT- TLE ring clockwise again.
When selecting the wrong day of the week in error, turn the SHUTTLE ring clockwise, use the JOG dial to display the correct day of the week and turn the SHUT- TLE ring clockwise again.
7.Turn the JOG dial clockwise to move the reversed display to the “hour” of the start time and turn the SHUTTLE ring clockwise.
•The background of the “hour” of the START changes to red and flashes.
••••••••••••••••••••••••••••••••••••••••••••••••••••••••••••••••••••••••••••••••••••••••••••••••••••••••••••••••••••••••••••••• | •••••••••••• |
44