Remote Control
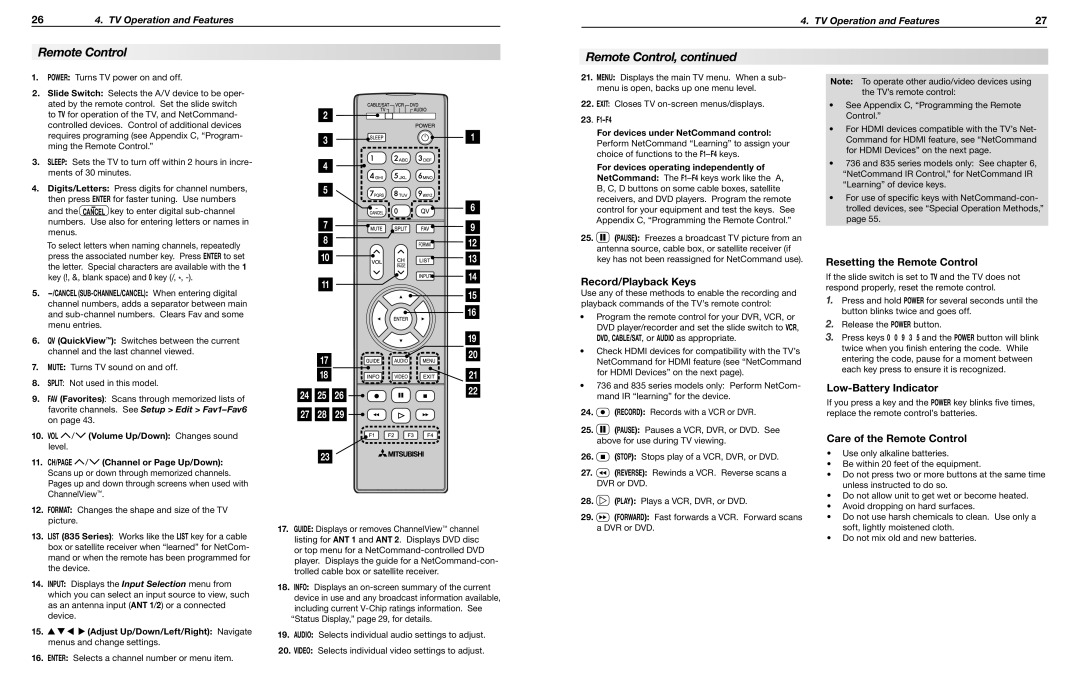
1.POWER: Turns TV power on and off.
2.Slide Switch: Selects the A/V device to be oper- ated by the remote control. Set the slide switch to TV for operation of the TV, and NetCommand- controlled devices. Control of additional devices requires programing (see Appendix C, “Program- ming the Remote Control.”
3.SLEEP: Sets the TV to turn off within 2 hours in incre- ments of 30 minutes.
4.Digits/Letters: Press digits for channel numbers,
then press ENTER for faster tuning. Use numbers and the — key to enter digital sub-channel
CANCEL
numbers. Use also for entering letters or names in menus.
To select letters when naming channels, repeatedly press the associated number key. Press ENTER to set the letter. Special characters are available with the 1 key (!, &, blank space) and 0 key (/, *, -).
5.—/CANCEL (SUB-Channel/CANCEL): When entering digital channel numbers, adds a separator between main and sub-channel numbers. Clears Fav and some menu entries.
6.QV (QuickView™): Switches between the current channel and the last channel viewed.
7.MUTE: Turns TV sound on and off.
8.SPLIT: Not used in this model.
9.FAV (Favorites): Scans through memorized lists of favorite channels. See Setup > Edit > Fav1–Fav6on page 43.
10.VOL  /
/  (Volume Up/Down): Changes sound level.
11.CH/PAGE  /
/  (Channel or Page Up/Down): Scans up or down through memorized channels. Pages up and down through screens when used with ChannelView™.
12.FORMAT: Changes the shape and size of the TV picture.
13.LIST (835 Series): Works like the LIST key for a cable box or satellite receiver when “learned” for NetCom- mand or when the remote has been programmed for the device.
14.INPUT: Displays the Input Selection menu from which you can select an input source to view, such as an antenna input (ANT 1/2) or a connected device.
15.


 (Adjust Up/Down/Left/Right): Navigate menus and change settings.
16.ENTER: Selects a channel number or menu item.
| 2 | | |
| 3 | | 1 |
| 4 | | |
| 5 | | |
| | | 6 |
| 7 | | 9 |
| 8 | | 12 |
| 10 | | 13 |
| 11 | | 14 |
| | 15 |
| | |
| | | 16 |
| | | 19 |
| 17 | | 20 |
| | |
| 18 | | 21 |
24 | 25 | 26 | 22 |
|
27 | 28 | 29 | |
| 23 | | |
17.GUIDE: Displays or removes ChannelView™ channel listing for ANT 1 and ANT 2. Displays DVD disc or top menu for a NetCommand-controlled DVD player. Displays the guide for a NetCommand-con- trolled cable box or satellite receiver.
18.INFO: Displays an on-screen summary of the current device in use and any broadcast information available, including current V-Chip ratings information. See
“Status Display,” page 29, for details.
19.AUDIO: Selects individual audio settings to adjust.
20.VIDEO: Selects individual video settings to adjust.
Remote Control, continued
21.MENU: Displays the main TV menu. When a sub- menu is open, backs up one menu level.
22.EXIT: Closes TV on-screen menus/displays.
23. F1–F4
For devices under NetCommand control: Perform NetCommand “Learning” to assign your choice of functions to the F1–F4 keys.
For devices operating independently of NetCommand: The F1–F4 keys work like the A, B, C, D buttons on some cable boxes, satellite receivers, and DVD players. Program the remote control for your equipment and test the keys. See Appendix C, “Programming the Remote Control.”
25. (Pause): Freezes a broadcast TV picture from an antenna source, cable box, or satellite receiver (if key has not been reassigned for NetCommand use).
Record/Playback Keys
Use any of these methods to enable the recording and playback commands of the TV’s remote control:
•Program the remote control for your DVR, VCR, or
DVD player/recorder and set the slide switch to VCR, DVD, CABLE/SAT, or AUDIO as appropriate.
•Check HDMI devices for compatibility with the TV’s
NetCommand for HDMI feature (see “NetCommand for HDMI Devices” on the next page).
•736 and 835 series models only: Perform NetCom- mand IR “learning” for the device.
24. (Record): Records with a VCR or DVR.
25. (Pause): Pauses a VCR, DVR, or DVD. See above for use during TV viewing.
26. (Stop): Stops play of a VCR, DVR, or DVD.
27. (Reverse): Rewinds a VCR. Reverse scans a DVR or DVD.
28. (Play): Plays a VCR, DVR, or DVD.
29. (Forward): Fast forwards a VCR. Forward scans a DVR or DVD.
Note: To operate other audio/video devices using the TV’s remote control:
•See Appendix C, “Programming the Remote
Control.”
•For HDMI devices compatible with the TV’s Net- Command for HDMI feature, see “NetCommand for HDMI Devices” on the next page.
•736 and 835 series models only: See chapter 6,
“NetCommand IR Control,” for NetCommand IR “Learning” of device keys.
•For use of specific keys with NetCommand-con- trolled devices, see “Special Operation Methods,” page 55.
Resetting the Remote Control
If the slide switch is set to TV and the TV does not respond properly, reset the remote control.
1.Press and hold POWER for several seconds until the button blinks twice and goes off.
2.Release the POWER button.
3.Press keys 0 0 9 3 5 and the POWER button will blink twice when you finish entering the code. While entering the code, pause for a moment between each key press to ensure it is recognized.
Low-Battery Indicator
If you press a key and the POWER key blinks five times, replace the remote control’s batteries.
Care of the Remote Control
•Use only alkaline batteries.
•Be within 20 feet of the equipment.
•Do not press two or more buttons at the same time unless instructed to do so.
•Do not allow unit to get wet or become heated.
•Avoid dropping on hard surfaces.
•Do not use harsh chemicals to clean. Use only a soft, lightly moistened cloth.
•Do not mix old and new batteries.