566. NetCommand IR Control (736 and 835 Series TVs)

Operating NetCommand-Controlled Devices, continued

6. NetCommand IR Control (736 and 835 Series TVs)

57

Setting Up NetCommand Control of an A/V Receiver

Key Name in

Special Operation Description and Setup

How to Use


Learning Screen


Guide

Displaying the Disc Menu (DVD or high-defini-

While watching the device, press GUIDE to display the


tion disc format)


disc menu.


“Learn” the Disc Menu, Top Menu, or other key as


named on the original remote in the Guide learn-


ing position.


Displaying the On-Screen Program Guide

1.

While watching the device, press GUIDE to


(cable box or satellite receiver)


display the guide.


1. “Learn” the Guide key on the original remote in

2.

Press CH/PAGE

 / 

to send the Page Up/Dn


commands for the guide.


the Guide learning position.


2.

Learn the PAGE

and PAGE

keys of the


original remote in the Page Up and Page Dn


learning positions.


Page Up

Using Page Up/Down


Inside the Guide


Page Dn

If the device’s original remote control has separate


Press CH/PAGE

 / 

to send the Page Up/Dn


commands.


keys for Channel Up/Dn and Page Up/Dn, the TV


remote control’s CH/PAGE  / 

key can work like

Outside the Guide


the two separate keys.


Press CH/PAGE

 / 

to send the Channel Up/


1.

“Learn” CHANNEL

/ in the Channel Up/Dn


Dn signal.


positions.


2.

“Learn” PAGE /

in the Page Up/Dn posi-


tions.


Enter

Enter Functions (cable boxes, satellite receivers, etc.)


Some devices have two keys that have “enter” functions. One key is for menus and is often labelled


SELECT or OK. A second key is for use with number keys for direct channel selection. NetCommand uses


the same ENTER key for both operations.


When ENTER has a menu or guide function or when

1.

Press MENU or GUIDE to display the device’s menu


the original remote control uses the same key for


or guide.


menus and channel selection:


2. Press ENTER within the menu and NetCommand


Learn the ENTER, SELECT, or OK key in the


will send the Enter signal for menus.


NetCommand Enter learning position.


Enter (digits)

When ENTER is for channel changes, i.e., the original

Press digit key(s) and then press ENTER.


remote control has a separate ENTER key for this

NetCommand will send the Enter signal for channel


function):


selection.


Learn the ENTER key for channel selection in the


NetCommand Enter (digits) learning position.


Use this learning position only if the original


remote control has separate keys for Enter in


menus and Enter for channel selection.


Cancel

CANCEL as the Cancel or Exit Function

1.

Press MENU or GUIDE to display the menu or guide.


“Learn” the Cancel or Exit function in the

2.

and NetCommand will send the


Press CANCEL


NetCommand Cancel learning position


Cancel or Exit signal.


The symbol “—” can serve as the separator


(separator)


between a digital channel’s main and sub-

Press digit key(s) and press CANCEL . NetCommand


will send the channel-separator signal.


channel digits, e.g., digital channel 12-1 (main


channel is 12, sub-channel is 1).

“Learn” the channel separator function in the NetCommand – (separator) learning position.

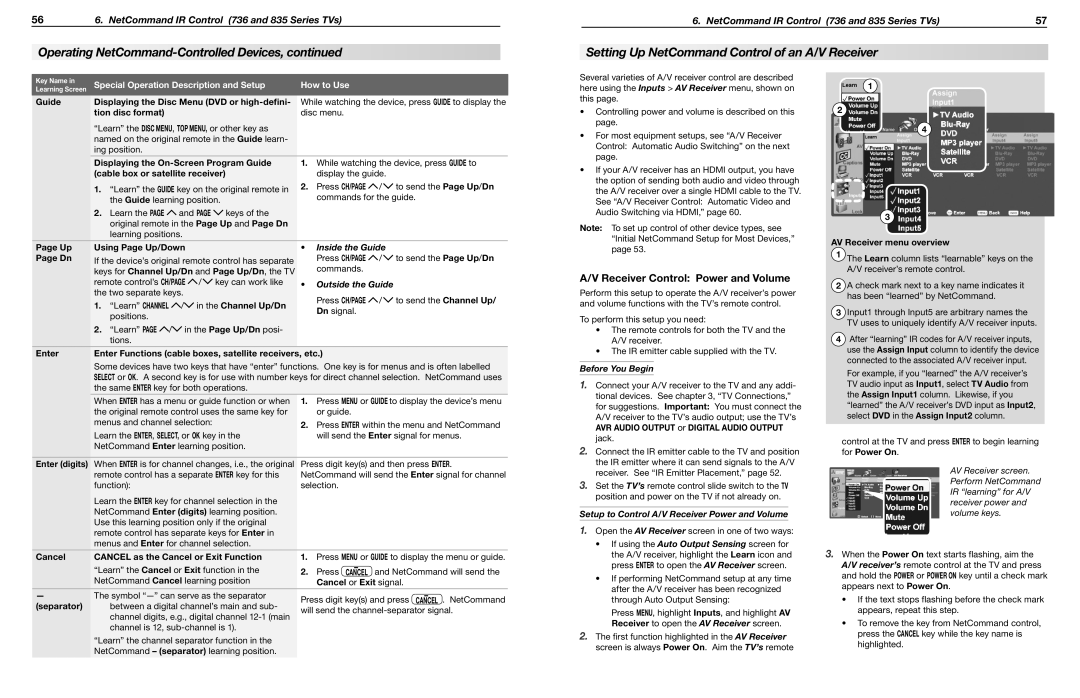
Several varieties of A/V receiver control are described here using the Inputs > AV Receiver menu, shown on this page.

Controlling power and volume is described on this page.

For most equipment setups, see “A/V Receiver Control: Automatic Audio Switching” on the next page.

If your A/V receiver has an HDMI output, you have the option of sending both audio and video through the A/V receiver over a single HDMI cable to the TV. See “A/V Receiver Control: Automatic Video and Audio Switching via HDMI,” page 60.

Note: To set up control of other device types, see “Initial NetCommand Setup for Most Devices,” page 53.

A/V Receiver Control: Power and Volume

Perform this setup to operate the A/V receiver’s power and volume functions with the TV’s remote control.

To perform this setup you need:

The remote controls for both the TV and the A/V receiver.

The IR emitter cable supplied with the TV.

Before You Begin

1.Connect your A/V receiver to the TV and any addi- tional devices. See chapter 3, “TV Connections,” for suggestions. Important: You must connect the A/V receiver to the TV’s audio output; use the TV’s AVR AUDIO OUTPUT or DIGITAL AUDIO OUTPUT jack.

2.Connect the IR emitter cable to the TV and position the IR emitter where it can send signals to the A/V receiver. See “IR Emitter Placement,” page 52.

3.Set the TV’s remote control slide switch to the TV position and power on the TV if not already on.

Setup to Control A/V Receiver Power and Volume

1.Open the AV Receiver screen in one of two ways:

If using the Auto Output Sensing screen for the A/V receiver, highlight the Learn icon and press ENTER to open the AV Receiver screen.

If performing NetCommand setup at any time after the A/V receiver has been recognized through Auto Output Sensing:

Press MENU, highlight Inputs, and highlight AV Receiver to open the AV Receiver screen.

2.The first function highlighted in the AV Receiver screen is always Power On. Aim the TV’s remote

1

2

4

3

AV Receiver menu overview

1The Learn column lists “learnable” keys on the A/V receiver’s remote control.

2A check mark next to a key name indicates it has been “learned” by NetCommand.

3Input1 through Input5 are arbitrary names the TV uses to uniquely identify A/V receiver inputs.

4After “learning” IR codes for A/V receiver inputs, use the Assign Input column to identify the device connected to the associated A/V receiver input.

For example, if you “learned” the A/V receiver’s TV audio input as Input1, select TV Audio from the Assign Input1 column. Likewise, if you “learned” the A/V receiver’s DVD input as Input2, select DVD in the Assign Input2 column.

control at the TV and press ENTER to begin learning for Power On.

AV Receiver screen. Perform NetCommand IR “learning” for A/V receiver power and volume keys.

3.When the Power On text starts flashing, aim the A/V receiver’s remote control at the TV and press and hold the POWER or POWER ON key until a check mark appears next to Power On.

If the text stops flashing before the check mark appears, repeat this step.

To remove the key from NetCommand control, press the CANCEL key while the key name is highlighted.

Page 29
Image 29
Mitsubishi Electronics WD-73735 manual Setting Up NetCommand Control of an A/V Receiver, Receiver Control Power and Volume

WD-73736, WD-65736, WD-65835, WD-73735, WD-73835 specifications

The Mitsubishi Electronics WD-73C8, WD-73735, WD-73835, WD-73736, and WD-60735 are a series of high-performance DLP televisions known for their exceptional picture quality, advanced technology, and user-friendly features. These models, mainly targeting the large-screen home entertainment segment, are designed to deliver an immersive viewing experience.

One of the standout features of these televisions is their use of DLP (Digital Light Processing) technology, which ensures high brightness levels and vibrant colors. With Mitsubishi’s advanced DLP projection system, viewers can enjoy deeper blacks and a wide color gamut, making movies and sporting events come alive.

The WD-73C8 model, with its 73-inch screen, offers a colossal viewing area, making it an ideal choice for home theaters. Its Full HD resolution of 1920x1080 ensures that image clarity is never compromised, allowing viewers to see the finest details in high-definition content.

Similar in size, the WD-73735, WD-73835, and WD-73736 models also feature a 73-inch display, while the WD-60735 comes with a 60-inch screen. All models utilize Mitsubishi’s advanced Color Management System, which provides customizable color settings and enhances overall picture quality.

Another key technology integrated into these televisions is the Reality Creation feature, which enhances the sharpness and detail of standard-definition content. This means that older movies and TV shows can be upscaled to look more vibrant and clear, providing a better experience without the need for high-resolution sources.

The internal sound system of these models is engineered to complement their impressive visuals. Equipped with powerful speakers and advanced audio technologies, they deliver a cinematic sound experience that enhances everything from action scenes to quiet dialogue.

Connectivity options abound in these Mitsubishi TVs, with multiple HDMI ports, USB inputs, and even Ethernet connectivity for streaming services. This allows users to easily link their gaming consoles, Blu-ray players, and smart devices, further enhancing the versatility of the televisions.

Overall, the Mitsubishi Electronics WD-73C8, WD-73735, WD-73835, WD-73736, and WD-60735 models position themselves as excellent choices for consumers looking to elevate their home entertainment experience, combining cutting-edge technology with user-centric design. These televisions stand as a testament to Mitsubishi’s commitment to delivering high-quality, reliable products that enrich the viewing experience.