Setting Up NetCommand Control of an A/V Receiver, continued
4. Press the key on the TV’s remote control to highlight other keys in the list. Repeat steps 2 and 3 for each addi- tional function you wish to control through NetCommand.
5.If the A/V receiver has a separate POWER OFF key,
press on the TV’s remote to highlight Power Off. Repeat steps 2 and 3 to “learn” the POWER OFF key.
6.When finished “learning” the power and volume keys, either press EXIT to watch TV or leave the AV Receiver screen open to continue with NetCom- mand setup to control switching of A/V receiver inputs.
A/V Receiver Control: Automatic Audio Switching
Perform this setup to enable the A/V receiver to switch automatically to the correct audio input when you select a device in the TV’s Input Selection menu.
To set up control of an A/V receiver you need:
•The remote controls for both the TV and the A/V receiver.
•The IR emitter cable supplied with the TV.
Two different setups are described here:
Setup 1: Automatic A/V Receiver Switching to TV Audio Input
Setup 2: Automatic A/V Receiver Switching for a device sending audio directly to the A/V receiver
Review these descriptions to find the setup needed for your equipment.
•Audio Available from TV only: Use Setup 1.
Audio from ANT 1 and ANT 2 must be sent to the A/V receiver from the TV’s DIGITAL AUDIO OUTPUT or analog AVR AUDIO OUTPUT.
Use Setup 1 to make the A/V receiver switch to its designated TV audio input when viewing these sources.
•HDMI Digital Stereo Audio: Use Setup 1
Digital stereo audio from an HDMI connection is available both in digital format (from the TV’s DIGITAL AUDIO OUTPUT) jack and in analog format (from the TV’s AVR AUDIO OUTPUT jack).
•Analog Stereo Audio: Use Setup 1.
Audio from sources with only analog stereo output (such as a VCR) can be sent either directly to the A/V receiver or through to the TV and then on to the A/V receiver.
Mitsubishi recommends you send audio through the TV as shown in the example. Setup 1 causes the A/V receiver to switch to its input designated for TV audio.
If you have a digital A/V receiver, the TV makes the audio available by converting analog audio to a digital output.
•Digital Surround Sound: Use Setup 2.
A device can send digital surround sound such as Dolby Digital or DTS directly to the A/V receiver, bypassing the TV entirely. The device might be a DVD player, cable box, or satellite receiver, and could have HDMI output. A DVD player is used in this example.
Your setup may include additional devices with digital surround sound connected directly to the A/V receiver. These devices might be a DVD player plus a cable box or satellite receiver.
Before You Begin
1.Connect your A/V devices to the TV and connect your A/V receiver to the audio outputs on the TV and the DVD player. See chapter 3, “TV Connec- tions,” for suggestions. Important: You must connect the A/V receiver to the TV’s audio output; use the TV’s AVR AUDIO OUTPUT or DIGITAL AUDIO OUTPUT jack.
2.Position NetCommand IR emitters as described in “IR Emitter Placement,” page 52.
3.Open the Inputs > AV Receiver menu.
Note: The terms Input1–Input5used in the AV Re- ceiver menu are arbitrary names used by the TV to distinguish A/V receiver inputs.
Setup 1: Automatic A/V Receiver Switching to the TV Audio Input
Most devices are set up like the VCR in this example, in which analog audio from the device is sent through the TV.
Use this setup for:
•Sources providing only analog stereo output, such as a VCR.
•Audio from ANT 1 and ANT 2
IMPORTANT
To hear audio sent from the TV to the A/V receiver, you must have:
•physically connected the TV to the A/V receiver
•selected the A/V receiver as the audio source.
Press AUDIO, then 
 to show the Speakers option, then
  to select the A/V Receiver.
•“learned” the IR codes for the A/V receiver inputs
•chosen the correct input in the NetCommand
A/V Receiver Learn screen
Setting Up NetCommand Control of an A/V Receiver, continued
7$3�XJUI� "OBMPH�"VEJP�0VUQVU
| | | | | | | | | | |
| | WJEFP | BOBMPH�BVEJP | | BVEJP�PVUQVU�GSPN� |
| | | | | 57� EJHJUBM�PS�BOBMPH |
| | | | | | | |
| | | | | | | %7% | | BVEJP� |
| | | | | | | � |
| | | 57 | PVU | | | JOQVU |
BVEJP���WJEFP | | | | 57�BVEJP� | | 57�BVEJP�JOQVU | |
| | | | | | "�7�3FDFJWFS |
| | | | |
| | | | | | |
*ODPNJOH�$PBYJBM�$BCMF� GSPN�"/5���"/5��
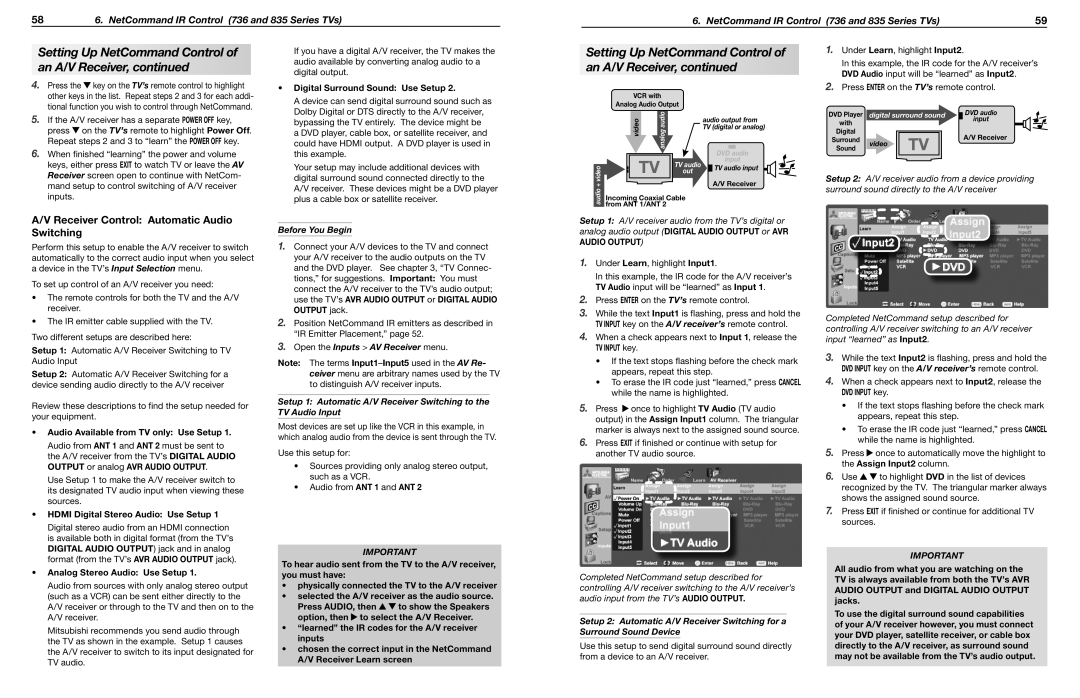
Setup 1: A/V receiver audio from the TV’s digital or analog audio output (DIGITAL AUDIO OUTPUT or AVR
AUDIO OUTPUT)
1.Under Learn, highlight Input1.
In this example, the IR code for the A/V receiver’s TV Audio input will be “learned” as Input 1.
2.Press ENTER on the TV’s remote control.
3.While the text Input1 is flashing, press and hold the TV INPUT key on the A/V receiver’s remote control.
4.When a check appears next to Input 1, release the TV INPUT key.
•If the text stops flashing before the check mark appears, repeat this step.
•To erase the IR code just “learned,” press CANCEL while the name is highlighted.
5.Press  once to highlight TV Audio (TV audio output) in the Assign Input1 column. The triangular marker is always next to the assigned sound source.
6.Press EXIT if finished or continue with setup for another TV audio source.
Completed NetCommand setup described for controlling A/V receiver switching to the A/V receiver’s audio input from the TV’s AUDIO OUTPUT.
Setup 2: Automatic A/V Receiver Switching for a Surround Sound Device
Use this setup to send digital surround sound directly from a device to an A/V receiver.
1.Under Learn, highlight Input2.
In this example, the IR code for the A/V receiver’s DVD Audio input will be “learned” as Input2.
2.Press ENTER on the TV’s remote control.
%7%�1MBZFS� | EJHJUBM�TVSSPVOE�TPVOE | | %7%�BVEJP� |
|
XJUI� | | | | | JOQVU |
| | | | |
%JHJUBM� | | | | | "�7�3FDFJWFS |
4VSSPVOE� | WJEFP | 57 | | |
| | |
4PVOE | | | |
| | | |
Setup 2: A/V receiver audio from a device providing surround sound directly to the A/V receiver
Completed NetCommand setup described for controlling A/V receiver switching to an A/V receiver input “learned” as Input2.
3.While the text Input2 is flashing, press and hold the DVD INPUT key on the A/V receiver’s remote control.
4.When a check appears next to Input2, release the DVD INPUT key.
•If the text stops flashing before the check mark appears, repeat this step.
•To erase the IR code just “learned,” press CANCEL while the name is highlighted.
5.Press  once to automatically move the highlight to the Assign Input2 column.
6.Use 
 to highlight DVD in the list of devices recognized by the TV. The triangular marker always shows the assigned sound source.
7.Press EXIT if finished or continue for additional TV sources.
IMPORTANT
All audio from what you are watching on the TV is always available from both the TV’s AVR AUDIO OUTPUT and DIGITAL AUDIO OUTPUT jacks.
To use the digital surround sound capabilities of your A/V receiver however, you must connect your DVD player, satellite receiver, or cable box directly to the A/V receiver, as surround sound may not be available from the TV’s audio output.