Manuals
/
Mitsubishi Electronics
/
Computer Equipment
/
Projector
Mitsubishi Electronics
XD20A
user manual
Dimensions, 230 mm/9.0″, Mm/7.0″, 177, 27 mm 48 mm 11 mm
Models:
XD20A
1
35
35
Download
35 pages
26.67 Kb
28
29
30
31
32
33
34
35
Troubleshooting
Specifications
Install
Timing Chart
Status indicator
Dimension
Resetting
Mouse connector
Automatic Screen Adjustment
Setting the Cinema Mode
Page 35
Image 35
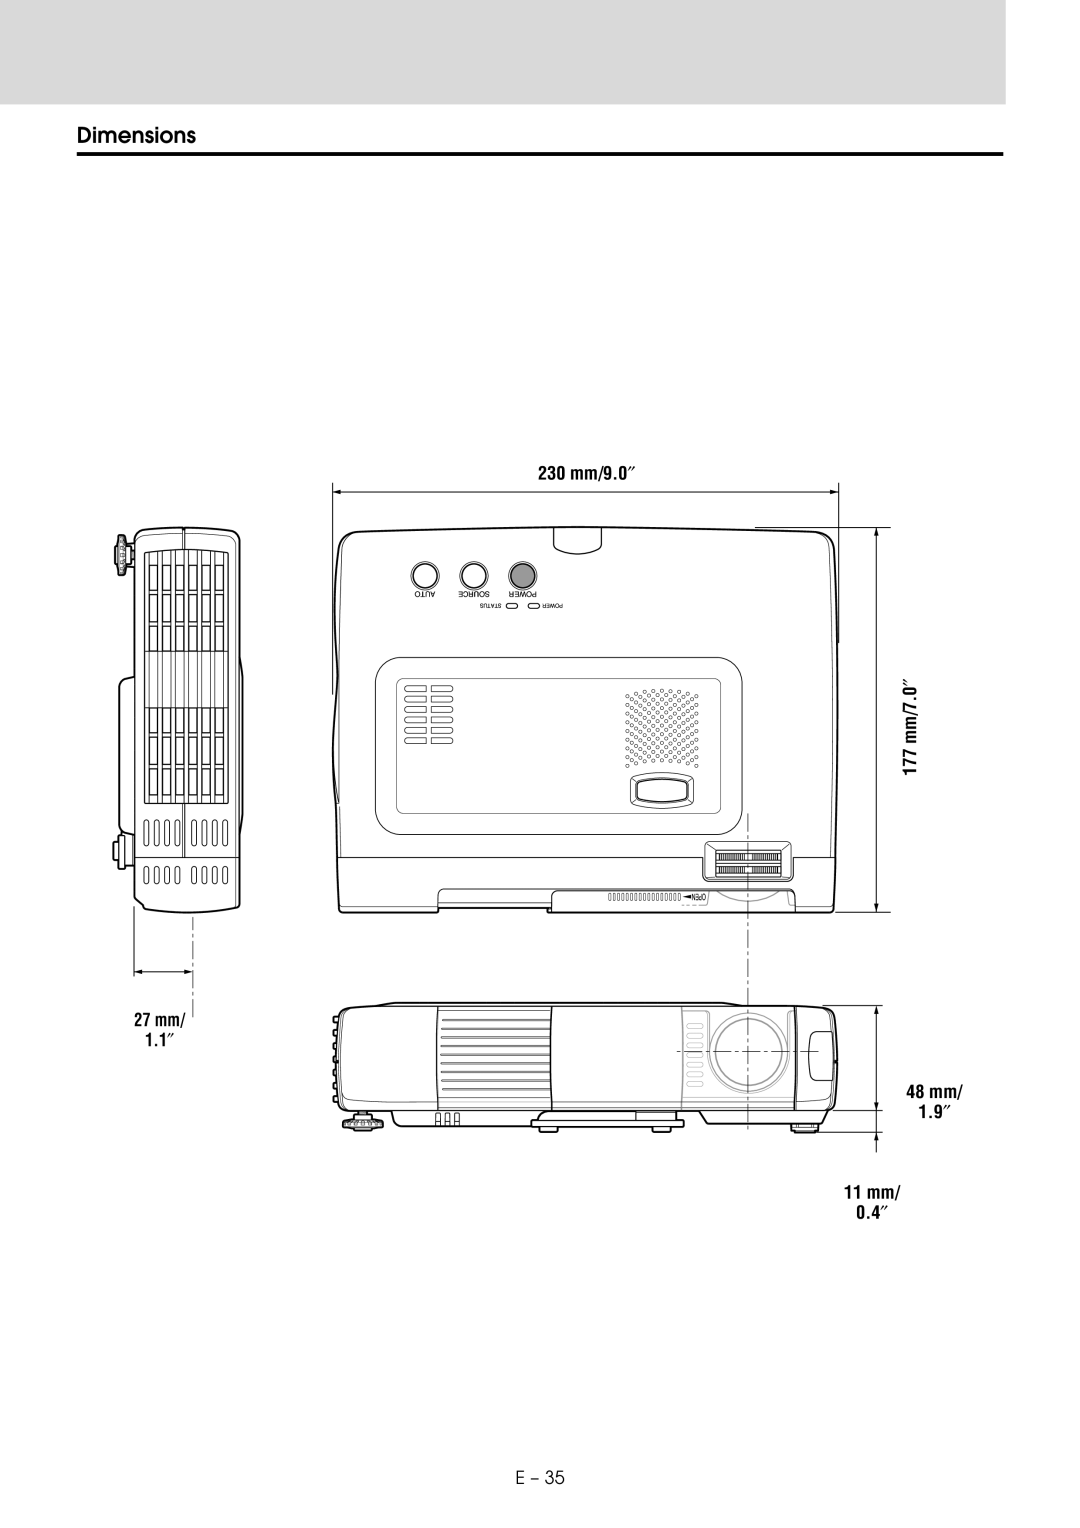
Dimensions
230 mm/9.0
″
AUTO
SOURCE
POWER
STATUS
POWER
OPEN
mm/7.0
″
177
27 mm/
1.1
″
48 mm/
1.9
″
11 mm/
0.4
″
E – 35
Page 34
Page 35
Page 35
Image 35
Page 34
Page 35
Contents
Data Projector
Power Supply
Precautions
Important Safeguards
Installation
B l e o f c o n t e n t s
RGB cable Audio cable 3.3 ft
Power cable mains lead 1.8 m/5.9 ft
A t u r e s
E c k i n g t h e P p l i e d a c c e s s o r i e s
Quick Start Guide
Remote control effective range
E p a r i n g t h e M o t e c o n t r o l
Inserting the batteries
Bottom
R t s a n d c o n t r o l s
Top, front and side panel view
Built-in Security Slot
Audio jack 10, 11, 12 RGB/YCbCr connector 11
Mouse connector
Rear and side panel view
Mute button
Enter button 17 Infrared transmitter
Auto button Freeze button
Screen size
Installation
Installation Guidelines normal installation
Screen height
Connection to the S-VIDEO jack of the unit
N n e c t i n g v i d e o e q u i p m e n t
Connection to the Video jack of the unit
Rear panel jacks of this device
Connection to the RGB/YCbCr connector
N n e c t i n g a P C o r M a c i n t o s h
Macintosh
Changing the computer’s video resolutions
Windows 98/Windows
Windows
Turn on the connected source computer, VCR, DVD player, etc
Connect the power cord
Adjust the position and height of the unit
I n g t h e u n i t
Case of RGB input, adjust the video of the connected PC
I n g t h e u n i t N t i n u e d
After using the unit
IBM PS/2 Mouse Port Connection
Remote control mouse functions
USB Port Connection
Freezing animated images
Automatic Screen Adjustment
Adjusting the Volume
Keystone Adjustment
Press the desired portion of the cursor key
To move to the desired portion of the enlarged picture
Enlarging the picture
Screen Reduction
Common menu
N u S t r u c t u r e
Normal menu RGB input Advanced menu
To close the menu
Press the cursor / keys to adjust the sharpness
J u s t i n g t h e p i c t u r e e l e m e n t s
To select other menu names
Timing Chart
If no images appear during setting
Adjusting Clock Frequency and Phase
Adjusting the position of the image
S e t t i n g t h e L a m p H o u r s o f U s a g e
Resetting
Resetting the time the hours of lamp usage
S e t t i n g
Selecting the Color System
Setting the Cinema Mode
Adjusting Color Balance
T t i n g N a r r o w I m a g e s a d v a n c e d M e n u
Setting Filter
Setting the RGB/YCbCr connector
Setting the Display Frame
Selecting the Background
Setting the partial display position
I t i a l S e t t i n g s
Audio Muting
Selecting a Projection Type
Auto Source Settings
Using the Power Saving Function
T t i n g t h e M e n u
Troubleshooting
Status Light Messages
Status indicator
Step
Lamp cartridge replacement procedure
P l a c i n g t h e l a m p
R t r i d g e
Electrical
Specification s
Sub Pin Assignments
Optical
177
Dimensions
230 mm/9.0″
Mm/7.0″
Top
Page
Image
Contents