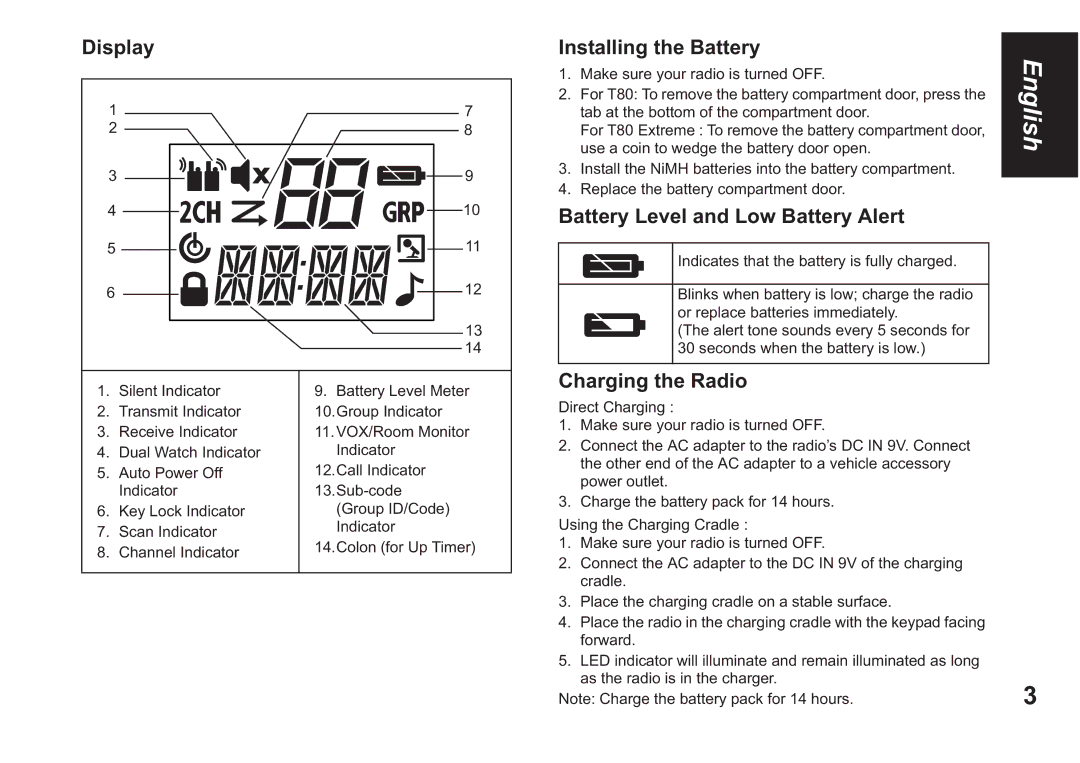
Display |
| ||
1 |
| 7 | |
2 |
| 8 | |
3 |
| 9 | |
4 |
| 10 | |
5 |
| 11 | |
6 |
| 12 | |
|
| 13 | |
|
| 14 | |
1. | Silent Indicator | 9. Battery Level Meter | |
2. | Transmit Indicator | 10.Group Indicator | |
3. | Receive Indicator | 11.VOX/Room Monitor | |
4. | Dual Watch Indicator | Indicator | |
5. | Auto Power Off | 12.Call Indicator | |
| Indicator | ||
6. | Key Lock Indicator | (Group ID/Code) | |
7. | Scan Indicator | Indicator | |
14.Colon (for Up Timer) | |||
8. | Channel Indicator | ||
| |||
Installing the Battery
1.Make sure your radio is turned OFF.
2.For T80: To remove the battery compartment door, press the tab at the bottom of the compartment door.
For T80 Extreme : To remove the battery compartment door, use a coin to wedge the battery door open.
3.Install the NiMH batteries into the battery compartment.
4.Replace the battery compartment door.
Battery Level and Low Battery Alert
Indicates that the battery is fully charged.
Blinks when battery is low; charge the radio or replace batteries immediately.
(The alert tone sounds every 5 seconds for 30 seconds when the battery is low.)
Charging the Radio
Direct Charging :
1.Make sure your radio is turned OFF.
2.Connect the AC adapter to the radio’s DC IN 9V. Connect the other end of the AC adapter to a vehicle accessory power outlet.
3.Charge the battery pack for 14 hours.
Using the Charging Cradle :
1.Make sure your radio is turned OFF.
2.Connect the AC adapter to the DC IN 9V of the charging cradle.
3.Place the charging cradle on a stable surface.
4.Place the radio in the charging cradle with the keypad facing forward.
5.LED indicator will illuminate and remain illuminated as long as the radio is in the charger.
Note: Charge the battery pack for 14 hours.
English
3
