Using A Tabletop Or Cart

1.Place your LCD projector on a flat level surface at the optimal distance from the screen or wall so you realize the size image you want. (Avoid having bright room lighting or sun light directly on the screen or wall where you'll be projecting the image.)

2.Connect the power cable, remove the lens cap and turn the projector on. (If no input signal is available, the projector will display a background image.)

3.Ensure that the projector is centered to the screen.

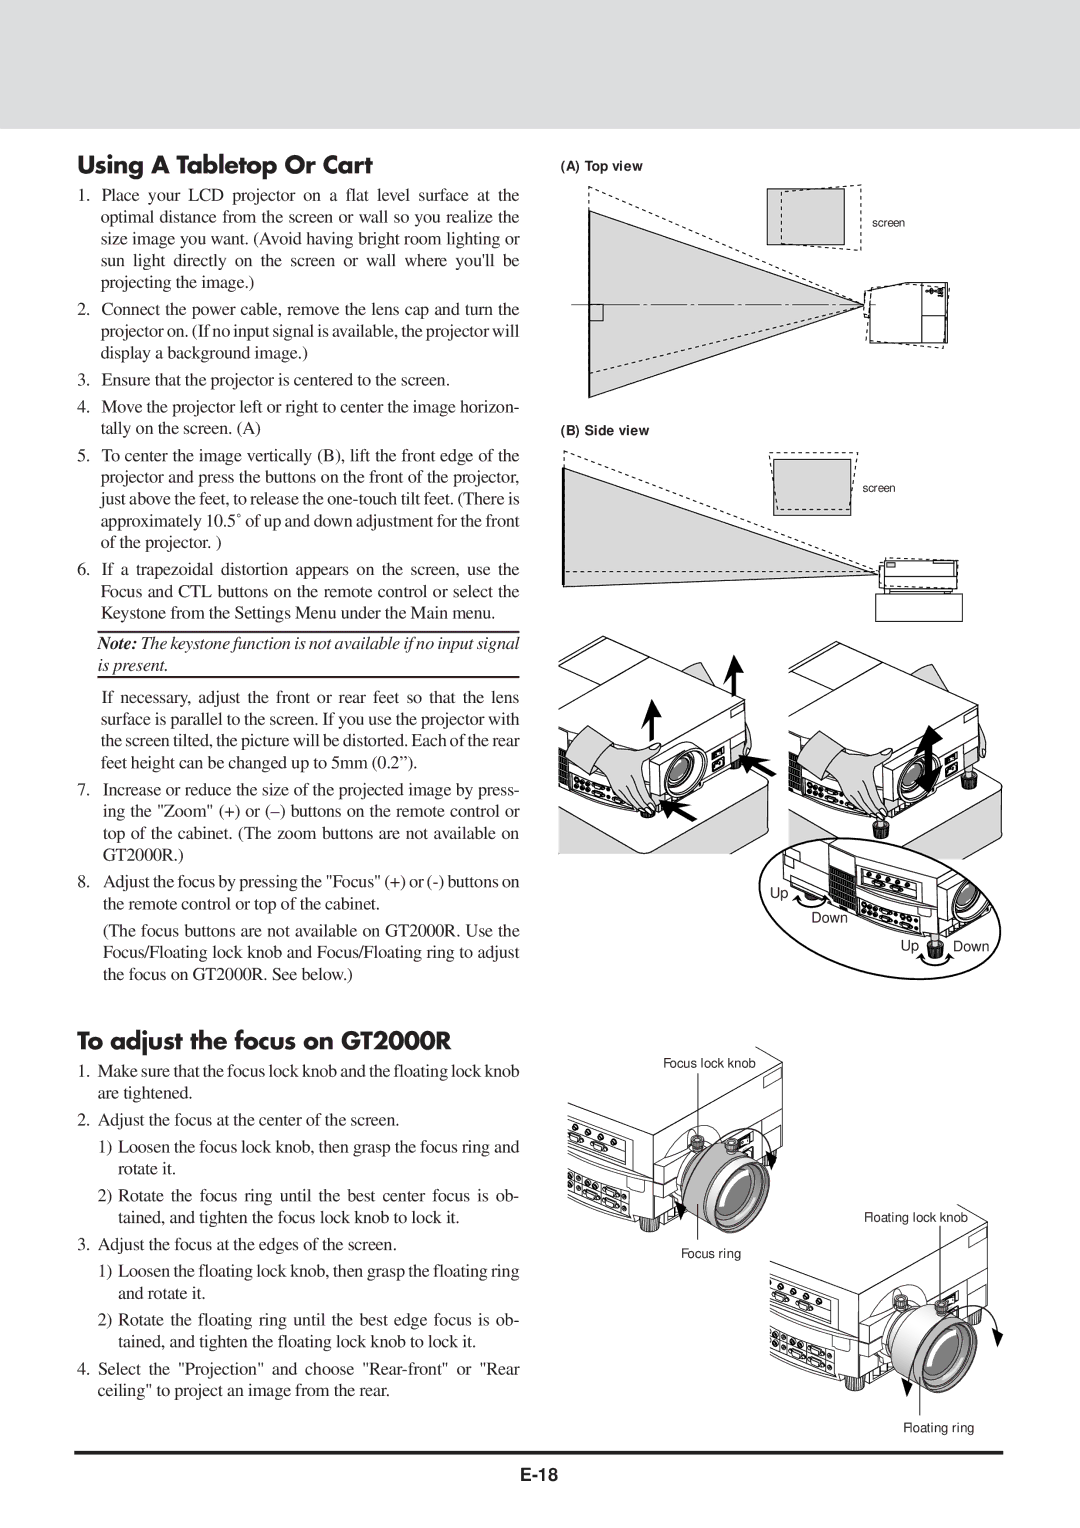
4.Move the projector left or right to center the image horizon- tally on the screen. (A)

5.To center the image vertically (B), lift the front edge of the projector and press the buttons on the front of the projector, just above the feet, to release the one-touch tilt feet. (There is approximately 10.5˚ of up and down adjustment for the front of the projector. )

6.If a trapezoidal distortion appears on the screen, use the Focus and CTL buttons on the remote control or select the Keystone from the Settings Menu under the Main menu.

Note: The keystone function is not available if no input signal is present.

If necessary, adjust the front or rear feet so that the lens surface is parallel to the screen. If you use the projector with the screen tilted, the picture will be distorted. Each of the rear feet height can be changed up to 5mm (0.2”).

7.Increase or reduce the size of the projected image by press- ing the "Zoom" (+) or (–) buttons on the remote control or top of the cabinet. (The zoom buttons are not available on GT2000R.)

8.Adjust the focus by pressing the "Focus" (+) or (-) buttons on the remote control or top of the cabinet.

(The focus buttons are not available on GT2000R. Use the Focus/Floating lock knob and Focus/Floating ring to adjust the focus on GT2000R. See below.)

(A) Top view

(B) Side view

screen

screen

Up

Down

Up Down

To adjust the focus on GT2000R

1.Make sure that the focus lock knob and the floating lock knob are tightened.

2.Adjust the focus at the center of the screen.

1)Loosen the focus lock knob, then grasp the focus ring and rotate it.

2)Rotate the focus ring until the best center focus is ob- tained, and tighten the focus lock knob to lock it.

3.Adjust the focus at the edges of the screen.

1)Loosen the floating lock knob, then grasp the floating ring and rotate it.

2)Rotate the floating ring until the best edge focus is ob- tained, and tighten the floating lock knob to lock it.

4.Select the "Projection" and choose "Rear-front" or "Rear ceiling" to project an image from the rear.

Focus lock knob

IN

AC

Floating lock knob

Focus ring

IN

AC

Floating ring

E-18

Page 18
Image 18
NEC GT2000, GT2000R user manual Using a Tabletop Or Cart, To adjust the focus on GT2000R

GT2000, GT2000R specifications

The NEC GT2000 and GT2000R are renowned projectors that have established themselves in the realm of high-performance visual equipment, catering primarily to the needs of businesses and educational institutions. These projectors are celebrated for their exceptional image quality, versatility, and advanced features, making them a popular choice among users seeking reliability and performance.

One of the primary features of the GT2000 series is its high brightness capability. With a brightness of up to 2,500 ANSI lumens, these projectors can deliver clear and vibrant images even in well-lit environments, ensuring that presentations and lectures maintain their visual integrity regardless of ambient light conditions. This makes them ideal for large conference rooms and classrooms where visibility is crucial.

The GT2000 series also boasts impressive resolution specifications. The GT2000 offers a native resolution of XGA (1024x768 pixels), while the GT2000R enhances this to a WXGA (1280x800 pixels), providing a wider aspect ratio and higher detail for images. This improved resolution is particularly beneficial for displaying detailed graphics, charts, and videos, making them suitable for a variety of presentation types.

In terms of connectivity, the GT2000 and GT2000R projectors are equipped with multiple input options including VGA, composite video, and audio inputs. This versatility allows for seamless integration with various devices, such as laptops, DVD players, and even mobile devices, further enhancing their usability in different settings.

Another noteworthy characteristic of the GT2000 series is its advanced color reproduction technology. NEC employs a 3LCD technology in these projectors, which ensures vibrant colors and deep blacks, resulting in images that are both engaging and lifelike. This technology minimizes the possibility of color distortion, offering consistent and accurate color performance.

Users will also appreciate the long lamp life offered by the GT2000 and GT2000R, with lamps typically lasting up to 5,000 hours in eco mode. This not only reduces maintenance costs but also enhances the overall efficiency of the projector.

In conclusion, the NEC GT2000 and GT2000R projectors are equipped with a robust set of features, from high brightness and resolution to advanced connectivity options and color accuracy. Their durability and reliability make them ideal for professional and educational environments, meeting the demands of users who require high-quality projections for effective communication and learning.