User’s Manual
AVC Patent Portfolio License
Trademark Information
Page
Turn off in the event of malfunction
For Your Safety
Do not disassemble
Handle the camera strap with care
Iii
For Your Safety
Observe caution when handling the battery
Use appropriate cables
Observe caution when using the flash
Handle moving parts with care
CD-ROMs
Interface Cables
Modifications
Nikon Inc Walt Whitman Road Melville, New York
Tel
Following apply only to users in European countries
Table of Contents
Viii
Table of Contents
104
102
105
106
179
152
175
About This Manual
Use Only Nikon Brand Electronic Accessories
Information and Precautions
Life-Long Learning
Before Taking Important Pictures
Disposing of Data Storage Devices
Information and Precautions
Camera Body
Parts of the Camera
Built-in flash raised
104
Parts of the Camera
21 22
Changing the Angle of the Monitor
Attaching the Camera Strap and Lens Cap
Raising and Lowering the Built-in Flash
Lens Cap
Remove the lens cap before you shoot a picture
Shooting
Monitor
127
Shooting mode
Playback
Basic Operations
Command Dial
For Shooting
For Playback
For the Menu Screen
Multi Selector
Basic Operations
Compensation
DButton
Switching Between Tabs
Help Displays
Diopter Adjustment of Electronic Viewfinder
Xmonitor Button
Monitor
Sdisplay Button
Open the battery-chamber/memory card slot cover
Inserting the Battery
Insert the battery
Close the battery-chamber/memory card slot cover
Removing the Battery
Be sure that the power-on lamp and the monitor are off
Charging the Battery
Connecting the Cable
Prepare the Charging AC Adapter EH-68P
Plug the Charging AC Adapter into an electrical outlet
Charging the Battery
Charging Using Computer or Battery Charger
Standby Mode Auto Power Off
Lens Error
Turning On and Off the Camera
Again
Press the power switch to turn on the camera
Setting Display Language, Date and Time
Choose Yes and press the kbutton
Daylight Saving Time
Changing the Date and Time and Imprinting the Date
Setting Display Language, Date and Time
Edit the date
Removing Memory Cards
Inserting Memory Cards
Insert the memory card
Inserting the Memory Card Correctly
Use only Secure Digital memory cards
Write Protect Switch
Formatting a Memory Card
Rotate the mode dial to a
Turn the Camera On and Select AAuto Mode
Remove the lens cap and press the power switch
Turn the Camera On and Select AAuto Mode
Indicators Displayed in AAuto Mode
Functions Available in AAuto Mode
Vibration Reduction
Frame a Picture
Using the Electronic Viewfinder
Ready the camera
Frame the picture
Digital Zoom
Using the Zoom
Frame a Picture
Digital Zoom and Interpolation
Focus and Shoot
When the button is pressed halfway, the camera focuses
Press the shutter-release button halfway
Press the shutter-release button the rest of the way down
During Recording
Focus and Shoot
Autofocus
Focus Lock
When Cis displayed, pictures stored in the internal memory
Viewing Pictures Playback Mode
Viewing and Deleting Pictures
Deleting Pictures
Deleting the Last Picture Taken While in Shooting Mode
Options Available in Playback Mode
Pressing the cButton to Turn on the Camera
Viewing Pictures
Auto with Red-eye Reduction
Using the Flash
Auto Flash fires automatically when lighting is poor
Press mflash mode on the multi selector
Setting the Flash Mode
Using the Flash
Press the mflash pop-up button
Flash Mode Setting
Flash Indicator
Press nself-timer on the multi selector
Taking Pictures with the Self-Timer
Self-timer menu is displayed
When the shutter is released, the self-timer turns OFF
Focus Modes Available in Each Shooting Mode
Using Focus Mode
Focus Mode Setting
Applied Simultaneously A96 for more information
Press pfocus mode on the multi selector
Setting the Focus Mode
Using Focus Mode
Macro Close-up
Press Hor Ion the multi selector to adjust the focus
Using Manual Focus
Press the kbutton to check the field of view
Press the kbutton
Using Exposure Compensation
Adjusting the Brightness Exposure Compensation
Press oexposure compensation on the multi selector
Press the shutter-release button to take the picture
Selecting a Shooting Mode Mode Dial
Shooting Suited for the Scene
Rotate the mode dial to
Frame the subject and take the picture
Press the mflash pop-up button to raise
Night Landscape Shooting in Scene Auto Selector Mode
Focusing in Scene Auto Selector Mode
Functions Available in Scene Auto Selector Mode
Shooting Suited for the Scene
Setting the Scene Mode
Selecting Scenes for Shooting Scene Mode
Rotate the mode dial to y
Image Quality and Image Size
Digital zoom is not available
Features
Other settings can be selected
Party/indoor
Shoot pictures with the built-in flash raised
Camera focuses on the subject in the center of the frame
Other settings can be selected More on Shooting
F5.6
MFireworks show
PPanorama assist
Backlit scene HDR
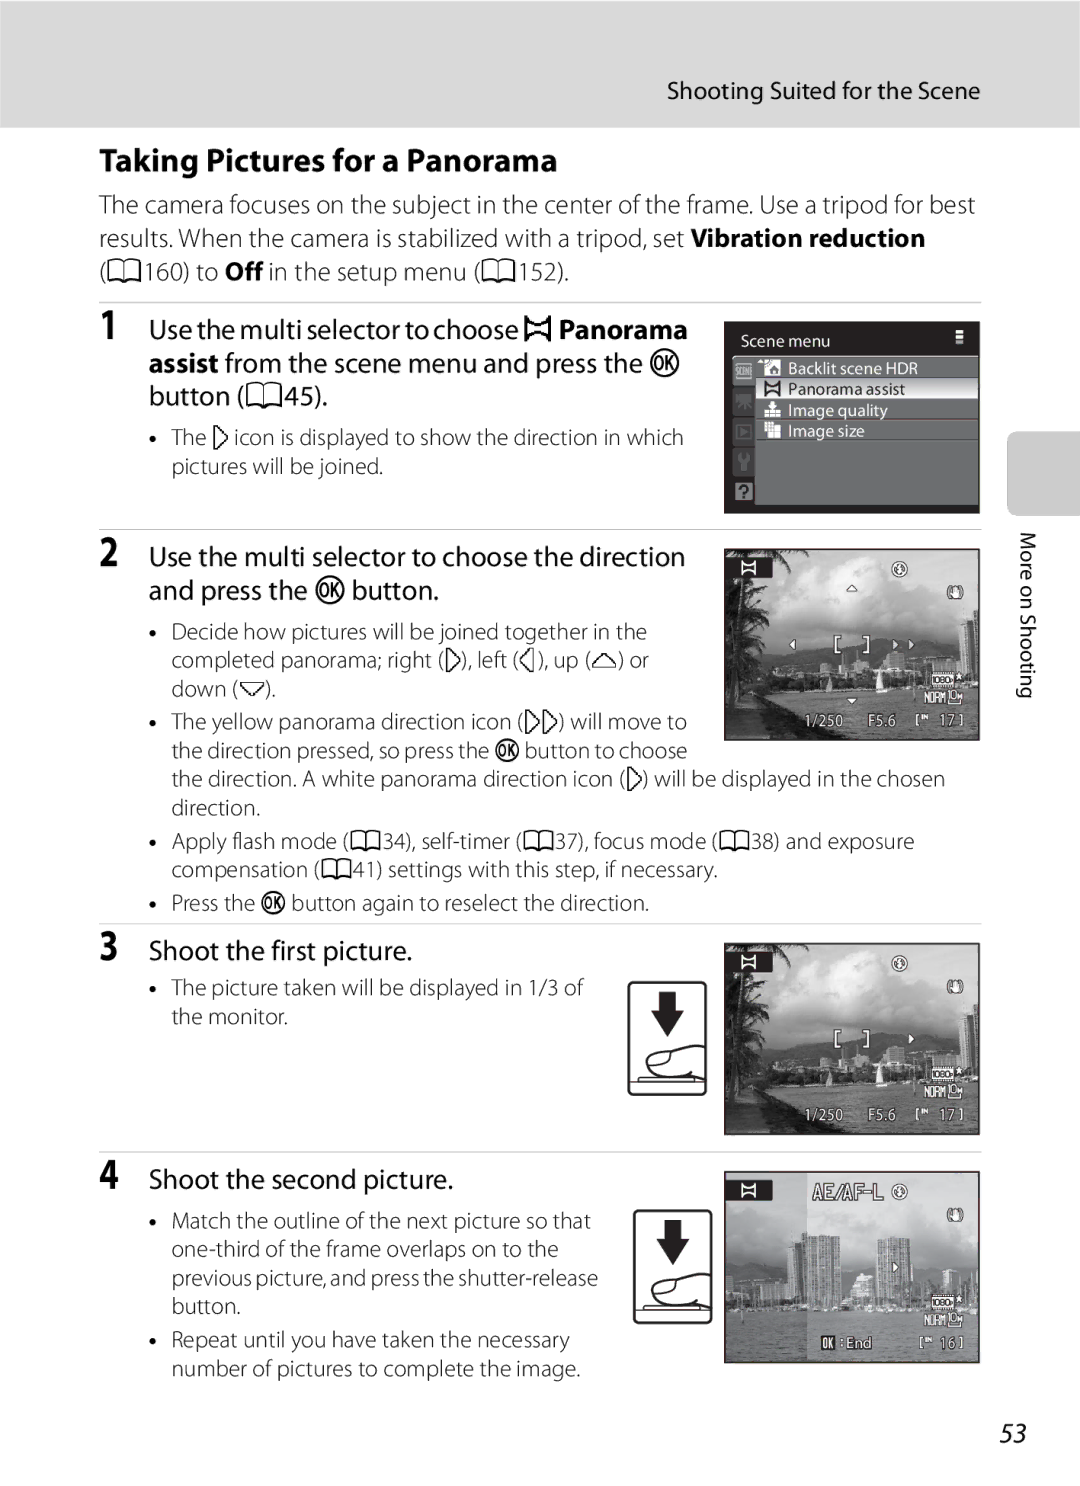
Shoot the first picture
Taking Pictures for a Panorama
Shoot the second picture
Picture taken will be displayed in 1/3 of the monitor
Rexposure lock Indicator
Press the kbutton when shooting is completed
Panorama Assist
Panorama Maker
Camera enters smart portrait mode
Rotate the mode dial to Fsmart portrait
Shutter is automatically released
Point the camera at the subject
Auto Power Off When Using Smile Timer Standby Mode
Taking Pictures of Smiling Faces Smart Portrait Mode
Functions Available in Smart Portrait Mode
Finish shooting
Smart Portrait Menu
Smile timer and Blink proof cannot be used simultaneously
Smile timer
Taking Pictures of Smiling Faces Smart Portrait Mode
Select a subject
Rotate the mode dial to ssubject tracking
Usable Functions in Subject Tracking Mode
Focusing on a Moving Subject in Subject Tracking Mode
Subject Tracking Mode
Subject Tracking Menu
Camera enters sport continuous Mode
Rotate the mode dial to dsport continuous
Frame the subject and shoot
More on
Shooting with a High-Speed Burst Sport Continuous Mode
Functions Available in Sport Continuous Mode
Sport Continuous Menu
Shooting with a High-Speed Burst Sport Continuous Mode
Images recorded
Pre-shooting Cache
Press down halfway
Functions Available in A, B, C and DModes
Setting the Exposure for Shooting A, B, C, DModes
C, D Modes
Shutter Speed and Aperture
Setting the Exposure for Shooting A, B, C, D Modes
Fast shutter speed 1000 s Slow shutter speed 30 s
Large aperture
Flexible Program
Programmed Auto Mode
Rotate the mode dial to B
Shutter-Priority Auto Mode
BShutter-Priority Auto Mode
Focus and shoot
Rotate the mode dial to C
Aperture-Priority Auto Mode
Aperture-Priority Auto Mode
Set the aperture value and shoot pictures
Exposure display
DManual Mode
Press the multi selector Kto activate the aperture setting
Range auto, ISO sensitivity will be fixed at ISO
Rotate the command dial to choose an aperture value
Shooting Options Shooting Menu A, B, C, DModes
Shooting Options Shooting Menu A, B, C, D Modes
Displaying the Shooting Menu
Functions that Cannot be Applied Simultaneously
Navigating the Camera Menu
Image Quality
Image Size
Number of Exposures Remaining
Printing Images of Size
Optimize Image
Optimize Image
Contrast Control contrast
Playback mode
Customizing Image Enhancement Options Custom
W + Color
Shooting in Black-and-White
Image sharpening, and Monochrome filter effects
White Balance
BPreset manual, then press the kbutton
Preset Manual
Choose Measure
Press the kbutton to measure the white balance value
Minimum shutter speed
ISO Sensitivity
ISO sensitivity
Is known as Metering Choose how the camera meters exposure
Metering
Metering Area
Spot
BSS
Continuous
Shooting Pictures in Continuous H or Continuous L
Interval Timer Shooting
Press the dbutton
Camera returns to shooting mode
30 s 600 images Min 300 images Min 60 images Min 30 images
On Shooting
±1.0
Auto Bracketing
±0.7
Face priority
AF-Area Mode
Focus area
Monitor’s focus-area selection screen, and shoot
Shooting with Face Priority
Shot while Continuous a 86 or Auto bracketing a 89 was set
Press the shutter-release button all the way down to shoot
Choose how the camera focuses
Autofocus Mode
Flash Exp. Comp
Distortion Control
Noise Reduction
Active D-Lighting
Off default setting Active D-Lighting is not applied
Active D-Lighting
Active D-Lighting Versus D-Lighting
Functions that Cannot be Applied Simultaneously
AF area mode Digital zoom
Setting Description Continuous/Auto
Bracketing A79
A164
Basic Settings
Using MUser Setting Mode
Clock battery
Shooting menu
Rotate the mode dial to the desired exposure mode
Save the Settings in M
Change to a frequently used setting Press the dbutton
Using M User Setting Mode
100
Resetting Saved Settings
101
Operations in Full-Frame Playback
Operations in Full-Frame Playback
Sequence Playback
Continuous Playback of Pictures in a Sequence
Perform Playback Zoom for Pictures in a Sequence
103
Deleting Pictures in a Sequence
Following operations can be performed in thumbnail playback
Viewing Multiple Pictures Thumbnail Playback
104
105
Calendar display
Viewing Multiple Pictures Thumbnail Playback
Icons on the Thumbnails
Taking a Closer Look Playback Zoom
Pictures Taken Using the Face-Priority Function
106
If more than one face was detected, the picture will be
Displaying the Playback Menu
Playback Options Playback Menu
107
Following options are available in playback menu
Choose the pictures up to a maximum
Choose Select images and press the k
Playback Options Playback Menu
Number of copies up to nine per picture
Date imprint
109
Deleting All Print Orders
Use the multi selector to choose Start
Slide Show
Slide show begins
Choose End or Restart
111
Delete Deleting Multiple Pictures
Delete a picture. Multiple pictures can also be deleted
Press the dbutton McPlayback menu A107 McDelete
Press the multi selector Jor Kto choose the desired picture
Selecting Pictures
112
Erase selected images in Delete A111
Press Hor Ito select on or OFF or the number of copies
Protect
Press the kbutton to apply picture selection
113
Hide Image
Rotate Image
114
Rotate Counterclockwise
Select a copy option and press the kbutton
Copy Copying Between the Internal Memory and Memory Card
115
Copy screen and press the kbutton
Choose Key Picture
Sequence Display Options
116
Memory contains no images. Message
Recording Voice Memos
Voice Memos Recording and Playback
Playing Voice Memos
Deleting Voice Memos
Picture Editing Functions
Picture Editing Functions
119
Restrictions on Picture Editing
Original Pictures and Edited Copies
Quick Retouch Enhancing Contrast and Saturation
Editing Pictures
Editing
Pictures
Editing Pictures
Lighting Enhancing Brightness and Contrast
121
122
Skin Softening Making Skin Appear Smoother
123
Confirm the results
Button
Small Picture Resizing Pictures
Black Border
Black Border Adding a Black Border to a Picture
125
Refine copy composition
Crop Cutting Out Part of a Picture
Image Size
New picture, containing only the portion visible
127
Recording Movies
Recording Movies
128
Functions Available in Movie Recording
129
130
Turn on the camera and rotate the movie mode switch to HS
Movie
Recording and Playback
Starting Recording with HS Movie
131
HS Movies
Displaying the Movie Menu
Movie Menu
132
Options below can be set in the movie menu
133
Movie Options
134
HS Movie Options
Open with HS Footage Check Box
Maximum Movie Length
Autofocus Mode during Movie Shooting
135
136
Electronic VR
Wind Noise Reduction
137
Movie Playback
Deleting Movie
When connecting using the supplied audio/video cable
Connecting to a TV
When connecting using the optional Hdmi cable
Turn off the camera Connect the camera to the TV
When Nothing Appears on the TV
Connecting to a TV
Tune the television to the video channel
Hold down the cbutton to turn on the camera
Before Connecting the Camera
Connecting to a Computer
Install the Software
Compatible Operating Systems
Connecting the USB Cable
Connecting to a Computer
Transferring Pictures from a Camera to a Computer
141
142
Start Nikon Transfer installed on the computer
Charging the Battery
Disconnecting the Camera
143
Charging A145
144
145
Charging While Connecting to a Computer
Power-on Lamp
Printing Pictures
Connecting to a Printer
Connecting to Televisions
Turn off the camera Turn on the printer
Connecting the Camera and Printer
Camera turns on automatically
147
Choose Copies and press the kbutton
Printing Pictures One at a Time
148
Choose the number of copies up to nine
Choose the desired paper size and press Button
Printing Multiple Pictures
Printing starts
Use the multi selector to choose Paper size
150
Choose the desired paper size and press the kbutton
Paper Size
151
Print all images
Current print/total number of prints
152
Setup Menu
Setup menu contains the following options
153
Displaying the Setup Menu
154
Press the dbutton MzSetup menu A153 MWelcome screen
Welcome Screen
Date
Setting the Travel Destination Time Zone
Choose x Travel destination and press
155
Press Jor Kto choose the travel destination time zone
Press K
Home Time Zone
Imprinting the Date on Pictures
Time Zones
157
Change the settings for the options below
Monitor Settings
Press the dbutton MzSetup menu A153 MMonitor settings
158
Off default setting Date Date and time
Press the dbutton MzSetup menu A153 MDate imprint
Date Imprint
159
Off Vibration reduction is not enabled
Press the dbutton MzSetup menu A153 MVibration reduction
Vibration Reduction
Compensating Movies with Electronic VR
161
162
Press the dbutton MzSetup menu A153 MMotion detection
Motion Detection
163
AF Assist
Red-eye reduction
Digital Zoom
Enable or disable digital zoom
Press the dbutton MzSetup menu A153 MDigital zoom
Adjust the following sound settings
Sound Settings
Canceling Standby Mode
Auto Off
Formatting the Internal Memory
Format Memory/Format Card
Formatting Memory Card
166
167
TV Settings
Language
Charge by Computer
Press the dbutton MzSetup menu A153 MCharge by computer
Off default setting Blink warning does not take effect
Press the dbutton MzSetup menu A153 MBlink warning
Blink Warning
169
170
Operating the Did someone blink? Screen
Select the face to be
Press the kbutton or the shutter-release button
171
Reset All
Movie Menu
172
Shooting Menu
Custom of Black-and-white in Optimize image
Option Default value Paper size A148 Slide show A110
Setup Menu
173
Others
Firmware Version
Reset file numbering
174
Displays the current camera firmware version
175
Caring for the Camera
Caring for the Camera
Battery
176
Do not use alcohol, thinner, or other volatile chemicals
Cleaning
177
178
Nikon-authorized service representative
Storage
179
Optional Accessories
Approved Memory Cards
Optional Accessories
180
Contact the manufacturer for details on the above cards
181
File and Folder Names
File and Folder Names
182
183
Error Messages
184
Error Messages
185
186
187
Printer error out of ink Kbutton to resume printing
Select Cancel and press the k
Display, Settings and Power Supply
Troubleshooting
Problem Cause/Solution
188
189
Troubleshooting
Electronically Controlled Cameras
Shooting
190
191
192
When flash is set to V auto with red-eye reduction
193
194
Nikon Coolpix P100 Digital Camera
Specifications
195
196
Specifications
Specifications
Rechargeable Li-ion Battery EN-EL5
Charging AC Adapter EH-68P/EH-68P AR
77 F
198
Supported Standards
Aperture-priority mode 66, 70 k apply selection button
Symbols
Thumbnail display 104 M User setting mode
Battery-chamber/memory card slot cover
Night landscape j
Flash exposure compensation 93 Flash indicator
Index
Playback 32, 101, 104, 105, 106, 117, 137 Playback menu
Smile timer
Sunset h
Night portrait e 47 Nikon Transfer 141 Noise reduction
202
Page
FX0B0211