Shop online at
16-Bit, 200-KHz PCI Data Acquisition Boards
User’s Guide
OMB-DAQBOARD-500 Series
For immediate technical or application assistance
OMEGAnet Online Service omega.com
Internet e-mail info@omega.com
Servicing North America
Warnings, Cautions, Notes, and Tips
Specifications and Calibration
⇒ Programs ⇒ Omega DaqX Software
6 - Specifications Glossary
Table of Contents
OMB-DAQBOARD-500 Series, Installation Guide 1 - Introduction
3 - Configuration
This product requires one of the following Operating Systems
Windows Windows XP
Reference Note
OMB-DAQBOARD-500 Series
Installation Guide
DaqView/500 Authorization Code
Reference Notes
Step 1 - Install Software
IMPORTANT Software must be installed before installing hardware
Installation, A Pictorial Overview
2. Remove the PC’s cover. Refer to your PC Owner’s Manual as needed
Step 2 - Install Boards in available PCI Bus-slots
IMPORTANT Bus Mastering DMA must be Enabled
9. Secure the board by inserting the rear-panel adapter-plate screw
Accessing the DaqBoard/500 Properties Tab
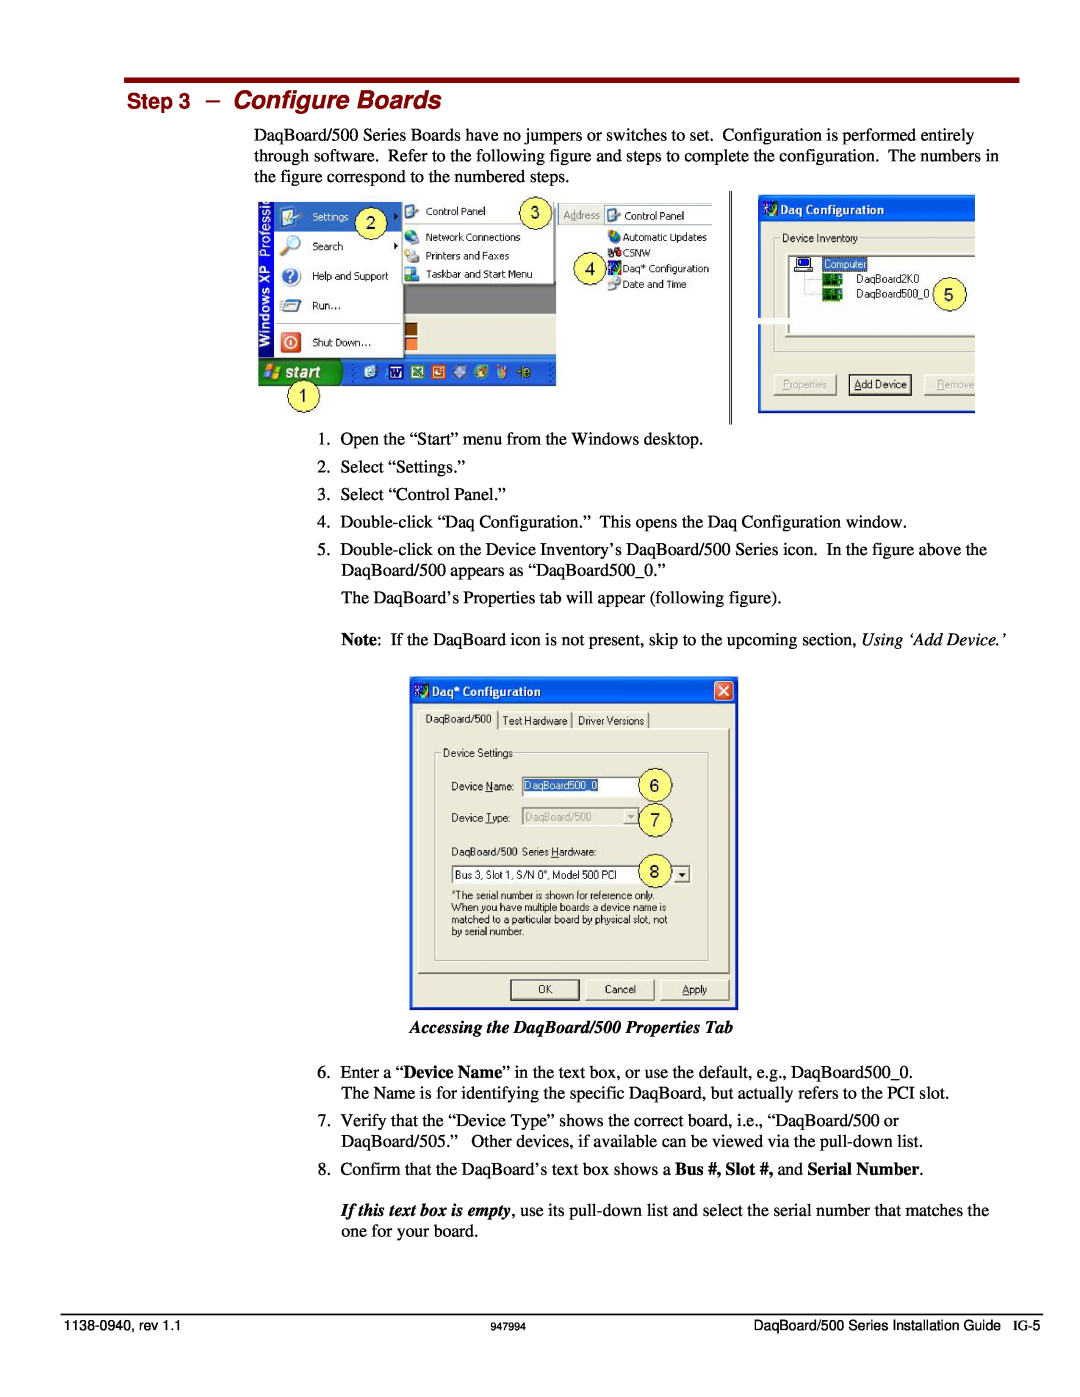
Step 3 - Configure Boards
Test Hardware Tab
Using “Add Device”
Step 4 - Test Hardware
Basic Information
Introduction
DaqBoard/500 Series User’s Manual
Block Diagram
DaqBoard/500 Series Block Diagram
Digital I/O
Board Features
Timer 0 and Timer
Analog I/O
947294
Overview
Connections and Pinouts
Power
68-Pin SCSI Type III Pinout
Standard 68-Pin SCSCI Type III, Socket Female Connector with Orb
Signal
HI + Pin #
Signal Definitions
Analog Input Channels
Differential Channels, Pin Reference
Clocks, Triggers, Counters, and Timers
Ground Lines
Power Line
2-6 Connections & Pinouts
TB-100 Terminal Connector Option
Screw Terminals for TB2 Side
Screw Terminals for TB1 Side
HI +
Connecting User Wiring
External Connections
Differential Channels Screw Terminal Reference
Single-Ended
Signal Types
Choosing A/D Input Configuration
Single-Ended Configuration
Differential Configuration for Grounded Sources
Differential DIFF
Differential for Grounded Signal Sources
Differential Configuration for Floating Sources
Differential for Floating Signal Sources
If the Input Signal is DC Coupled
If the Input Signal is AC Coupled
ADC Ranges
Configuration
Configuration through Software
Analog Input Configuration
Microvolt Resolution
DAC Ranges
DAC OUTPUT DaqBoard/500 DAC Range Resolution
Range Configuration
Drivers for Third-party, Icon-driven Software …… DaqCOM Driver ……
Software and Board Operation
Out-of-theBoxTM Software
Overview …… Out-of-the-BoxTM Software ……
4-2 Software and Board Operation
Drivers for Third-party, Icon-driven Software
DaqCOM Driver
LabVIEW
Process Definitions
Theory of Operation
ADC Maximum Clock Rate
Clocking the ADC
ADC Pacer Clocking
ADC External Event Clocking
ADC External Trigger
Starting Triggering an ADC Acquisition
ADC Software
ADC External Gate
Stopping an ADC Acquisition CLOCK
ADC Clock and FIFO Errors
DaqBoard/500 Only
Digital Acquisition
DAC Software Update
Clocking the DAC
4-8 Software and Board Operation
Emissions/Immunity Conditions ……5-2
CE-Compliance
CE Standards and Directives
Overview ……5-1 CE Standards and Directives …… Safety Conditions ……5-2
Emissions/Immunity Conditions
Safety Conditions
of calibration
Specifications
General
Analog Inputs
6-2 Specifications
Analog Input Triggering/Clocking
Analog Outputs DaqBoard/500 Only
Digital Inputs / Outputs
Counter - 1 Counter designated as CNTR1
Physical & Environmental
single-ended mode
Glossary
referenced to common
Page
Page
RETURN REQUESTS/INQUIRIES
WARRANTY/DISCLAIMER
TEMPERATURE
324545A-01
Shop online at omega.com
OMEGA…Of Course
