Configuring the DV-SP506—Continued
Menu | Setting | Description | Page # | ||||
|
|
|
| Parental Lock | Set the Parental Lock function. | 56 | |
|
|
|
|
|
|
| |
|
|
|
| Security Code | Change the security code for use with parental lock. | 57 | |
|
|
|
|
|
|
| |
|
|
|
| DVD Priority Contents | Determines what's played on | 57 | |
|
|
|
| ||||
|
|
|
|
|
| ||
Operation |
|
|
| ||||
SACD Priority Contents | Determines how the SACD multichannel and | 57 | |||||
Setting | |||||||
nel area and the CD area are played. | |||||||
|
|
|
|
|
| ||
|
|
|
|
|
|
| |
|
|
|
| HDMI Control | Turn on or off RIHD control over HDMI. | 57 | |
|
|
|
|
|
|
| |
|
|
|
| Power Control | Turn on or off RIHD power control over HDMI. | 58 | |
|
|
|
|
|
|
| |
|
|
|
| Direct Change | Turn on or off RIHD direct change over HDMI. | 58 | |
|
|
|
|
|
|
| |
|
|
|
| Auto Power Off | Sets the Auto power off function. | 58 | |
|
|
|
|
|
|
| |
|
|
|
| DivX Registration (not North | Displays your DivX VOD registration code | 58 | |
|
|
|
| American model) | |||
|
|
|
|
|
| ||
|
|
|
|
|
|
| |
Initial Setup | TV Shape |
|
| ||||
| This menu appears automatically the very first time |
| |||||
HDMI Output Setting |
| ||||||
|
|
|
|
| |||
|
|
|
| you turn on your | 30 | ||
|
|
|
|
| |||
|
|
|
| HDMI Audio Out | |||
|
|
|
| able in other menus.) |
| ||
|
|
|
|
|
| ||
|
|
|
|
|
| ||
|
|
|
|
|
| ||
|
|
|
|
|
|
| |
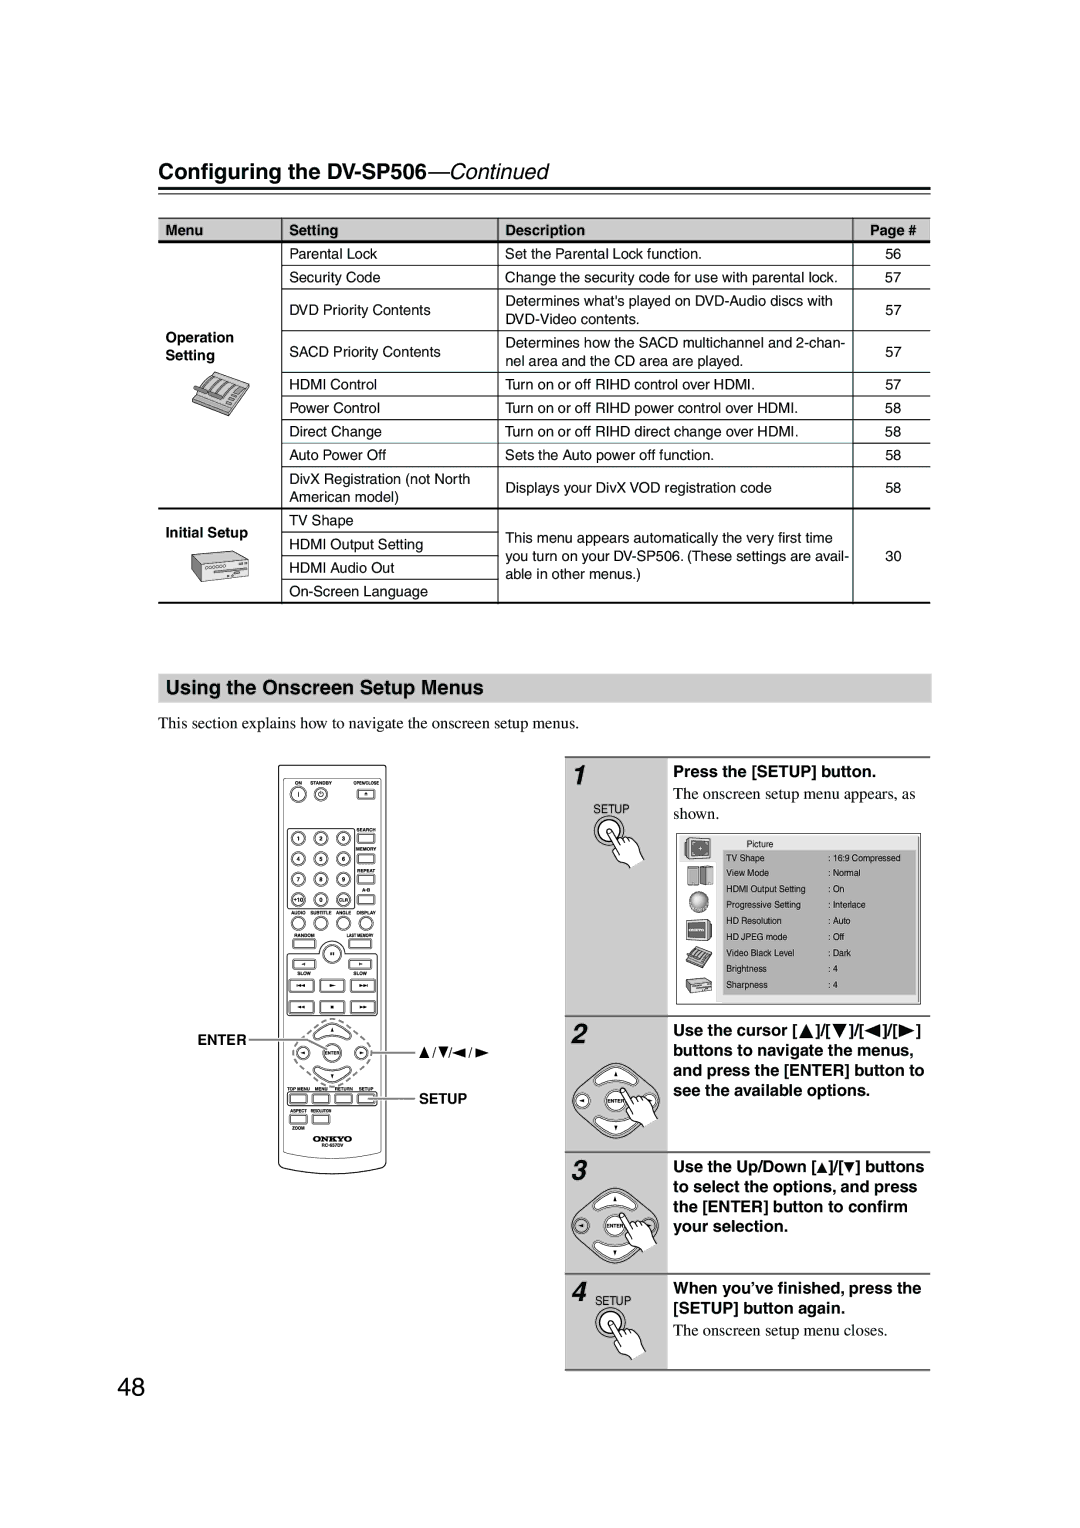
Using the Onscreen Setup Menus
This section explains how to navigate the onscreen setup menus.
ENTER
![]()
![]()
![]() /
/ ![]() /
/![]() /
/ ![]()
SETUP
1 | Press the [SETUP] button. | ||
| |||
SETUP | The onscreen setup menu appears, as | ||
shown. |
|
| |
| Picture |
|
|
| TV Shape | : 16:9 Compressed | |
| View Mode | : Normal | |
| HDMI Output Setting | : On |
|
| Progressive Setting | : Interlace | |
| HD Resolution | : Auto | |
| HD JPEG mode | : Off |
|
| Video Black Level | : Dark | |
| Brightness | : 4 |
|
| Sharpness | : 4 |
|
2 | Use the cursor [ ]/[ | ]/[ ]/[ ] | |
| |||
| buttons to navigate the menus, | ||
| and press the [ENTER] button to | ||
| see the available options. | ||
3 | Use the Up/Down [ | ]/[ | ] buttons |
| |||
to select the options, and press the [ENTER] button to confirm your selection.
4 | SETUP | When you’ve finished, press the | |
[SETUP] button again. | |||
|
|
The onscreen setup menu closes.
48
