Turning On
First Time Setup
• American | • Other |
model | models |
STANDBY/ON | STANDBY/ON |
STANDBY/ON | STANDBY/ON |
| POWER |
| ON OFF |
A SPEAKERS B | A SPEAKERS B |
PHONES | PHONES |
POWER
ON STANDBY
ON STANDBY
TV
I![]()
![]() INPUT
INPUT
V1 V2 V3
1 2 3 +
DVD MULTI CH | TV CH |
4 5 6 -
CD | TAPE | TUNER |
|
7 | 8 | 9 |
|
|
|
| TV VOL |
+10 | 0 | CLEAR |
|
|
| TUNER/ | |
|
|
| |
TONE | _ |
| TAPE |
| + | AMP | |
|
|
REMOTE MODE
DIGITAL INPUT
|
|
|
|
|
|
|
|
|
| MASTER VOLUME | |
STANDBY/ON |
|
|
|
|
|
|
|
| TUNING |
|
|
|
|
|
|
|
|
|
|
| PRESET |
|
|
| STANDBY |
|
|
|
|
|
|
|
|
|
|
|
|
|
|
|
|
|
| SETUP | RETURN |
|
|
A SPEAKERS B | TONE | STEREO | LISTENING | DISPLAY | DIGITAL INPUT | MEMORY | TUNING MODE |
|
|
|
|
MODE |
|
|
|
| |||||||
PHONES |
|
|
|
|
|
|
|
|
| VIDEO 3 INPUT | |
MULTI CH | DVD | VIDEO 1 | VIDEO 2 | VIDEO 3 | TAPE | TUNER | C D | S VIDEO | VIDEO | L AUDIO R | |
|
|
| VCR |
|
|
|
|
|
|
|
|
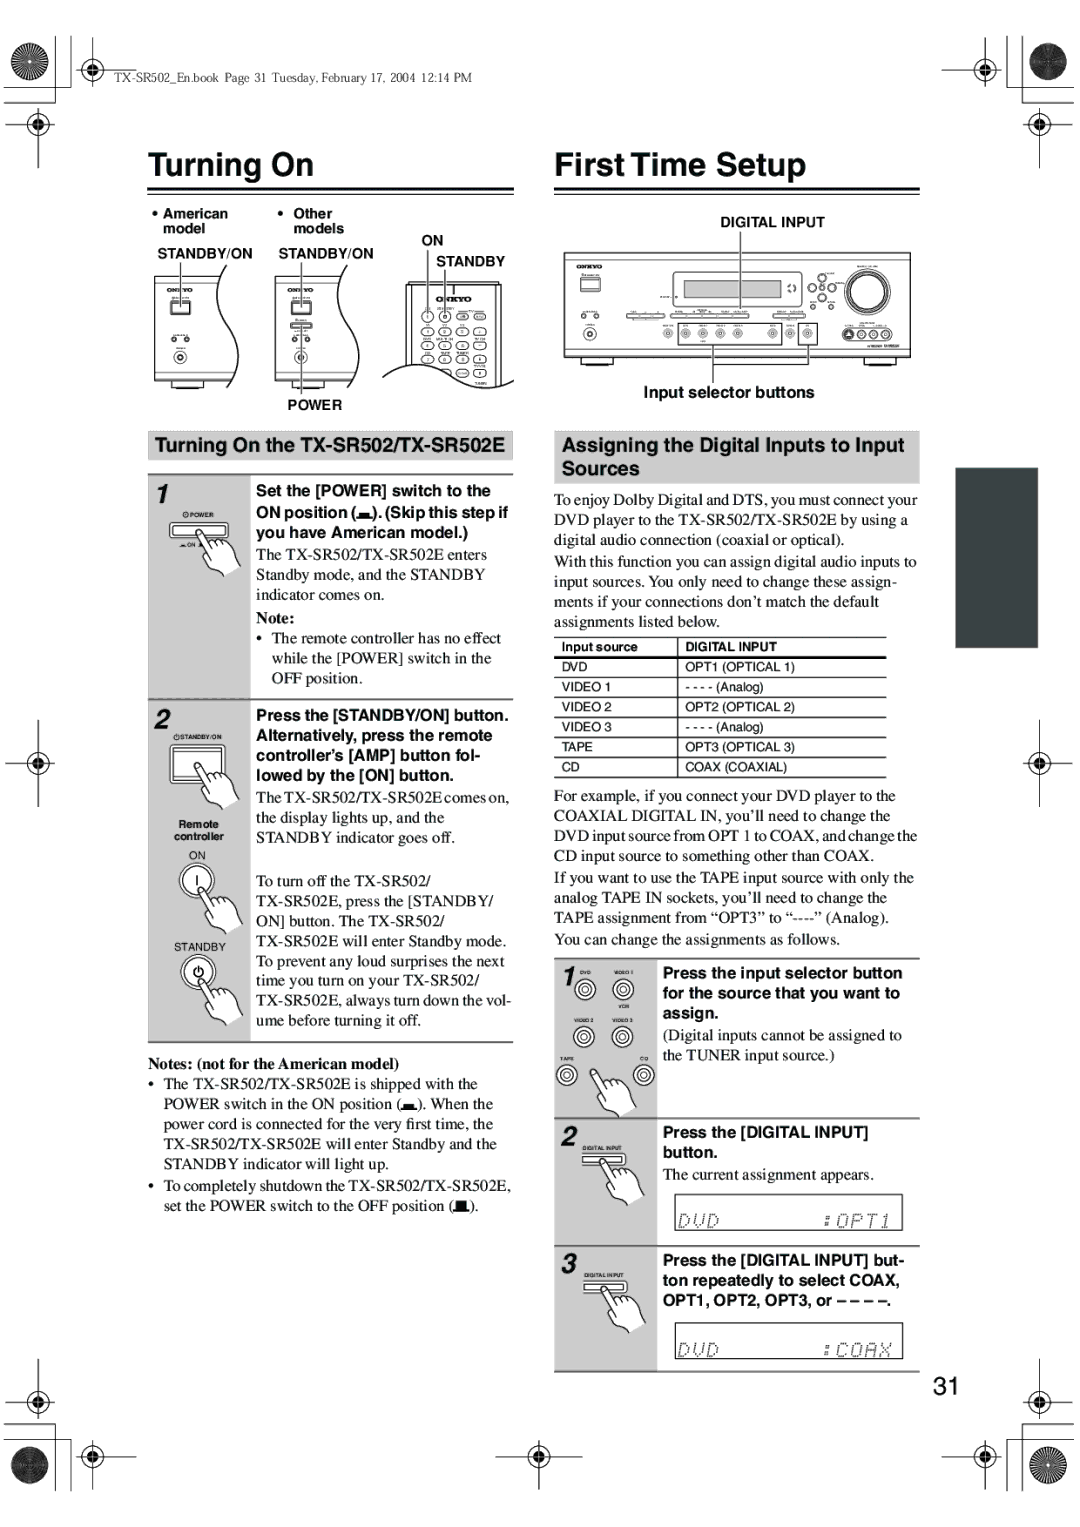
Input selector buttons
Turning On the
Assigning the Digital Inputs to Input Sources
1
![]() POWER
POWER
![]() ON
ON ![]() OFF
OFF
Set the [POWER] switch to the ON position (![]() ). (Skip this step if you have American model.)
). (Skip this step if you have American model.)
The
Note:
•The remote controller has no effect while the [POWER] switch in the OFF position.
To enjoy Dolby Digital and DTS, you must connect your DVD player to the
With this function you can assign digital audio inputs to input sources. You only need to change these assign- ments if your connections don’t match the default assignments listed below.
Input source | DIGITAL INPUT |
DVD | OPT1 (OPTICAL 1) |
|
|
VIDEO 1 | - - - - (Analog) |
|
|
VIDEO 2 | OPT2 (OPTICAL 2) |
2 |
|
|
|
| Press the [STANDBY/ON] button. |
|
|
|
|
| |
| STANDBY/ON | Alternatively, press the remote | |||
|
|
|
|
| controller’s [AMP] button fol- |
|
|
|
|
| |
|
|
|
|
| lowed by the [ON] button. |
|
|
|
|
| |
|
|
|
|
| |
|
|
|
|
| The |
| Remote | the display lights up, and the | |||
| STANDBY indicator goes off. | ||||
| controller | ||||
| ON |
| |||
|
|
|
|
| To turn off the |
|
|
|
|
| |
|
|
|
|
| ON] button. The |
| STANDBY | ||||
| To prevent any loud surprises the next | ||||
|
|
|
|
| |
|
|
|
|
| time you turn on your |
|
|
|
|
| |
|
|
|
|
| ume before turning it off. |
|
|
|
|
|
|
Notes: (not for the American model)
•The ![]() ). When the power cord is connected for the very first time, the
). When the power cord is connected for the very first time, the
•To completely shutdown the ![]() ).
).
VIDEO 3 | - - - - (Analog) |
TAPE | OPT3 (OPTICAL 3) |
|
|
CD | COAX (COAXIAL) |
For example, if you connect your DVD player to the COAXIAL DIGITAL IN, you’ll need to change the DVD input source from OPT 1 to COAX, and change the CD input source to something other than COAX.
If you want to use the TAPE input source with only the analog TAPE IN sockets, you’ll need to change the TAPE assignment from “OPT3” to
You can change the assignments as follows.
1 | DVD | VIDEO 1 | Press the input selector button |
|
| ||
|
| for the source that you want to | |
|
|
| |
|
| VCR | assign. |
VIDEO 2 | VIDEO 3 | ||
|
|
| (Digital inputs cannot be assigned to |
TAPE |
|
| C D the TUNER input source.) |
2 |
|
|
| Press the [DIGITAL INPUT] |
DIGITAL INPUT | button. | |||
The current assignment appears.
3 |
|
|
| Press the [DIGITAL INPUT] but- |
DIGITAL INPUT | ton repeatedly to select COAX, | |||
OPT1, OPT2, OPT3, or – – –
31