Operating Instructions
Accessories included
Before Initial Use
For your future reference
Attach your purchase receipt here
Contents
Indicator p , 19 Redial Button p
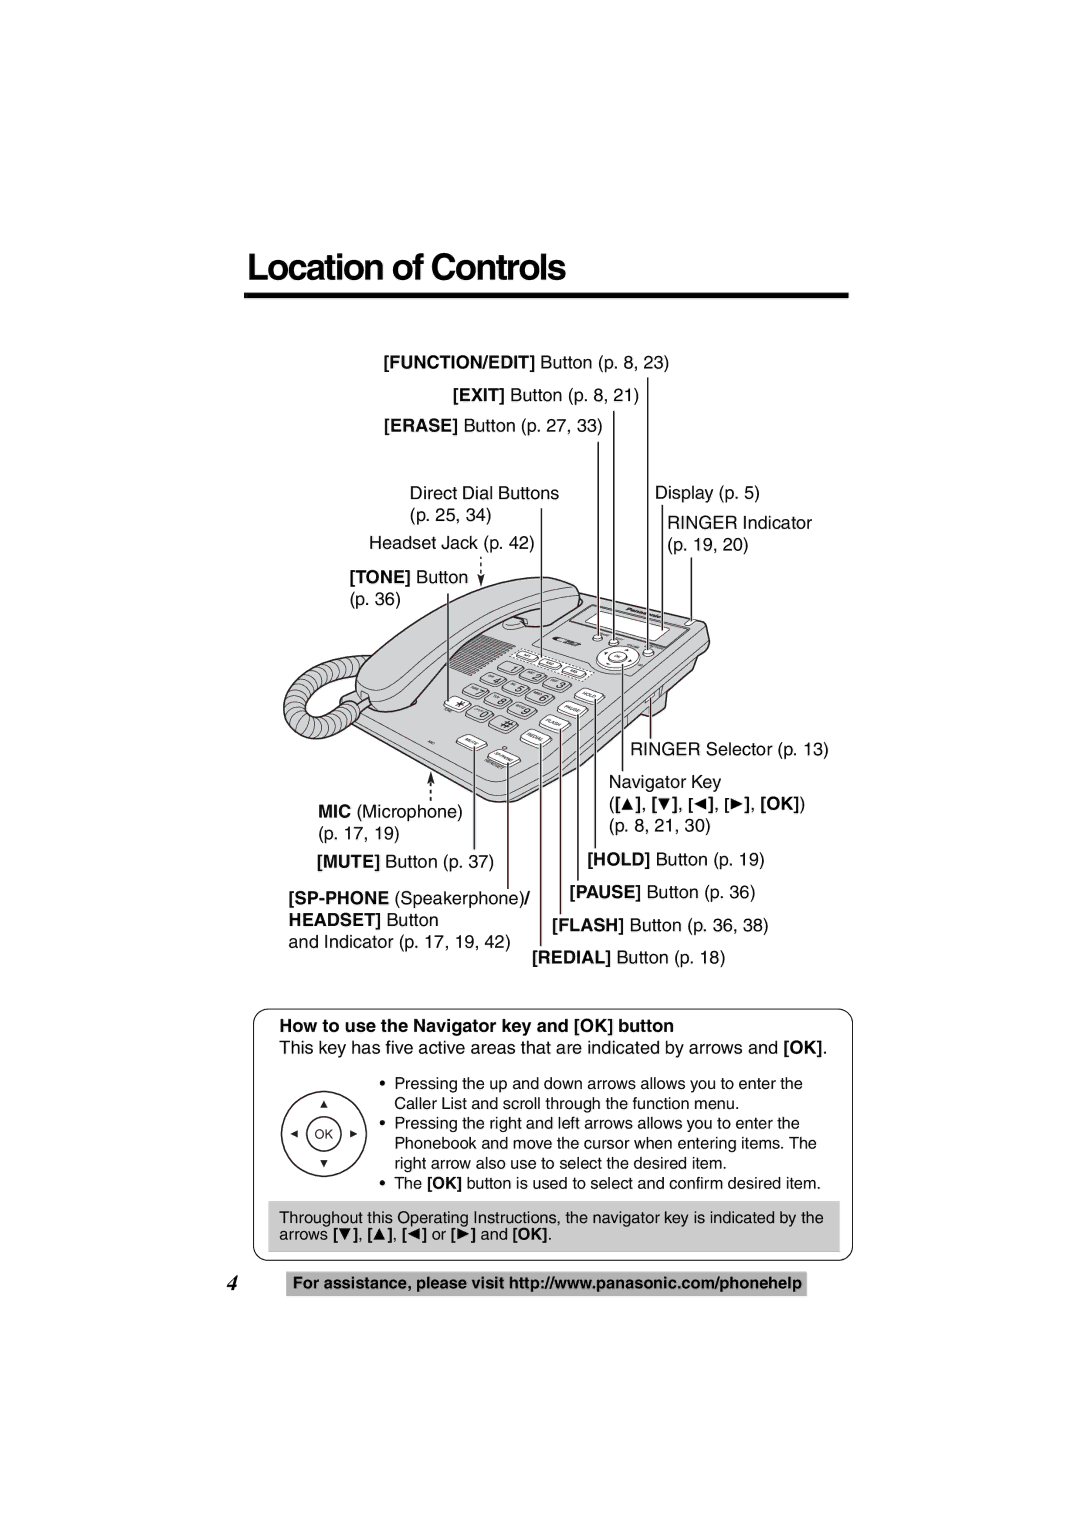
How to use the Navigator key and OK button
Location of Controls
Headset Button
Display
1200AM 12/31
Missed calls
1234AM 5/21
Settings
Installing the Batteries
Connecting the Handset/Telephone Line Cord
After connection, lift the handset to check for a dial tone
Connecting a Communication Device
If you subscribe to a DSL service
Programming Summary
During programming
Enter time 34 OK=Next
Time and Date
#=AM/PM/24H 34 OK=Next
Enter month/day 12/31 OK=Save Enter month/day 12/27
For Caller ID service users p
Display Option
Display Language
Change language?
34 OK=Yes
34 OK=Save
Set dial mode ?
Dialing Mode
Select Pulse or Tone by pressing 4 or Press OK Save key
Ringer Volume
LCD Contrast
34 OK=Yes LCD contrast Low???? High 34 OK=Save
Ringer Selector
Set auto edit ?
Caller ID Number Auto Edit
34 OK=Yes Auto edit On 34 OK=Save
Time Adjustment Caller ID subscribers only
Time adjustment?
34 OK=Yes Time adjustment On 34 OK=Save
Select On or Off by pressing 4 or
Voice Mail VM Tone
34 OK=Yes VM tone detect On 34 OK=Save
Using the speakerphone
Making Calls
1234PM 5/21
Press SP-PHONE/HEADSET
To redial using the redial list Memory Redial
To redial the last number dialed
Loud Low ???? High
Loud Low ??? High
Answering Calls
To put a call on hold
To release the hold
Press Hold
How caller information is displayed when a call is received
Caller ID Service
Private name display
Using the Caller List
Ex. When you search from the most recent call
Viewing the Caller List
1234AM 5/21
Calling Back from the Caller List
1234PM 11/25
Display meaning
Scroll to the desired caller by pressing
Editing the Caller’s Phone Number
Procedures
Smith,Jack
Storing Caller List Information in the Phonebook
Enter name OK=Next
OK=Next Save phonebook Save M1,M2,M3
Phonebook by pressing 4 or
Storing Caller List Information in the Direct Dial Memory
M1,M2,M3=Save
Press one of the Direct Dial button
M1, M2 or M3 Ex. M1 is pressed
M1 is occupied Overwrite ? =No OK=Yes
Erasing Caller List Information
To erase a specific caller from the Caller List
To erase all entries in the Caller List
Erased
Phonebook
Storing Names and Phone Numbers in Phonebook
34 OK=Yes Phonebook 10 items Enter name Tom Jones OK=Next
Enter phone No 0987654321 OK=Save
Selecting characters to enter names
Tom Tom Jo Tom Jones
If you make a mistake while entering a name
For example, to enter Tom Jones
Scroll to the desired item by using
Dialing from the Phonebook
Press 2 or 1 to enter the Phonebook
To search for a name by initial
Chain Dial
Index table
While you are on a call Press 2 or
Search for the desired item by pressing 4 or
Editing
123-4567
Enter name Jane OK=Next
8901 OK=Save
Scroll the Phonebook item you want to erase by using 4 or
Erasing
Direct Dial M1, M2, M3
Storing Names and Phone Numbers in Memory
Save M1,M2,M3 ?
34 OK=Yes Enter name White,John OK=Next
Dialing
To erase a stored number
M1 is occupied
Overwrite ?
Special Features
How to Use the Pause Button
For Call Waiting Service Users
Temporary Tone Dialing
Setting a Hold Music to ON/OFF
Visual Call Waiting Caller ID Feature
Muting Your Conversation
34 OK=Yes Hold music On 34 OK=Save
Selecting the flash time
Flash Button
Select the desired time by pressing
Setting the Password
To set the password
34 OK=Yes Current password OK=Next
Enter the current password
Enter password OK=Next
Call Restriction
Call restrict ?
To set the call restriction
Voice Mail Service
To cancel the call restriction
Listening to Voice Mail Messages
1234PM 12/15 Voice mail Missed calls
Optional Headset
Connecting the Optional Headset to the Unit
Making/Answering Calls
Wall Mounting
Wall Template
Battery Replacement
Battery Precautions
Troubleshooting
Problem Cause and Remedy
Troubleshooting
Press SP-PHONE/HEADSET. Start
Important Safety Instructions
Important Safety Instructions
Specifications
Power Source
Mass Weight
Dialing Mode
FCC and Other Information
Useful Information
Index
Pause
Warranty
Panasonic Telephone Limited Warranty
Limited Warranty Coverage
To obtain service in the USA please contact
Warranty
Limited Warranty Limits And Exclusions
Customer services
Customer Services Directory
Call us at 1-800-211-PANA
When you ship the product
PQQX14924ZA FM1005SN0