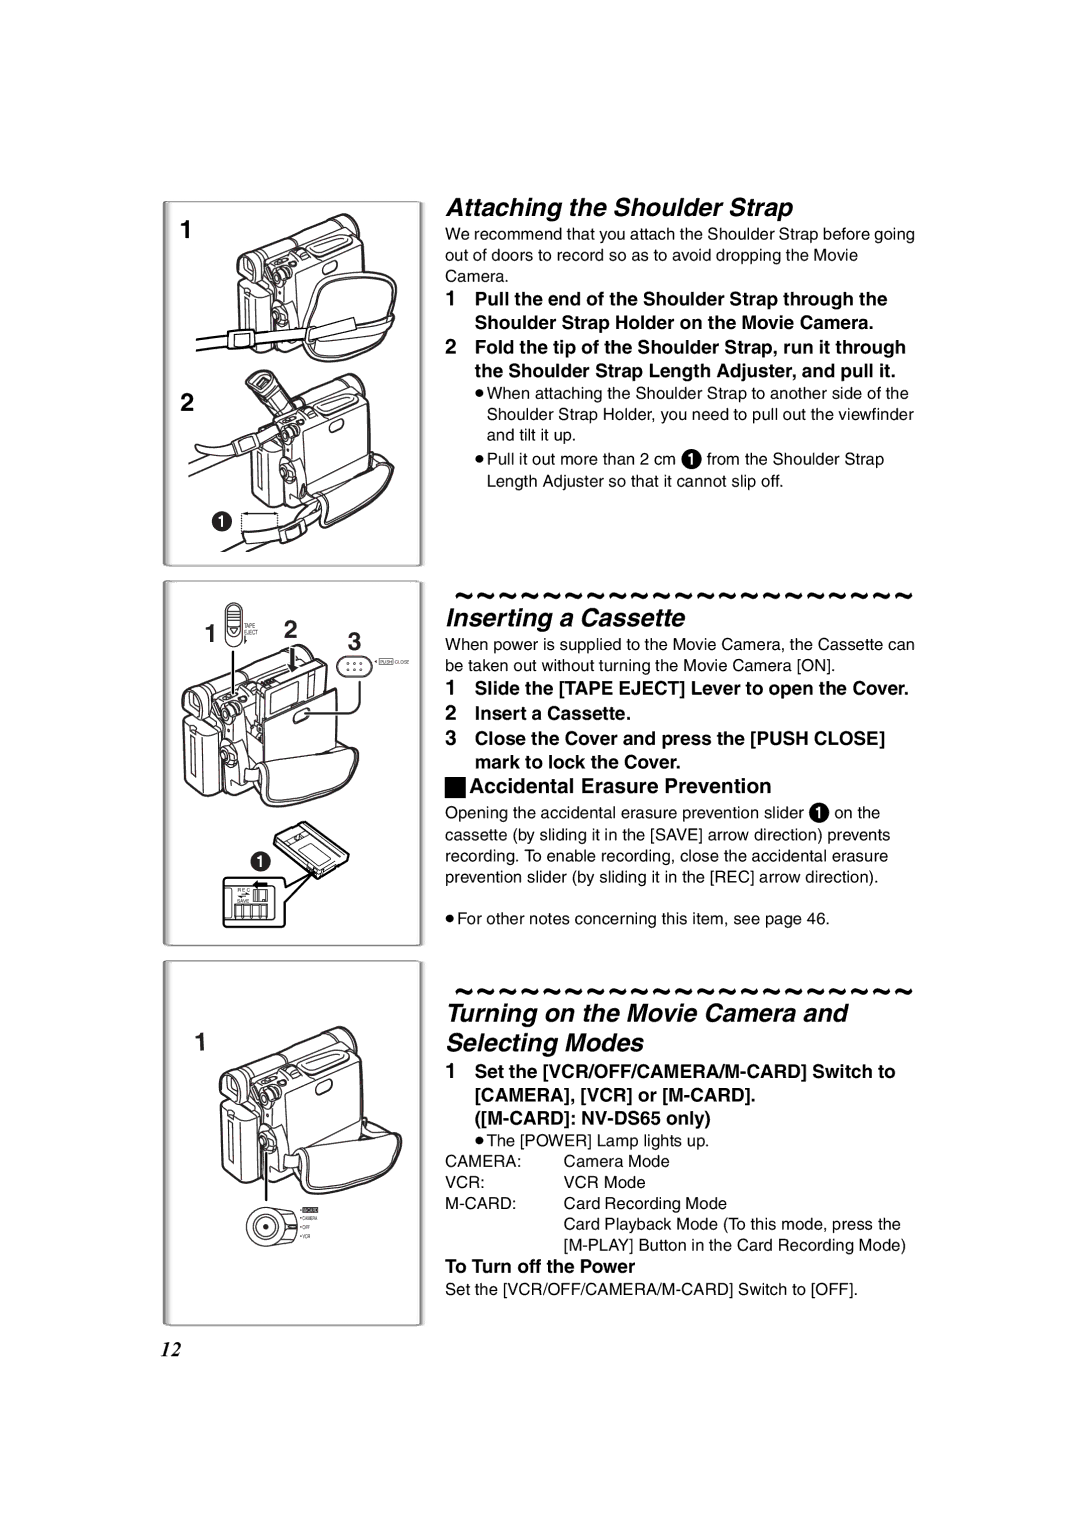
NV-DS60 NV-DS65
Operating Instructions
NV-DS65EG
Digital Video Camera
Information for Your Safety
The manufacturer is not liable for loss of recorded contents
Refer servicing to qualified service personnel
This symbol CE is located on the rating plate
Contents
Before Use
CAMERA Mode
VCR Mode
Standard Accessories
Optional Accessories
1 AC Adaptor, DC Input Lead and AC Mains Lead l10 2 Battery Pack l10
3 Remote Controller and Button-Type Battery l8
1 Charge the Battery. l10
2 Attach the Charged Battery to the Movie Camera
Getting Started
3 Insert the Cassette. l12
17 Eyepiece Corrector Knob l13 18 Battery Holder
23 Built-in Video Light l19 24 Remote Control Sensor l9
Controls and Components
1 2
26 Zoom Lever W/T l21 Volume Lever VOLUME l30
30 Power Lamp POWER l18, 30 31 Recording Start/Stop Button l18
35 Card Access Lamp ACCESS NV-DS65 only l38
36 Card Slot NV-DS65 only l38 37 Button Type Battery Tray l17
Remote Controller
Remote Controller Buttons 1 Date/Time Button DATE/TIME l45
4 Reset Button RESET l57 5 Recording Button REC l37
9 Zoom/Volume Button ZOOM/VOL l21
ª Inserting a Button-type Battery
ª Using the Remote Controller
1 While pressing the Stopper 1, pull out the Battery Holder
2 Insert the button-type battery with the imprint i facing upward
Power Supply
ª Using the AC Adaptor
ª Using the Battery
ª Using the Car Battery Charger
3 Put your hand through the Grip Belt and adjust the length
Charging Time and Available Recording Time
Lens Cap and Grip Belt
2 Attach the Lens Cap to the Grip Belt
1 Set the VCR/OFF/CAMERA/M-CARD Switch to CAMERA, VCR or M-CARD
To Turn off the Power
When power is supplied to the Movie Camera, the Cassette can
Attaching the Shoulder Strap
Using the Viewfinder/LCD Monitor
ª Using the Viewfinder
ª Using the LCD Monitor
ª Adjusting Brightness and Colour Level
Using the Menu Screen
About the Menu Mode Setting
2, 3, 4
ª Image Selection in the Card Playback Mode NV-DS65 only l40
CAMERA SETUP Sub-Menu
RECORDING SETUP Sub-Menu
DISPLAY SETUP Sub-Menu
LCD/EVF SETUP Sub-Menu
Card Playback Mode Menu CARD SETUP NV-DS65 only
PLAYBACK FUNCTIONS Sub-Menu
VCR Mode Main-Menu VCR FUNCTIONS
RECORDING SETUP Sub-Menu
Setting Date and Time
Replacing Clock Battery
3 Press the MENU Button to finish setting the date and time
1 While pinching the 2 tabs, pull Battery Tray out
1 Set the VCR/OFF/CAMERA/M-CARD Switch to CAMERA
CAMERA Mode
1, 3 OFF
Recording
ª Recording Yourself
ª Recording with the Built-in Video Light
ª LP Mode
ª Audio Recording Mode
Photoshot
ª Progressive Photoshot
ª Continuous Photoshot
ª Digital Still Picture
1 Set CAMERA FUNCTIONS CAMERA SETUP D.ZOOM 20t or 500t
To Cancel the Digital Zoom Function
Zoom In/Out Functions
Digital Zoom Function
To Cancel Image Stabilizer
Image Stabilizer Function
Fade In/Out Functions
1 Press the SIS Button
1 Set CAMERA FUNCTIONS CAMERA SETUP CINEMA ON
To Cancel the Cinema Mode
To Cancel the Colour Night View Function
Cinema Function
2 Set CAMERA FUNCTIONS CAMERA SETUP PROG.AE a desired mode
To Cancel the Programme AE Function
1 Set CAMERA FUNCTIONS RECORDING SETUP WIND CUT ON
Recording in Special Situations
Adjusting White Balance Manually
To Resume Automatic Adjustment
Recording in Natural Colours
3, 4
Manual Shutter Speed Adjustment
3 Turn the PUSH Dial to adjust the shutter speed
Range of Shutter Speed Adjustment 1/50-1/8000 s
2 Press the PUSH Dial until the Shutter Speed Indication 1 appears
Manual Iris Adjustment
Manual Focus Adjustment
3 Turn the PUSH Dial to adjust the iris
3 Turn the PUSH Dial to adjust the focus
To Cancel the Digital Effect
Digital Effect Functions
Digital Effects EFFECT
To Select a Desired Digital Effect
2, 3
ª Wipe Mode and Mix Mode
P-IN-P
ª Picture-in-Picture Mode
ª Adjusting the Sound Volume
1 Set the VCR/OFF/CAMERA/M-CARD Switch to VCR
1 Push the VOLUME lever in the VCR mode
VCR Mode
Finding a Scene You Want to Playback
Slow Motion Playback
A B C
ª Cue/Review Playback
3 Press the E Button or D Button on the Remote Controller
To Cancel Blank Search Before Completion
Still Playback/Still Advance Playback
Finding the End of Recording
2 Press the 9 Button 1 or Button 2 on the Remote Controller
Photoshot Index Signal
Scene Index Signal
Index Search Functions
To Cancel the Playback Digital Zoom Function
Playback Digital Effect Functions
ª Playback Digital Zoom Function
Digital Effects 1 EFFECT1
2 Press the A.DUB Button on the Remote Controller
3 To start Audio Dubbing, press the Button To Cancel Audio Dubbing
Playing Back on Your TV
Audio Dubbing
2, 4
1, 3
Copying on an S-VHS or a VHS Cassette Dubbing
1 Insert the recorded Cassette
Using the DV Cable for Recording
Personal Computer Connection Kit
Player/Recorder 1 Insert the Cassette and set to the VCR Mode
Player 2 Press the 1 Button to start playback. Recorder
Using a Card
ª ACCESS Lamp
ACCESS Lamp is available only when the Card Slot Cover is opened
CARD Mode
1 Set the VCR/OFF/CAMERA/M-CARD Switch to M-CARD
Recording on a Card
ª Card Photoshot
Recording from the Movie Camera Lens
Playing Back a Card
2 Press the M-PLAY Button
3 Turn the PUSH Dial and select a desired picture
4 Press the PUSH Dial
1, 2, 3
Recording with a Photo Title
1 Set CAMERA FUNCTIONS PHOTO TITLE MODE WIPE or MIX
2 Set CAMERA FUNCTIONS PHOTO TITLE TITLE SET
1, 1
Deleting the Pictures Recorded on a Card
To Select and Delete a Picture
1 Press the M-DEL Button in the card playback mode
Using the USB Connection Kit
2 Set CARD SETUP DPOF ON VARIABLE ON
1 Install the supplied USB driver
DPOF Setting
Others
Indications
Warning/Alarm Indications
ª To Change the Counter Display Mode
ª To Display Date/Time Indication
ª To Change the Display Mode
ª Selecting Remote Controller Modes
ª Concerning the Power Supply
ª Alarm Sounds
Setup on the Movie Camera
ª Photoshot
ª Progressive Photoshot Function
ª Zoom In/Out Functions
ª Image Stabilizer Function
ª Manual Shutter Speed Adjustment
ª Manual Iris Adjustment
It is as follows when GAIN UP is selected
Listening to Playback Sound through Headphones
ª Recording the Contents of Other Equipment
ª Using the DV Cable for Recording Digital Dubbing
ª Using a Card in a Personal Computer
ª Audio Dubbing
Constructing a Folder when the Card is used with a PC
2 Set the VCR/OFF/CAMERA/M-CARD Switch to OFF
4 Detach the power supply and retract
Cautions for Use
Do not use benzine, thinner or alcohol for cleaning the Movie Camera
ª About AC Adaptor
ª Condensation
1 Take out the Cassette
ª Optimal Use of the Battery
ª Video Head Clogging and Care
2 Press the 1 Button, and
Always Keep the Terminals of the Battery Clean
Battery
ª Cautions for Storage
ª LCD Monitor/Viewfinder/Lens
Before Requesting Repair Problems and Solutions
Power 1 The Movie Camera power cannot be turned on
2 The Movie Camera power is turned off automatically
l18 3 The Movie Camera power does not stay on long enough
1 Images cannot be played back even when the 1 Button is pressed
Explanation of Terms
ª Digital Video System
Indications 1 The Time Code becomes inaccurate
ª White Balance Adjustment
Auto Focus Adjustment
White Balance Adjustment
Automatic White Balance Adjustment
1 Set DISPLAY SETUP C.DISPLAY MEMORY
2 Reset the Tape Counter to zero at the
Set the VCR/OFF/CAMERA/M-CARD Switch to VCR 5 Rewind the tape
3 Play back the still picture where you want to start audio dubbing
Specifications
Digital Still Picture Output, Control
Index