THE TIMER – SETTING ACTIVATE TO ON OR OFF |
| ||||||||
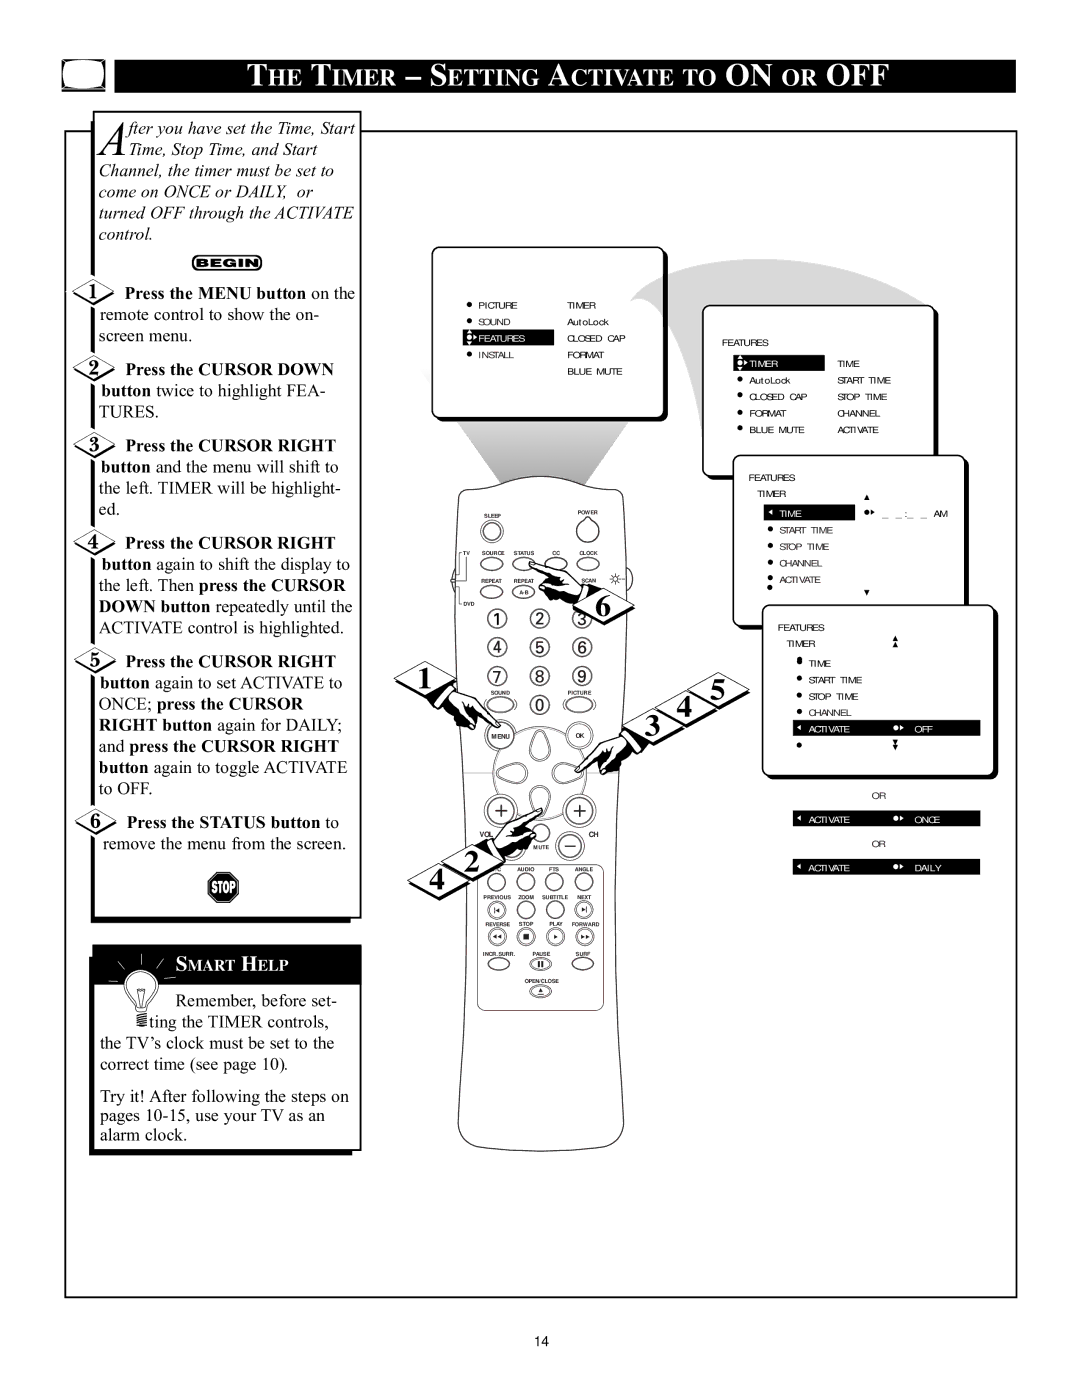
fter you have set the Time, Start |
|
|
|
|
|
|
|
|
|
ATime, Stop Time, and Start |
|
|
|
|
|
|
|
|
|
Channel, the timer must be set to |
|
|
|
|
|
|
|
|
|
come on ONCE or DAILY, or |
|
|
|
|
|
|
|
|
|
turned OFF through the ACTIVATE |
|
|
|
|
|
|
|
|
|
control. |
|
|
|
|
|
|
|
|
|
Press the MENU button on the |
| PICTURE |
| TIMER |
|
|
|
| |
remote control to show the on- |
|
|
|
|
|
| |||
| SOUND |
|
| AutoLock |
|
|
|
| |
screen menu. |
|
|
|
|
|
|
| ||
| FEATURES |
| CLOSED CAP |
| FEATURES |
|
| ||
|
| INSTALL |
|
| FORMAT |
|
|
| |
Press the CURSOR DOWN |
|
|
|
| TIMER | TIME |
| ||
|
|
|
| BLUE MUTE |
|
| |||
|
|
|
|
| AutoLock | START TIME |
| ||
button twice to highlight FEA- |
|
|
|
|
|
|
| ||
|
|
|
|
|
| CLOSED CAP | STOP TIME |
| |
TURES. |
|
|
|
|
|
| FORMAT | CHANNEL |
|
Press the CURSOR RIGHT |
|
|
|
|
|
| BLUE MUTE | ACTIVATE |
|
|
|
|
|
|
|
|
|
| |
button and the menu will shift to |
|
|
|
|
|
| FEATURES |
|
|
the left. TIMER will be highlight- |
|
|
|
|
|
|
|
| |
|
|
|
|
|
| TIMER |
|
| |
ed. |
| SLEEP |
|
| POWER |
| TIME | _ _:_ _ AM | |
|
|
|
|
| |||||
Press the CURSOR RIGHT |
|
|
|
|
|
| START TIME |
| |
TV | SOURCE | STATUS | CC | CLOCK |
| STOP TIME |
| ||
button again to shift the display to |
| CHANNEL |
| ||||||
|
|
|
|
|
|
| |||
the left. Then press the CURSOR |
| REPEAT | REPEAT | SHUFFLE SCAN |
| ACTIVATE |
| ||
|
|
| 6 |
|
|
|
| ||
DOWN button repeatedly until the | DVD |
|
|
|
|
|
|
| |
|
|
|
|
|
|
|
| ||
ACTIVATE control is highlighted. |
|
|
|
|
|
| FEATURES |
| |
|
|
|
|
|
|
| TIMER |
| |
Press the CURSOR RIGHT | 1 |
|
|
|
|
|
| TIME |
|
button again to set ACTIVATE to |
|
|
|
|
| 5 | START TIME |
| |
SOUND |
|
| PICTURE | 3 4 | STOP TIME |
| |||
ONCE; press the CURSOR |
|
|
|
|
|
| |||
|
|
|
|
|
| CHANNEL |
| ||
RIGHT button again for DAILY; |
|
|
|
|
|
|
| ||
| MENU |
|
| OK |
| ACTIVATE | OFF | ||
and press the CURSOR RIGHT |
|
|
|
|
|
|
|
|
|
button again to toggle ACTIVATE |
|
|
|
|
|
|
|
|
|
to OFF. |
|
|
|
|
|
|
| OR |
|
Press the STATUS button to |
| VOL |
|
| CH |
|
| ACTIVATE | ONCE |
remove the menu from the screen. |
|
|
|
|
| OR |
| ||
4 2 | MUTE |
|
|
|
| ||||
| AUDIO | FTS | ANGLE |
|
| ACTIVATE | DAILY | ||
|
| PREVIOUS | ZOOM | SUBTITLE NEXT |
|
|
|
| |
|
| REVERSE | STOP | PLAY | FORWARD |
|
|
|
|
SMART HELP |
| INCR.SURR. PAUSE | SURF |
|
|
|
| ||
|
|
|
|
|
|
|
|
| |
|
|
| OPEN/CLOSE |
|
|
|
|
| |
Remember, before set- |
|
|
|
|
|
|
|
|
|
ting the TIMER controls, |
|
|
|
|
|
|
|
|
|
the TVÕs clock must be set to the |
|
|
|
|
|
|
|
|
|
correct time (see page 10). |
|
|
|
|
|
|
|
|
|
Try it! After following the steps on |
|
|
|
|
|
|
|
|
|
pages |
|
|
|
|
|
|
|
|
|
alarm clock. |
|
|
|
|
|
|
|
|
|
|
|
| 14 |
|
|
|
|
| |