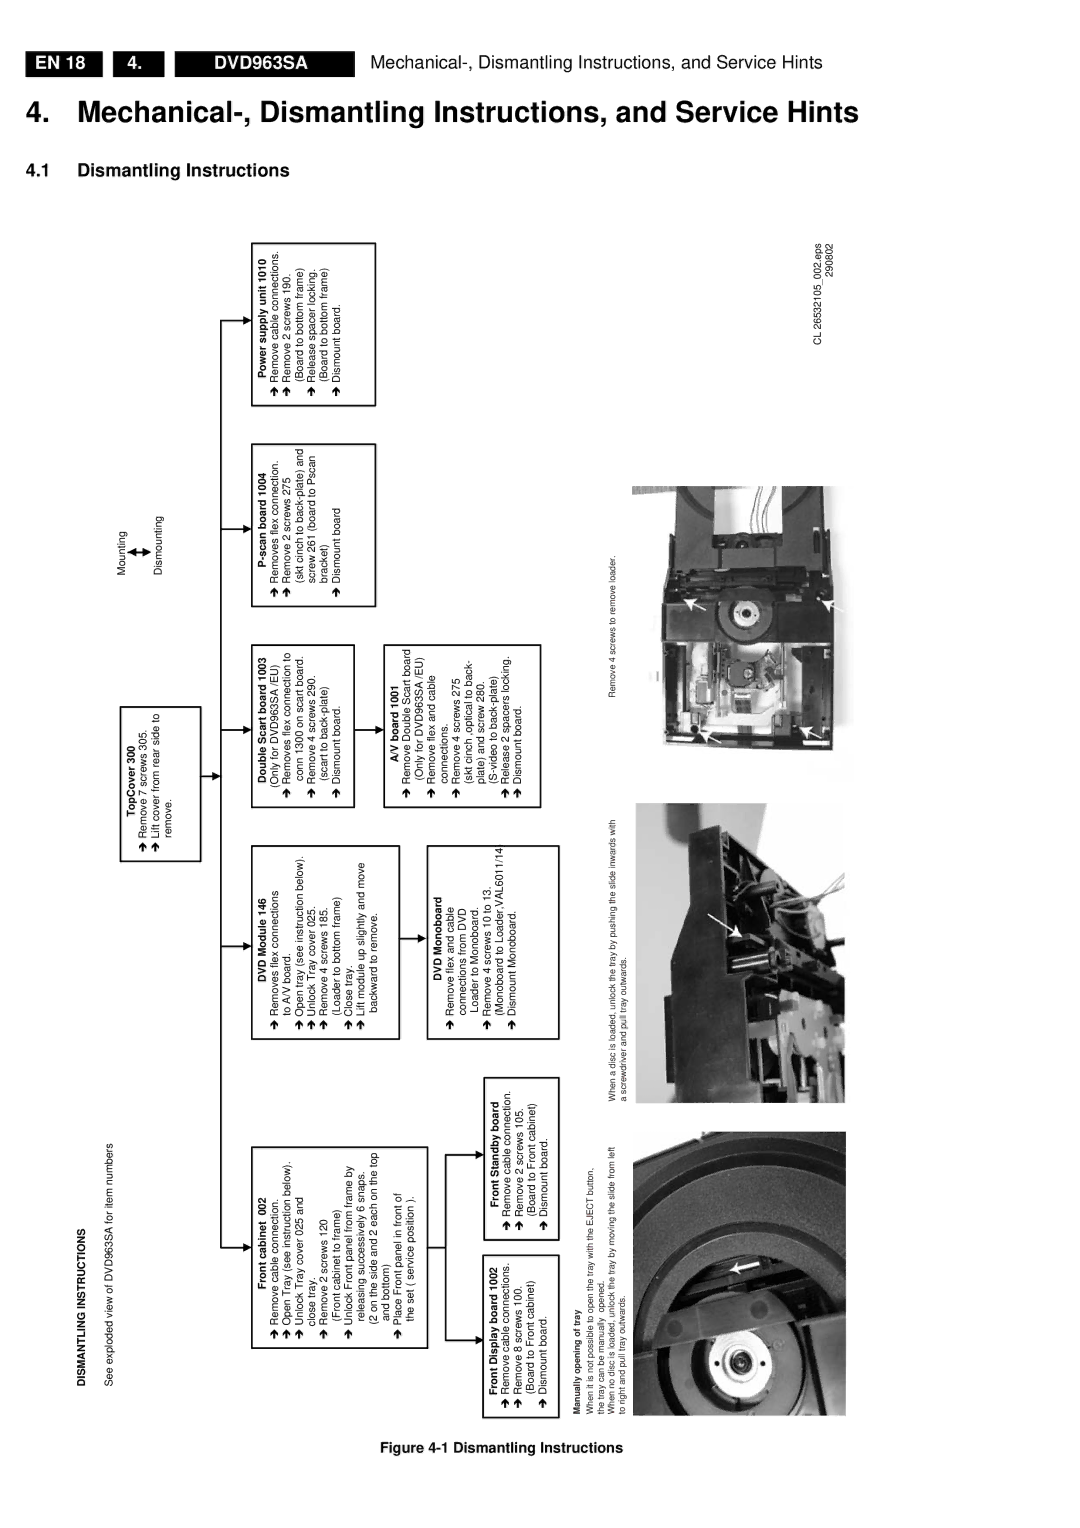
DISMANTLING INSTRUCTIONS
See exploded view of DVD963SA for item numbers
TopCover 300
Î Remove 7 screws 305. Î Lift cover from rear side to
remove.
Mounting
Dismounting
4.1 Dismantling Instructions
4. Mechanical-,
EN 18 4.
Figure 4-1 Dismantling
Front cabinet 002
ÎRemove cable connection.
ÎOpen Tray (see instruction below).
ÎUnlock Tray cover 025 and close tray.
ÎRemove 2 screws 120
(Front cabinet to frame)
ÎUnlock Front panel from frame by
releasing successively 6 snaps.
(2 on the side and 2 each on the top and bottom)
ÎPlace Front panel in front of the set ( service position ).
Front Display board 1002 |
| Front Standby board |
Î Remove cable connections. |
| Î Remove cable connection. |
Î Remove 8 screws 100. |
| Î Remove 2 screws 105. |
(Board to Front cabinet) |
| (Board to Front cabinet) |
Î Dismount board. |
| Î Dismount board. |
|
|
|
DVD Module 146
ÎRemoves flex connections to A/V board.
ÎOpen tray (see instruction below).
ÎUnlock Tray cover 025.
ÎRemove 4 screws 185. (Loader to bottom frame)
ÎClose tray.
ÎLift module up slightly and move backward to remove.
DVD Monoboard
ÎRemove flex and cable connections from DVD Loader to Monoboard.
ÎRemove 4 screws 10 to 13. (Monoboard to Loader,VAL6011/14)
ÎDismount Monoboard.
Double Scart board 1003 (Only for DVD963SA /EU)
ÎRemoves flex connection to conn 1300 on scart board.
ÎRemove 4 screws 290. (scart to
ÎDismount board.
A/V board 1001
ÎRemove Double Scart board (Only for DVD963SA /EU)
ÎRemove flex and cable connections.
ÎRemove 4 screws 275 (skt cinch ,optical to back- plate) and screw 280.
ÎRelease 2 spacers locking.
ÎDismount board.
P-scan board 1004
ÎRemoves flex connection.
ÎRemove 2 screws 275
(skt cinch to
ÎDismount board
Power supply unit 1010
ÎRemove cable connections.
ÎRemove 2 screws 190. (Board to bottom frame)
ÎRelease spacer locking. (Board to bottom frame)
ÎDismount board.
Dismantling Instructions,
DVD963SA Mechanical-, Dismantling
Instructions
Manually opening of tray |
|
When it is not possible to open the tray with the EJECT button, |
|
the tray can be manually opened. |
|
When no disc is loaded, unlock the tray by moving the slide from left | When a disc is loaded, unlock the tray by pushing the slide inwards with |
to right and pull tray outwards. | a screwdriver and pull tray outwards. |
Remove 4 screws to remove loader.
CL 26532105_002.eps 290802
and Service Hints
Instructions, and Service Hints
