03Connecting your equipment

Important

• The signal ground ( ) is designed to reduce noise that occurs when an antenna is connected. It is not an electrical safety ground.

FM wire antenna

Connect the FM wire antenna to the FM UNBAL 75in the same way as the AM antenna.

For best results, extend the FM antenna fully and fix to a wall or door frame. Don’t drape loosely or leave coiled up.

Connecting external antennas

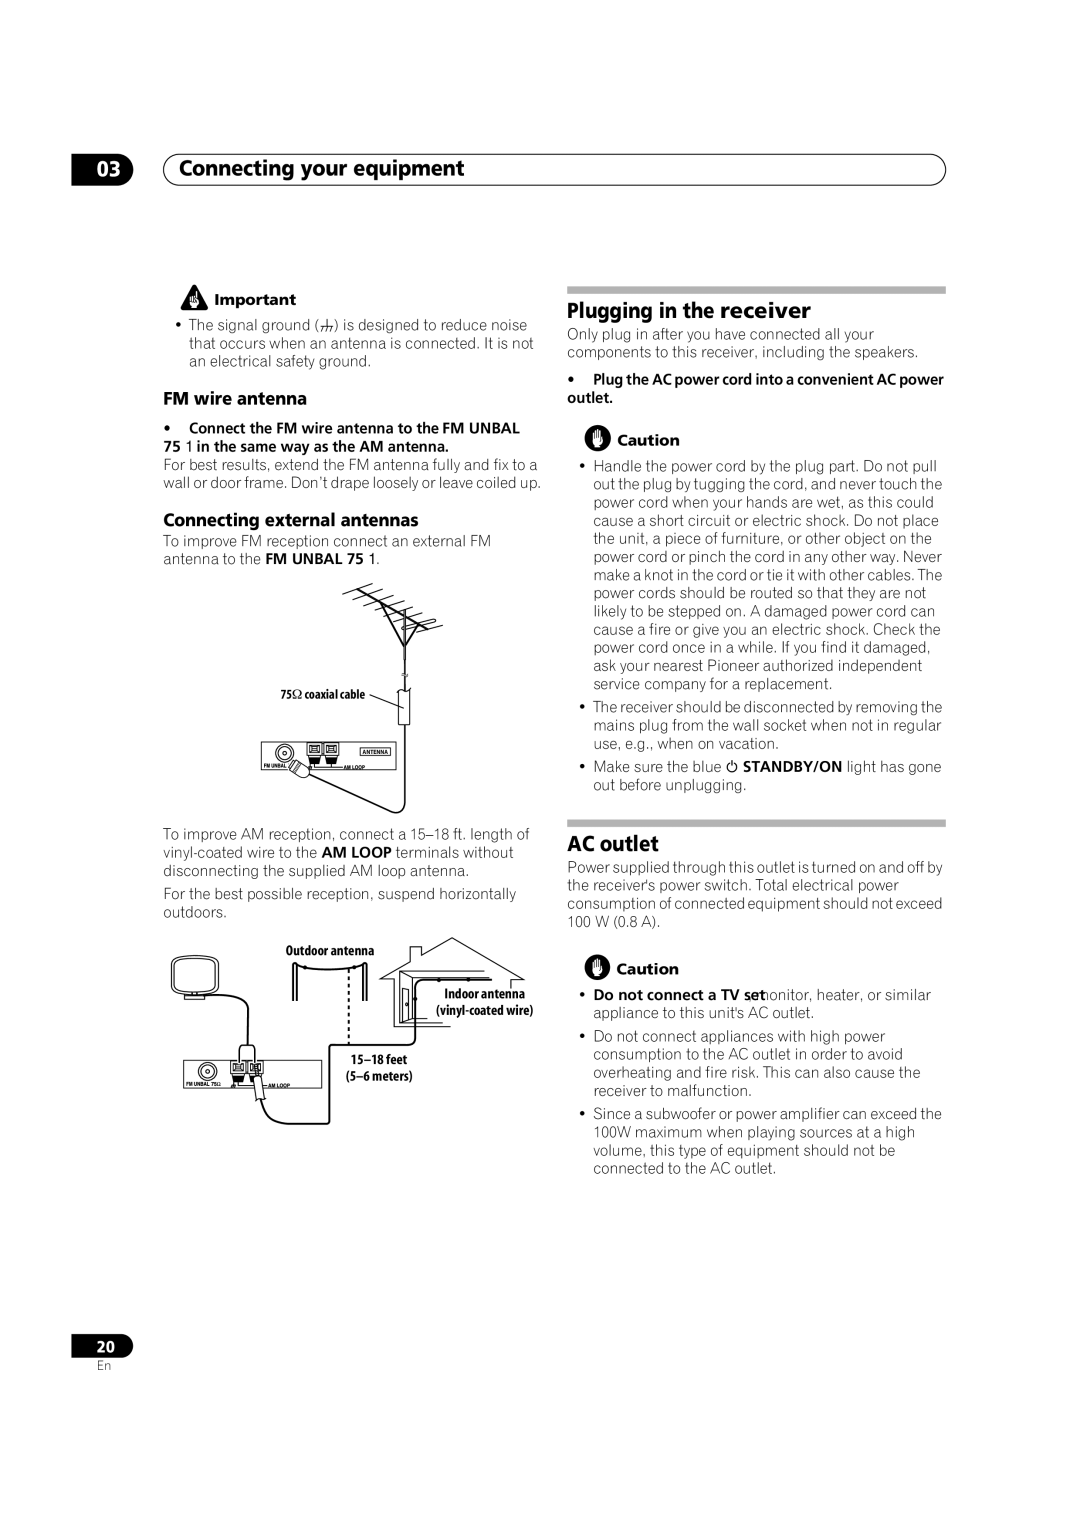
To improve FM reception connect an external FM antenna to the FM UNBAL 75.

75coaxial cable

ANTENNA

To improve AM reception, connect a 15–18 ft. length of vinyl-coated wire to the AM LOOP terminals without disconnecting the supplied AM loop antenna.

For the best possible reception, suspend horizontally outdoors.

Outdoor antenna

Indoor antenna

(vinyl-coated wire)

15–18 feet

(5–6 meters)

Plugging in the receiver

Only plug in after you have connected all your components to this receiver, including the speakers.

Plug the AC power cord into a convenient AC power outlet.

Caution

Handle the power cord by the plug part. Do not pull out the plug by tugging the cord, and never touch the power cord when your hands are wet, as this could cause a short circuit or electric shock. Do not place the unit, a piece of furniture, or other object on the power cord or pinch the cord in any other way. Never make a knot in the cord or tie it with other cables. The power cords should be routed so that they are not likely to be stepped on. A damaged power cord can cause a fire or give you an electric shock. Check the power cord once in a while. If you find it damaged, ask your nearest Pioneer authorized independent service company for a replacement.

The receiver should be disconnected by removing the mains plug from the wall socket when not in regular use, e.g., when on vacation.

Make sure the blue STANDBY/ON light has gone out before unplugging.

AC outlet

Power supplied through this outlet is turned on and off by the receiver's power switch. Total electrical power consumption of connected equipment should not exceed 100 W (0.8 A).

Caution

Do not connect a TV set, monitor, heater, or similar appliance to this unit's AC outlet.

Do not connect appliances with high power consumption to the AC outlet in order to avoid overheating and fire risk. This can also cause the receiver to malfunction.

Since a subwoofer or power amplifier can exceed the 100W maximum when playing sources at a high volume, this type of equipment should not be connected to the AC outlet.

20

En

Page 20
Image 20
Pioneer VSX-74TXVI, VSX-72TXV manual Plugging in the receiver, AC outlet, FM wire antenna, Connecting external antennas

VSX-72TXV, VSX-74TXVi-S, VSX-72TXV-S, VSX-74TXVI specifications

The Pioneer VSX-74TXVi and VSX-72TXV series are renowned for their exceptional sound quality and versatile features, making them a popular choice among audio enthusiasts and home theater aficionados. These models stand out for their advanced technologies and comprehensive functionalities, catering to both music and movie lovers.

The VSX-74TXVi is a high-performance receiver that supports a wide range of audio formats and provides impressive connectivity options. One of its main features is the incorporation of Dolby TrueHD and DTS-HD Master Audio decoding, allowing users to experience studio-quality sound. The model also supports multi-channel audio setups, making it ideal for immersive 7.1 surround sound environments. The Automatic MCACC (Multi-Channel Acoustic Calibration System) optimizes the sound based on the room's acoustic characteristics, enhancing the overall listening experience.

On the other hand, the VSX-72TXV-S offers many similar features but focuses on delivering high-definition audio and video. With support for HDMI inputs, it facilitates easy switching between multiple HD sources while maintaining top-notch audio quality. The inclusion of 1080p video upscaling allows users to enjoy standard-definition content in much higher resolutions, enhancing picture clarity for a better viewing experience.

Both models boast Zone 2 and Zone 3 capabilities, enabling audio distribution to different areas of a home, thus providing flexibility for playing music in various rooms. They also feature a user-friendly interface with an on-screen display, allowing users to navigate through options with ease.

In addition to robust audio performance, these Pioneers are designed with a focus on aesthetic appeal and durability. Their sleek designs make them an elegant addition to any entertainment setup. The VSX-74TXVi and VSX-72TXV also include built-in amplifier technologies, ensuring efficient power delivery and reliable performance over extended periods.

The VSX series exemplifies Pioneer's commitment to quality and innovation, providing features that enhance the home entertainment experience while ensuring compatibility with modern technologies. Overall, these models embody a combination of versatility, high fidelity, and user-friendly functionality, making them standout choices for any home theater system.