Additional information

12

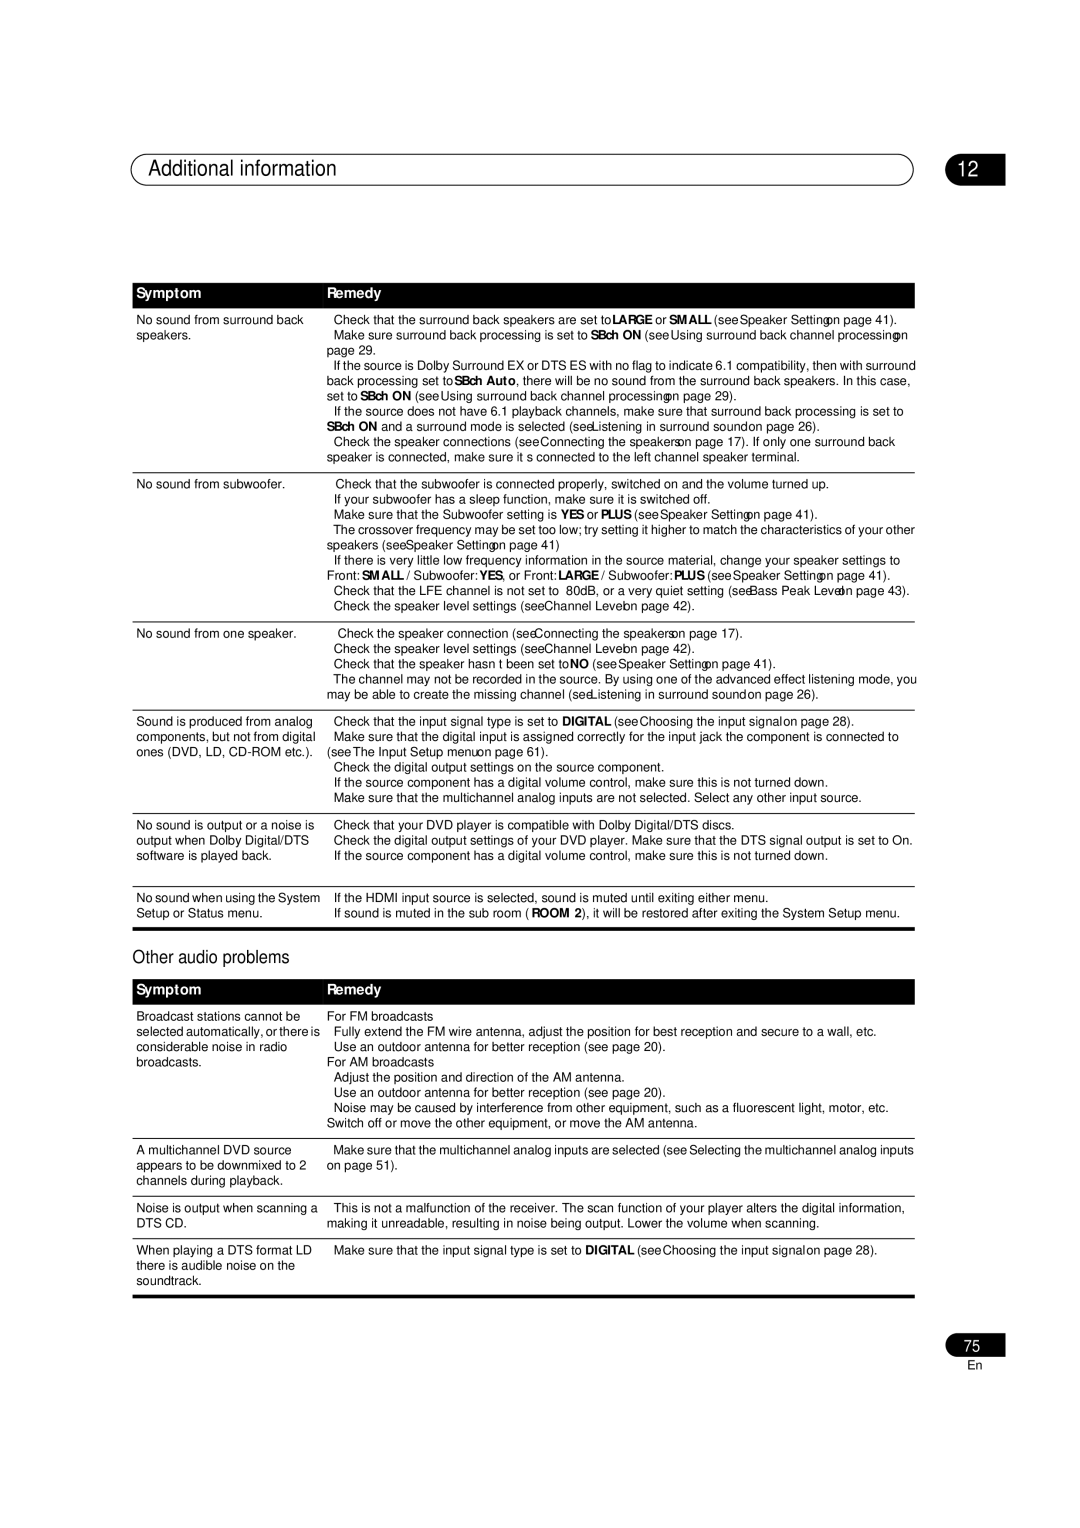
SymptomRemedy

No sound from surround back speakers.

Check that the surround back speakers are set to LARGE or SMALL (see Speaker Setting on page 41).

Make sure surround back processing is set to SBch ON (see Using surround back channel processing on page 29.

If the source is Dolby Surround EX or DTS ES with no flag to indicate 6.1 compatibility, then with surround back processing set to SBch Auto, there will be no sound from the surround back speakers. In this case, set to SBch ON (see Using surround back channel processing on page 29).

If the source does not have 6.1 playback channels, make sure that surround back processing is set to SBch ON and a surround mode is selected (see Listening in surround sound on page 26).

Check the speaker connections (see Connecting the speakers on page 17). If only one surround back speaker is connected, make sure it’s connected to the left channel speaker terminal.

No sound from subwoofer.

• Check that the subwoofer is connected properly, switched on and the volume turned up.


• If your subwoofer has a sleep function, make sure it is switched off.


• Make sure that the Subwoofer setting is YES or PLUS (see Speaker Setting on page 41).


• The crossover frequency may be set too low; try setting it higher to match the characteristics of your other


speakers (see Speaker Setting on page 41)


• If there is very little low frequency information in the source material, change your speaker settings to


Front: SMALL / Subwoofer: YES, or Front: LARGE / Subwoofer: PLUS (see Speaker Setting on page 41).


• Check that the LFE channel is not set to –80dB, or a very quiet setting (see Bass Peak Level on page 43).


• Check the speaker level settings (see Channel Level on page 42).

No sound from one speaker.

Check the speaker connection (see Connecting the speakers on page 17).

Check the speaker level settings (see Channel Level on page 42).

Check that the speaker hasn’t been set to NO (see Speaker Setting on page 41).

The channel may not be recorded in the source. By using one of the advanced effect listening mode, you may be able to create the missing channel (see Listening in surround sound on page 26).

Sound is produced from analog

• Check that the input signal type is set to DIGITAL (see Choosing the input signal on page 28).

components, but not from digital

• Make sure that the digital input is assigned correctly for the input jack the component is connected to

ones (DVD, LD, CD-ROM etc.).

(see The Input Setup menu on page 61).


• Check the digital output settings on the source component.


• If the source component has a digital volume control, make sure this is not turned down.


• Make sure that the multichannel analog inputs are not selected. Select any other input source.


No sound is output or a noise is

• Check that your DVD player is compatible with Dolby Digital/DTS discs.

output when Dolby Digital/DTS

• Check the digital output settings of your DVD player. Make sure that the DTS signal output is set to On.

software is played back.

• If the source component has a digital volume control, make sure this is not turned down.

No sound when using the System Setup or Status menu.

If the HDMI input source is selected, sound is muted until exiting either menu.

If sound is muted in the sub room (ROOM 2), it will be restored after exiting the System Setup menu.

Other audio problems

Symptom

Remedy

Broadcast stations cannot be

For FM broadcasts

selected automatically, or there is

• Fully extend the FM wire antenna, adjust the position for best reception and secure to a wall, etc.

considerable noise in radio

• Use an outdoor antenna for better reception (see page 20).

broadcasts.

For AM broadcasts


• Adjust the position and direction of the AM antenna.


• Use an outdoor antenna for better reception (see page 20).


• Noise may be caused by interference from other equipment, such as a fluorescent light, motor, etc.


Switch off or move the other equipment, or move the AM antenna.


A multichannel DVD source

• Make sure that the multichannel analog inputs are selected (see Selecting the multichannel analog inputs

appears to be downmixed to 2

on page 51).

channels during playback.


Noise is output when scanning a • This is not a malfunction of the receiver. The scan function of your player alters the digital information,

DTS CD.

making it unreadable, resulting in noise being output. Lower the volume when scanning.


When playing a DTS format LD

• Make sure that the input signal type is set to DIGITAL (see Choosing the input signal on page 28).

there is audible noise on the


soundtrack.


75

En

Page 75
Image 75
Pioneer VSX-72TXV-S, VSX-74TXVI, VSX-74TXVi-S manual Additional information, Other audio problems, SymptomRemedy

VSX-72TXV, VSX-74TXVi-S, VSX-72TXV-S, VSX-74TXVI specifications

The Pioneer VSX-74TXVi and VSX-72TXV series are renowned for their exceptional sound quality and versatile features, making them a popular choice among audio enthusiasts and home theater aficionados. These models stand out for their advanced technologies and comprehensive functionalities, catering to both music and movie lovers.

The VSX-74TXVi is a high-performance receiver that supports a wide range of audio formats and provides impressive connectivity options. One of its main features is the incorporation of Dolby TrueHD and DTS-HD Master Audio decoding, allowing users to experience studio-quality sound. The model also supports multi-channel audio setups, making it ideal for immersive 7.1 surround sound environments. The Automatic MCACC (Multi-Channel Acoustic Calibration System) optimizes the sound based on the room's acoustic characteristics, enhancing the overall listening experience.

On the other hand, the VSX-72TXV-S offers many similar features but focuses on delivering high-definition audio and video. With support for HDMI inputs, it facilitates easy switching between multiple HD sources while maintaining top-notch audio quality. The inclusion of 1080p video upscaling allows users to enjoy standard-definition content in much higher resolutions, enhancing picture clarity for a better viewing experience.

Both models boast Zone 2 and Zone 3 capabilities, enabling audio distribution to different areas of a home, thus providing flexibility for playing music in various rooms. They also feature a user-friendly interface with an on-screen display, allowing users to navigate through options with ease.

In addition to robust audio performance, these Pioneers are designed with a focus on aesthetic appeal and durability. Their sleek designs make them an elegant addition to any entertainment setup. The VSX-74TXVi and VSX-72TXV also include built-in amplifier technologies, ensuring efficient power delivery and reliable performance over extended periods.

The VSX series exemplifies Pioneer's commitment to quality and innovation, providing features that enhance the home entertainment experience while ensuring compatibility with modern technologies. Overall, these models embody a combination of versatility, high fidelity, and user-friendly functionality, making them standout choices for any home theater system.