03Connecting your equipment

• For a second recorder, use the DVR/VCR2 outputs.

3 If the device can output digital audio, connect an

optical-type1digital audio output from the recorder to the DIGITAL 2 (DVR/VCR1) input.

Use an optical cable for the connection.2

For a second recorder, use the DIGITAL 3 (DVR/ VCR2) inputs.

Using the component video jacks

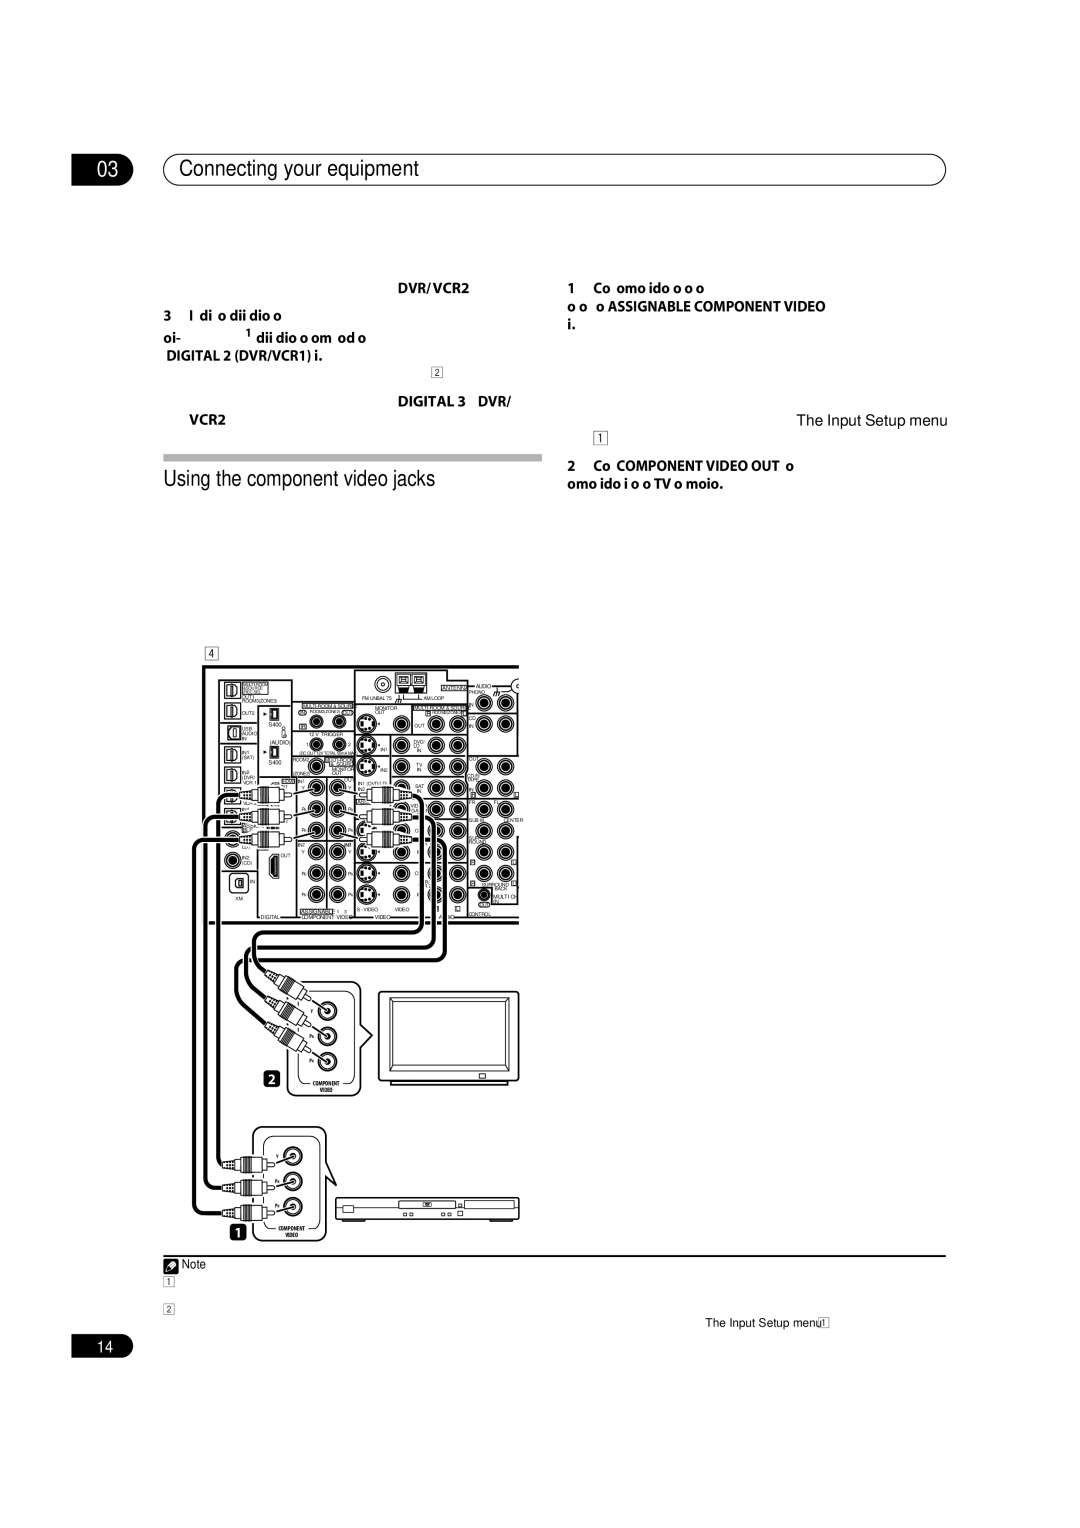
Component video should give superior picture quality when compared to composite or S-video. You can also take advantage of progressive scan video (if your source and TV are both compatible), which delivers a very stable, flicker-free picture. See the manuals that came with your TV and source component to check whether they are compatible with progressive-scan video.

1Connect the component video outputs of your source to a set of ASSIGNABLE COMPONENT VIDEO inputs.

Connect using a three-way component video cable.

Since they are assignable, it doesn’t matter which component video inputs you use for which source. After connecting everything, you’ll need to assign the component video inputs—see The Input Setup menu on page 61.

2Connect the COMPONENT VIDEO OUT jacks to the component video inputs on your TV or monitor.

Use a three-way component video cable.

VSX-74TXVi


MULTI-ROOM


ANTENNA

AUDIO


&SOURCE


/REC SEL


PHONO


OUT1


FM UNBAL 75


AM LOOP


ROOM3(ZONE3)


IN


MULTI-ROOM & SOURCE

MONITOR

MULTI-ROOM & SOURCE


OUT2


IN

ROOM2(ZONE2) OUT

OUT


R ROOM2(ZONE2) L

CD


USB

S400


IR


OUT


IN


AUDIO


12 V TRIGGER


IN

(AUDIO)


DVD/


1

2


IN1


LD


IN1


(DC OUT 12VTOTAL 50mA MAX)


IN


(SAT)

S400

ROOM2

MULTI-ROOM


OUT


& SOURCE


TV


IN2


(ZONE2)

MONITOR

IN2


IN


OUT


CD-R/


(DVR/


HDMI

IN1

OUT


TAPE


VCR 1)


IN1(DVD/LD)


SAT


Y

Y

IN


IN


IN


L


R


V


VIDEO1/


FR


FL


PB

PB


GAME1


IN


SUB W.

CENTER


BLE


PR

PR


OUT


DVR/


SUR-


LD)


IN2

IN3


VCR 1


ROUND


OUT

Y

Y


IN


IN2


(CD)


R


L


PB

PB


OUT


IN


DVR/


R

SURROUND

L


VCR 2


BACK


XM


PR

PR


IN


MULTI CH


S -VIDEO

VIDEO

R

L


OUT

IN


ASSIGNABLE 13

CONTROL


DIGITAL


COMPONENT VIDEO

VIDEO


AUDIO


Y


PB


PR


2


COMPONENT


VIDEO

TV


Y


PB


PR


1


COMPONENT

DVD player


VIDEO


Note

1• In order to record, you must connect the analog audio cables (the digital connection is for playback only).

If your video component doesn’t have a digital audio output, you can skip this step.

2If your recorder only has a coaxial digital output, you can connect it to one of the coaxial inputs on this receiver using a coaxial digital audio cable. When you set up the receiver you’ll need to tell the receiver which input you connected the recorder to (see also The Input Setup menu on page 61).

14

En

Page 14
Image 14
Pioneer VSX-74TXVi-S manual Using the component video jacks, For a second recorder, use the DVR/VCR2 outputs, DVD player

VSX-72TXV, VSX-74TXVi-S, VSX-72TXV-S, VSX-74TXVI specifications

The Pioneer VSX-74TXVi and VSX-72TXV series are renowned for their exceptional sound quality and versatile features, making them a popular choice among audio enthusiasts and home theater aficionados. These models stand out for their advanced technologies and comprehensive functionalities, catering to both music and movie lovers.

The VSX-74TXVi is a high-performance receiver that supports a wide range of audio formats and provides impressive connectivity options. One of its main features is the incorporation of Dolby TrueHD and DTS-HD Master Audio decoding, allowing users to experience studio-quality sound. The model also supports multi-channel audio setups, making it ideal for immersive 7.1 surround sound environments. The Automatic MCACC (Multi-Channel Acoustic Calibration System) optimizes the sound based on the room's acoustic characteristics, enhancing the overall listening experience.

On the other hand, the VSX-72TXV-S offers many similar features but focuses on delivering high-definition audio and video. With support for HDMI inputs, it facilitates easy switching between multiple HD sources while maintaining top-notch audio quality. The inclusion of 1080p video upscaling allows users to enjoy standard-definition content in much higher resolutions, enhancing picture clarity for a better viewing experience.

Both models boast Zone 2 and Zone 3 capabilities, enabling audio distribution to different areas of a home, thus providing flexibility for playing music in various rooms. They also feature a user-friendly interface with an on-screen display, allowing users to navigate through options with ease.

In addition to robust audio performance, these Pioneers are designed with a focus on aesthetic appeal and durability. Their sleek designs make them an elegant addition to any entertainment setup. The VSX-74TXVi and VSX-72TXV also include built-in amplifier technologies, ensuring efficient power delivery and reliable performance over extended periods.

The VSX series exemplifies Pioneer's commitment to quality and innovation, providing features that enhance the home entertainment experience while ensuring compatibility with modern technologies. Overall, these models embody a combination of versatility, high fidelity, and user-friendly functionality, making them standout choices for any home theater system.