The System Setup menu

07

1Connect the microphone to the MCACC SETUP MIC jack on the front panel.

Make sure there are no obstacles between the speakers and the microphone.

SPEAKERS


(TUNE +)


BAND

MULTI – ROOM &

VIDEO

SIGNAL

SBch


SOURCE/REC SEL


CONTROL ON/OFF

SELECT

SELECT

PROCESSING STEREO


AV


TUNER


PARAMETER


EDIT


VIDEO/GAME 2 INPUT

PHONES

(ST –)

ENTER

(ST +)

MCACC


SETUP MIC


SETUP


RETURN


(TUNE –)

DIGITAL IN

S-VIDEO

VIDEO

L AUDIO R

weighting is given to any one channel. Optionally,5 FRONT ALIGN sets all speakers in accordance with the front speaker settings (no equalization is applied to the front left and right channels), and OFF (only available when ALL is selected) allows you to save calibration settings (such as speaker distance and channel level) with no EQ or standing wave adjustment to your selected preset.

If you have a tripod, use it to place the microphone so that it’s about ear level at your normal listening position. Otherwise, place the microphone at ear level using a table or a chair.

2Select ‘Auto MCACC’ from the System Setup menu then press ENTER.

System Setup


1.Auto

MCACC


Surr

Back

System


1.Auto

MCACC


2.Surr

Back System


[

Normal (SB)

]


3.Manual MCACC


Data

Save

to


4.Data

Management


[M1.

MEMORY 1 ]


5.Manual SP Setup


6.Input

Setup


Setting Start?

[

OK

]


7.Other

Setup


[Option]


: Exit


ENTER:Next

:Cancel

3 Make sure ‘Normal (SB)’ is selected,1 select an MCACC preset2 then select OK.

For a fully customized Auto MCACC setup, select Option and set the following parameters:

1.Auto

MCACC

Option


1. Auto

MCACC

Option


1.Auto

MCACC Option

Auto

Mode


( Back )


Auto

Mode


[


ALL

]


[

Aco

Cal

EQ

Pro. ]

Speaker settings


EQ Type : FRONT ALIGN


EQ Type


will be updated.


Data

Save to


[ALL

CH

ADJUST]

THX

Speaker


EQ Type :

M2.

MEMORY

2


Multi-Point


NO


NO


OFF


If you are using THX

Data

Save to


speakers,

select

YES.


[ – – . – – –

]


(

Next )


: Return to

Auto MCACC


: Return

to Auto

MCACC

: Return

to

Auto MCACC

Auto Mode – The default is ALL (recommended), but you can limit the system calibration to only one setting (to save time) if you want.3 The available options are ALL, ALL (Keep SPsetting),4 Speaker Setting, Channel Level, Speaker Distance, Acoustic Cal EQ, and Aco Cal EQ Pro.

THX Speaker (only available when the Auto Mode above is ALL or Speaker Setting) – Select YES if you are using THX speakers (set all speakers to SMALL), otherwise leave it set to NO.

EQ Type (only available when the Auto Mode above is Acoustic Cal EQ or Aco Cal EQ Pro.) – This determines how the frequency balance is adjusted. ALL CH ADJUST (default) is a ‘flat’ setting where all the speakers are set individually so no special

Multi-Point(only available when the Auto Mode above is Acoustic Cal EQ or Aco Cal EQ Pro.) – In addition to measurements at the listening position, you can use two more reference points for which test tones will be analyzed for standing waves. This is useful if you want to get a balanced ‘flat’ calibration for several seating positions in your listening area.6 Place the microphone at the reference point indicated on-screen and note the last microphone placement will be at your main listening position:

2nd reference

3rd reference

point

point

1

2

3

Main listening

position

When you’re finished settings the options, press RETURN to go back to the Auto MCACC main setup.

4Follow the instructions on-screen.

Make sure the microphone is connected.

If you’re using a subwoofer, it is automatically detected every time you switch on the system. Make sure it is on and the volume is turned up.

See Problems when using the Auto MCACC Setup on page 9 for notes regarding high background noise levels and other possible interference.

5Wait for the Auto MCACC Setup to finish outputting test tones.

A progress report is displayed on-screen while the receiver outputs test tones to determine the speakers present in your setup. Try to be as quiet as possible while it’s doing this.

Do not adjust the volume during the test tones. This may result in incorrect speaker settings.

Note

1If you are planning on bi-amping your front speakers, or setting up a separate speaker system in another room, read through Surround back speaker set- ting on page 36 and make sure to connect your speakers as necessary before continuing to step 4.

2The six MCACC presets are used for storing surround sound settings for different listening positions. Simply choose an unused preset for now (you can rename it later in Data Management on page 42).

3The Aco Cal EQ Pro. measurement is also taken when ALL is selected. See Professional Acoustic Calibration EQ on page 39 for more on this.

4The ALL (Keep SPsetting) option allows you to calibrate your system while leaving your current speaker setting (page 43) unchanged.

5If you selected ALL as your Auto Mode setting, you can specify the MCACC preset where you want to save the FRONT ALIGN and/or OFF settings.

6Switch the Multi-Pointsetting OFF if you only use one listening position.

35

En

Page 35
Image 35
Pioneer VSX-84TXSi-S, VSX-84TXSI, VSX-82TXS-S manual System Setup menu, Memory

VSX-84TXSi-S, VSX-82TXS, VSX-82TXS-S, VSX-84TXSI specifications

The Pioneer VSX-84TXSi, VSX-82TXS, VSX-84TXSi-S, and VSX-82TXS are part of Pioneer's renowned lineup of home theater receivers, notable for their impressive audio capabilities and advanced features. Designed for enthusiasts who appreciate high-quality sound, these receivers stand out in the crowded market of A/V receivers.

The VSX-84TXSi and VSX-84TXSi-S come equipped with a robust 7.1-channel amplifier configuration, delivering a powerful output that ensures dynamic and immersive audio experience. Both models boast Pioneer's sophisticated Class D3 amplification technology, which efficiently provides high power output while minimizing distortion and heat. This feature allows listeners to enjoy their favorite music and movies with clarity and depth.

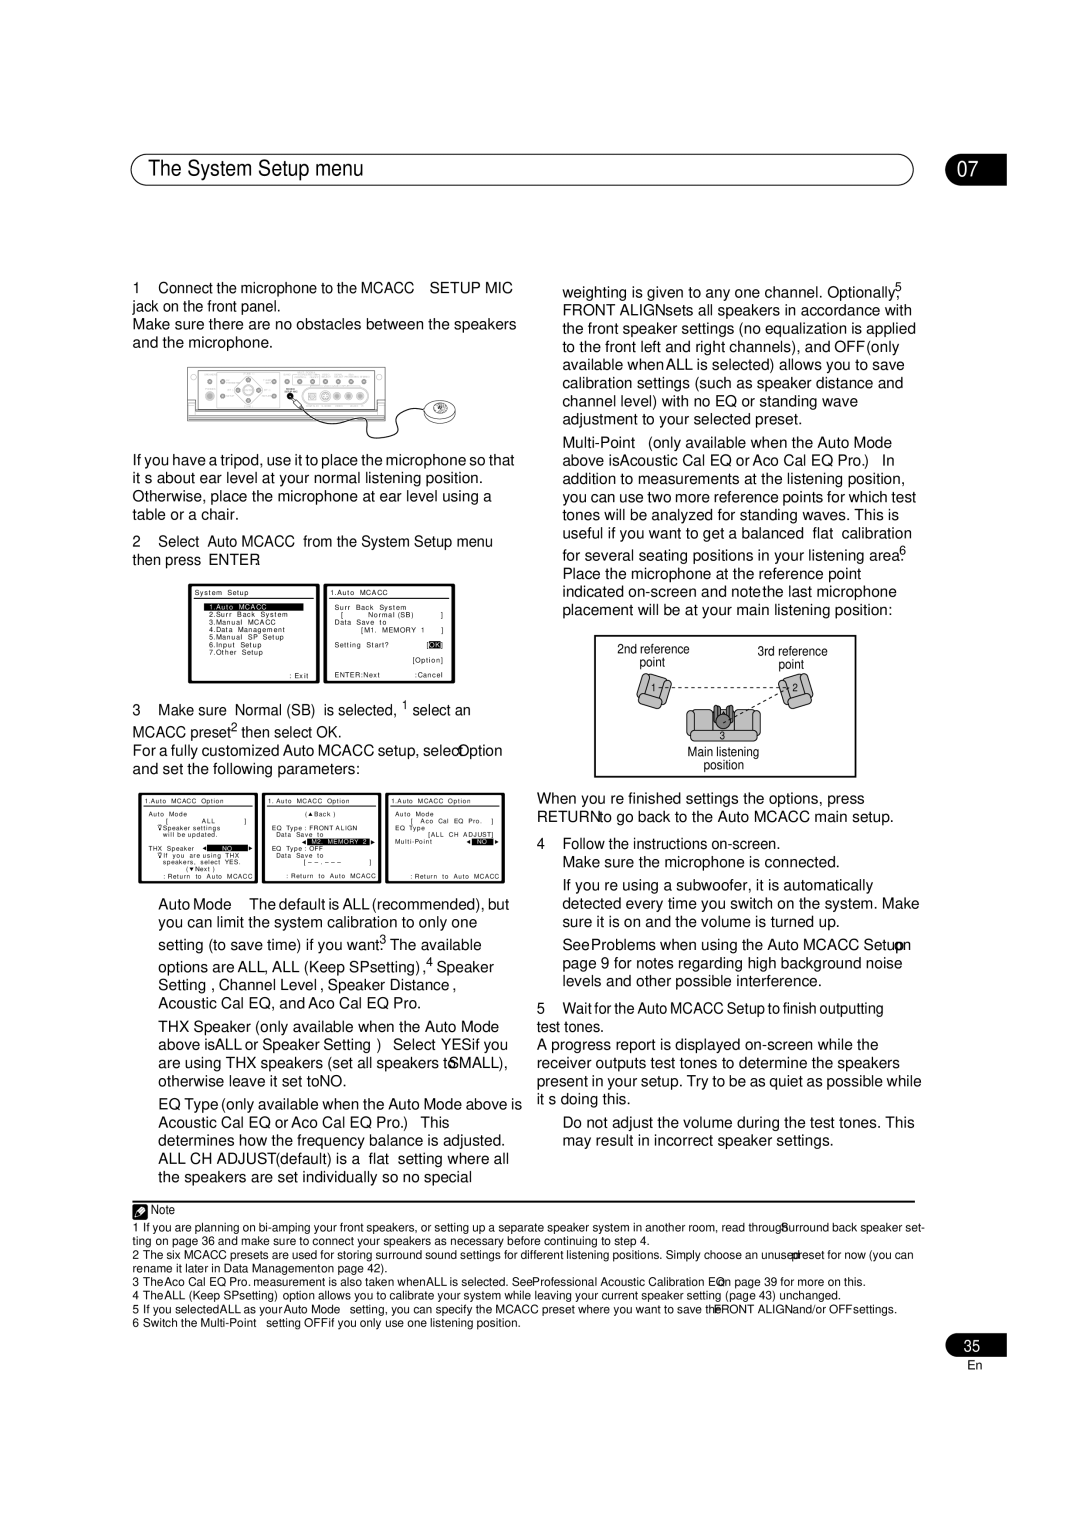
One standout feature of these receivers is the Advanced MCACC (Multi-Channel Acoustic Calibration System) technology. This automatically adjusts the speaker settings to fit the unique acoustics of the room, ensuring balanced sound across all channels. The calibration process is user-friendly, allowing even novice users to achieve optimal sound performance.

In terms of connectivity, the VSX-84TXSi and VSX-82TXS are equipped with multiple HDMI inputs, supporting the latest audio and video formats, including 4K Ultra HD. They also support Dolby TrueHD and DTS-HD Master Audio, which deliver lossless audio quality for a truly cinematic experience at home.

The VSX-84TXSi and VSX-82TXS models feature a user-friendly interface that includes on-screen displays and intuitive controls. They also offer extensive compatibility with various formats, including MP3, WMA, and AAC. For those who want to stream their music, both models have built-in support for networking capabilities, allowing users to connect to their home network and stream content from devices seamlessly.

The VSX-82TXS, while slightly less powerful than the VSX-84TXSi, offers many features that appeal to casual users and audiophiles alike. It retains the same high-quality audio processing and supports a variety of surround sound formats, making it a versatile choice for different media types.

Overall, the Pioneer VSX-84TXSi, VSX-82TXS, VSX-84TXSi-S, and VSX-82TXS are excellent choices for anyone looking to enhance their home entertainment experience. With a blend of advanced technology, impressive audio performance, and user-friendly features, these receivers continue to be favored options for home theater setups.