11Controlling the rest of your system

Button (s)

Function

Components

TOP MENU

Displays the disc ‘top’ menu of a

DVD/DVR player


DVD player.


MENU

Displays menus concerning the

DVD/DVR player


current DVD or DVR you are using.


Pauses the tape.

Cassette deck


Stops the tape.

Cassette deck


ENTER

Starts playback.

Cassette deck


Fast rewinds/fast forwards the

Cassette deck


tape.


& ENTER

Navigates DVD menu/options.

DVD/DVR player


GUIDE

Press to access the DVD player

DVD/DVR player


setup screen.


CH +/–

Selects channels.

VCR/DVD/DVR


player

Operating other Pioneer components with this unit’s sensor

Many Pioneer components have SR CONTROL jacks which can be used to link components together so that you can use just the remote sensor of one component. When you use a remote control, the control signal is

passed along the chain to the appropriate component.1

Important

Note that if you use this feature, make sure that you also have at least one set of analog audio or video jacks connected to another component for grounding purposes.

AUDIO

Changes the audio language or

DVD/DVR player


channel.


SUBTITLE

Displays/changes the subtitles on

DVD/DVR player


multilingual DVDs.


SHIFT

Switches to the VCR controls when

VCR/DVD/DVR

+SUBTITLE

using a VCR/DVD/HDD recorder.

player


HDD

Switches to the hard disk controls

DVR player

(SHIFT +

when using a DVD/HDD recorder.


CH–)


DVD (SHIFT

Switches to the DVD controls

DVR player

+CH+) when using a DVD/HDD recorder.

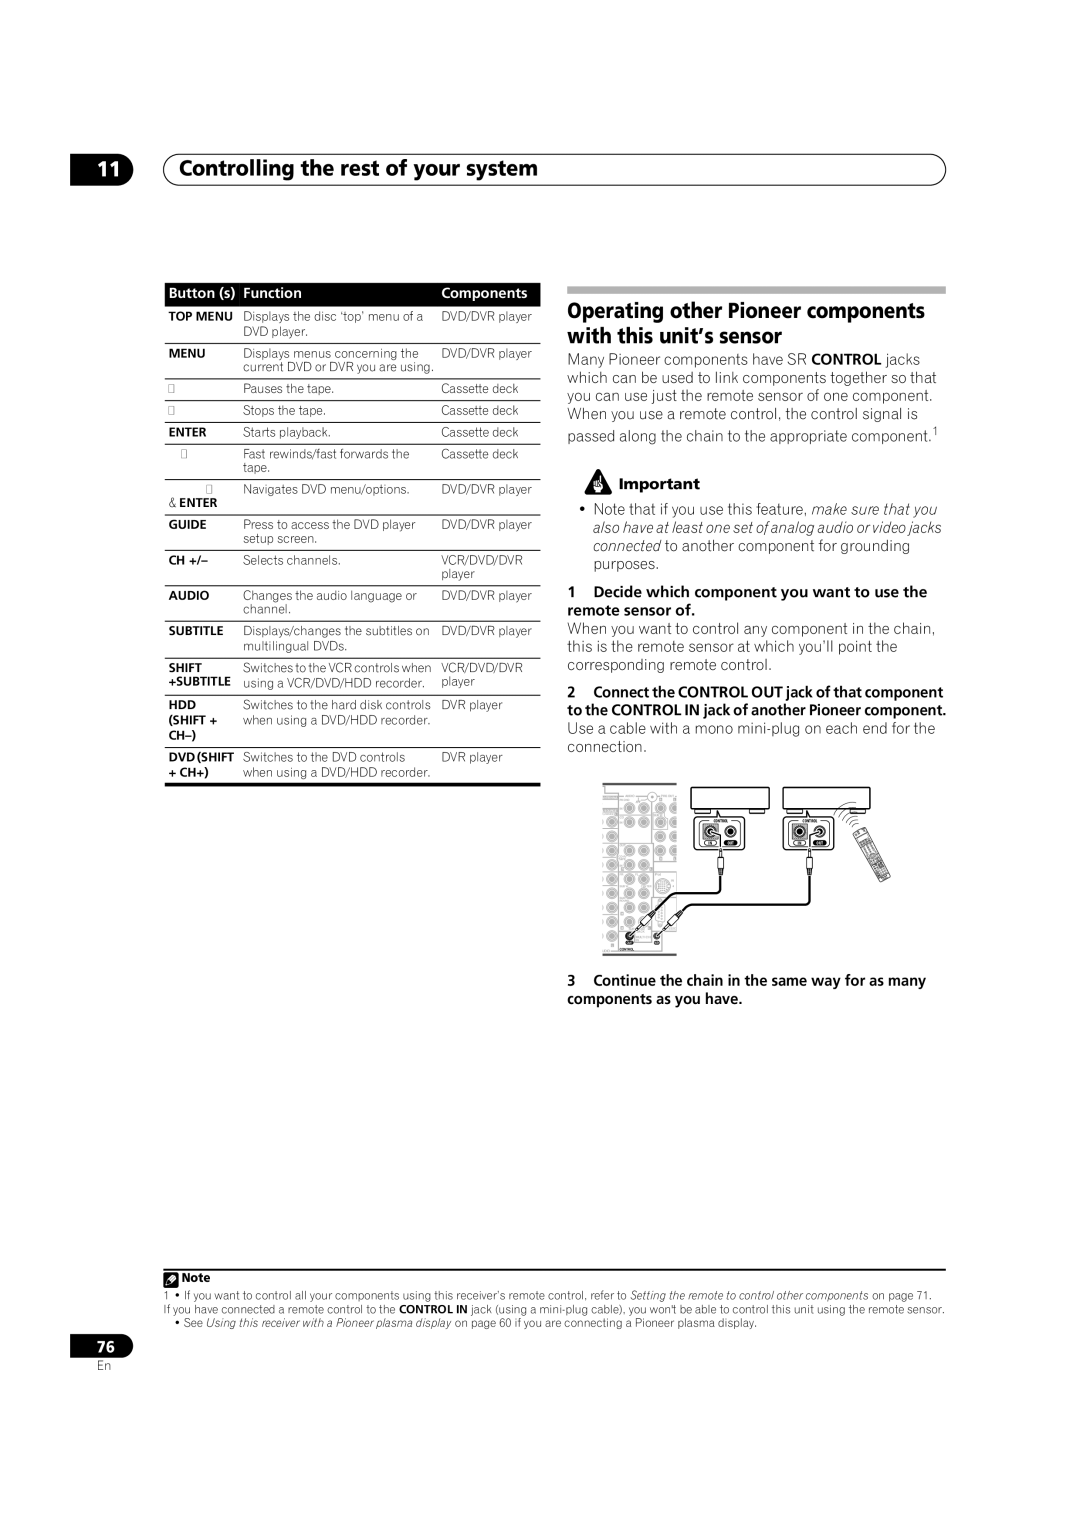
1Decide which component you want to use the remote sensor of.

When you want to control any component in the chain, this is the remote sensor at which you’ll point the corresponding remote control.

2Connect the CONTROL OUT jack of that component to the CONTROL IN jack of another Pioneer component. Use a cable with a mono mini-plug on each end for the connection.

ANTENNA

AUDIO

PRE OUT


PHONO

R

L

P


& SOURCE

IN


2(ZONE2) L

CD

SUB W.


IN


OUT


CD-R/

R

L


TAPE

IN

RL

FR

FL

iPod


IN

SUB W.


CENTER

SUR-


ROUND


R


R

L

232C


BACK


MULTI CH

IN

OUTIN

L


CONTROL


CONTROL

IN

OUT

IN

OUT

UDIO

CONTROL

3 Continue the chain in the same way for as many components as you have.

Note

1 • If you want to control all your components using this receiver’s remote control, refer to Setting the remote to control other components on page 71.

If you have connected a remote control to the CONTROL IN jack (using a mini-plug cable), you won't be able to control this unit using the remote sensor.

• See Using this receiver with a Pioneer plasma display on page 60 if you are connecting a Pioneer plasma display.

76

En

Page 76
Image 76
Pioneer VSX-84TXSI, VSX-82TXS-S Operating other Pioneer components with this unit’s sensor, Button s Function Components

VSX-84TXSi-S, VSX-82TXS, VSX-82TXS-S, VSX-84TXSI specifications

The Pioneer VSX-84TXSi, VSX-82TXS, VSX-84TXSi-S, and VSX-82TXS are part of Pioneer's renowned lineup of home theater receivers, notable for their impressive audio capabilities and advanced features. Designed for enthusiasts who appreciate high-quality sound, these receivers stand out in the crowded market of A/V receivers.

The VSX-84TXSi and VSX-84TXSi-S come equipped with a robust 7.1-channel amplifier configuration, delivering a powerful output that ensures dynamic and immersive audio experience. Both models boast Pioneer's sophisticated Class D3 amplification technology, which efficiently provides high power output while minimizing distortion and heat. This feature allows listeners to enjoy their favorite music and movies with clarity and depth.

One standout feature of these receivers is the Advanced MCACC (Multi-Channel Acoustic Calibration System) technology. This automatically adjusts the speaker settings to fit the unique acoustics of the room, ensuring balanced sound across all channels. The calibration process is user-friendly, allowing even novice users to achieve optimal sound performance.

In terms of connectivity, the VSX-84TXSi and VSX-82TXS are equipped with multiple HDMI inputs, supporting the latest audio and video formats, including 4K Ultra HD. They also support Dolby TrueHD and DTS-HD Master Audio, which deliver lossless audio quality for a truly cinematic experience at home.

The VSX-84TXSi and VSX-82TXS models feature a user-friendly interface that includes on-screen displays and intuitive controls. They also offer extensive compatibility with various formats, including MP3, WMA, and AAC. For those who want to stream their music, both models have built-in support for networking capabilities, allowing users to connect to their home network and stream content from devices seamlessly.

The VSX-82TXS, while slightly less powerful than the VSX-84TXSi, offers many features that appeal to casual users and audiophiles alike. It retains the same high-quality audio processing and supports a variety of surround sound formats, making it a versatile choice for different media types.

Overall, the Pioneer VSX-84TXSi, VSX-82TXS, VSX-84TXSi-S, and VSX-82TXS are excellent choices for anyone looking to enhance their home entertainment experience. With a blend of advanced technology, impressive audio performance, and user-friendly features, these receivers continue to be favored options for home theater setups.