07The System Setup menu

2Choose the set of speakers that you want to set then select a speaker size.

Use

to select the size (and number) of each of the

following speakers:1

Front – Select LARGE if your front speakers reproduce bass frequencies effectively, or if you didn’t connect a subwoofer. Select SMALL to send the bass frequencies to the subwoofer.

Center – Select LARGE if your center speaker reproduces bass frequencies effectively, or select SMALL to send bass frequencies to the other speakers or subwoofer. If you didn’t connect a center speaker, choose NO (the center channel is sent to the front speakers).

Surround – Select LARGE if your surround speakers reproduce bass frequencies effectively. Select SMALL to send bass frequencies to the other speakers or subwoofer. If you didn’t connect surround speakers choose NO (the sound of the surround channels is sent to the front speakers or a subwoofer).

Surr Back – Select the number of surround back speakers you have (one, two or none).2 Select LARGE if your surround back speakers reproduce bass frequencies effectively. Select SMALL to send bass frequencies to the other speakers or subwoofer. If you didn’t connect surround back speakers choose NO.

Subwoofer – LFE signals and bass frequencies of channels set to SMALL are output from the subwoofer when YES is selected. Choose the PLUS setting if you want the subwoofer to output bass sound continuously or you want deeper bass (the bass frequencies that would normally come out the front and center speakers are also routed to the subwoofer).3 If you did not connect a subwoofer choose NO (the bass frequencies are output from other speakers).

3Select ‘X. OVER’ and set the crossover frequency.4 Frequencies below this point will be sent to the subwoofer (or LARGE speakers).

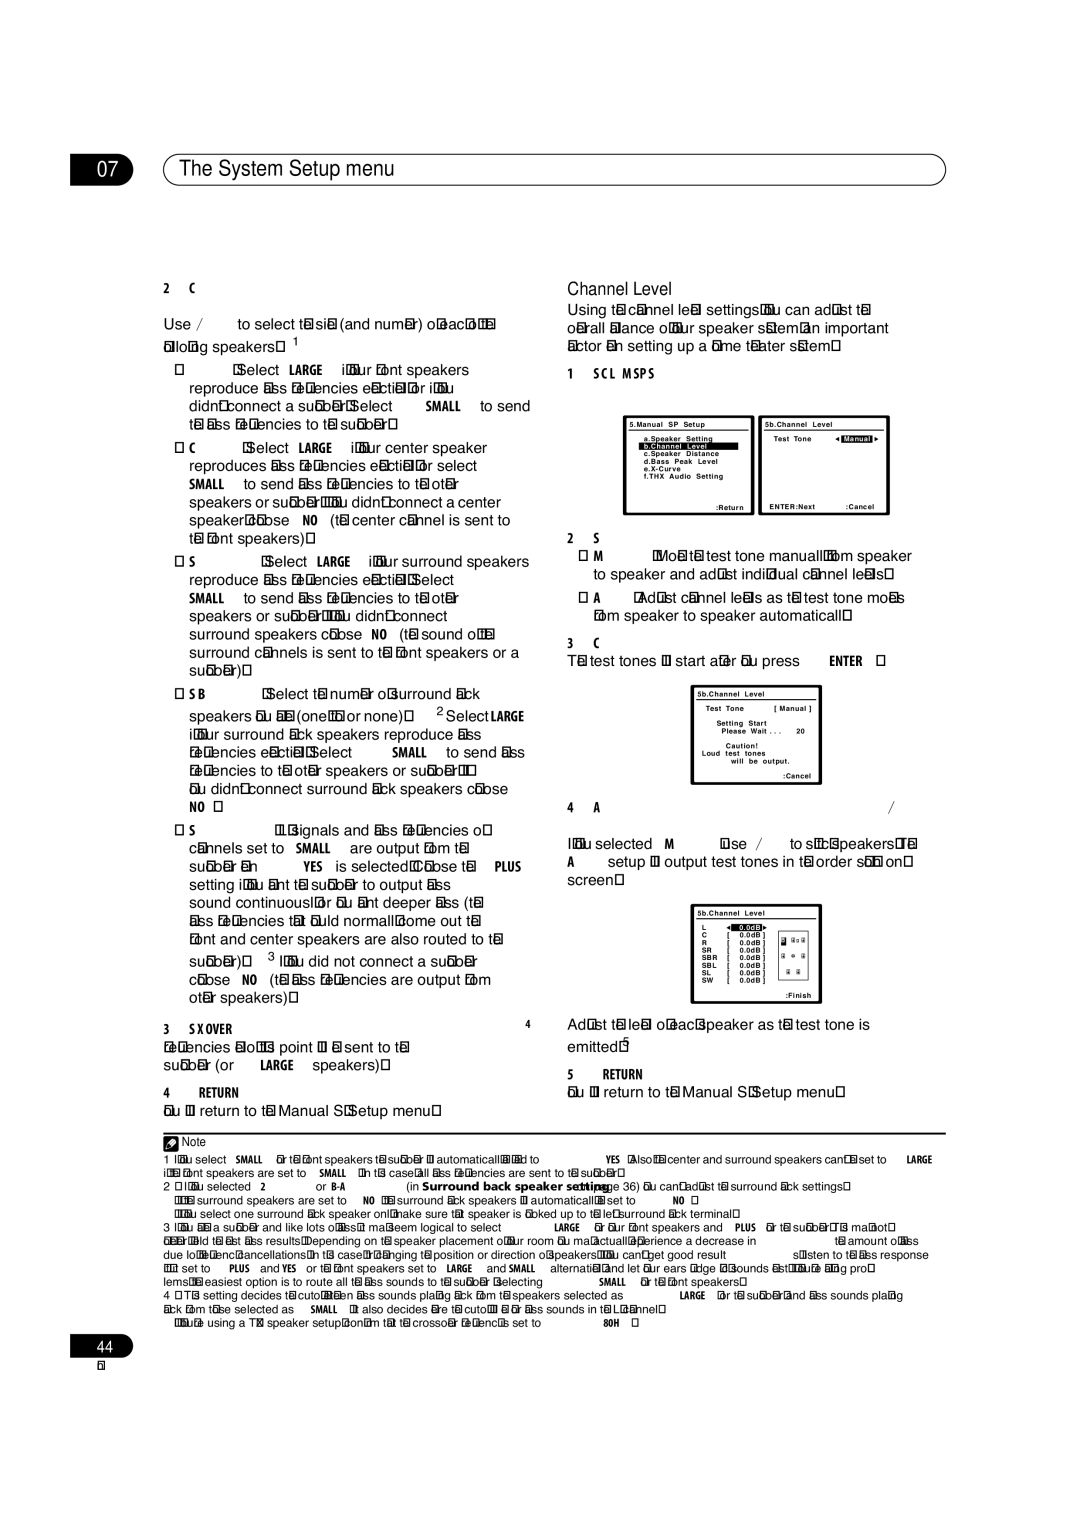
Channel Level

Using the channel level settings, you can adjust the overall balance of your speaker system, an important factor when setting up a home theater system.

1Select ‘Channel Level’ from the Manual SP Setup menu.


5.Manual SP

Setup


5b.Channel Level


a.Speaker

Setting


Test Tone


Manual


b.Channel

Level


c.Speaker

Distance


d.Bass Peak

Level


e.X-Curve


f.THX Audio

Setting


:Return


ENTER:Next

:Cancel


2Select a setup option.

Manual – Move the test tone manually from speaker to speaker and adjust individual channel levels.

Auto – Adjust channel levels as the test tone moves from speaker to speaker automatically.

3Confirm your selected setup option.

The test tones will start after you press ENTER.

5b.Channel Level

Test Tone

[ Manual ]

Setting

Start


Please

Wait . . .

20

Caution!

Loud test tones

will be output.

:Cancel

4Adjust the level of each channel using the buttons.

If you selected Manual, use to switch speakers. The Auto setup will output test tones in the order shown on- screen:

5b.Channel Level

L 0.0dB

C[ 0.0dB ]

R

[

0.0dB ]

SR

[

0.0dB ]

SBR

[

0.0dB ]

SBL

[

0.0dB ]

SL

[

0.0dB ]

SW

[

0.0dB ]

:Finish

Adjust the level of each speaker as the test tone is emitted.5

5 When you’re finished, press RETURN.

4When you’re finished, press RETURN.

You will return to the Manual SP Setup menu.

You will return to the Manual SP Setup menu.

Note

1If you select SMALL for the front speakers the subwoofer will automatically be fixed to YES. Also, the center and surround speakers can’t be set to LARGE if the front speakers are set to SMALL. In this case, all bass frequencies are sent to the subwoofer.

2• If you selected 2nd Zone or Front Bi-Amp(in Surround back speaker setting on page 36) you can’t adjust the surround back settings.

If the surround speakers are set to NO, the surround back speakers will automatically be set to NO.

If you select one surround back speaker only, make sure that speaker is hooked up to the left surround back terminal.

3If you have a subwoofer and like lots of bass, it may seem logical to select LARGE for your front speakers and PLUS for the subwoofer. This may not, however, yield the best bass results. Depending on the speaker placement of your room you may actually experience a decrease in the amount of bass due low frequency cancellations. In this case, try changing the position or direction of speakers. If you can’t get good results, listen to the bass response with it set to PLUS and YES or the front speakers set to LARGE and SMALL alternatively and let your ears judge which sounds best. If you’re having prob- lems, the easiest option is to route all the bass sounds to the subwoofer by selecting SMALL for the front speakers.

4• This setting decides the cutoff between bass sounds playing back from the speakers selected as LARGE, or the subwoofer, and bass sounds playing back from those selected as SMALL. It also decides where the cutoff will be for bass sounds in the LFE channel.

•If you’re using a THX speaker setup, confirm that the crossover frequency is set to 80Hz.

44

En

Page 44
Image 44
Pioneer VSX-84TXSI, VSX-82TXS-S manual Select ‘Channel Level’ from the Manual SP Setup menu, Select a setup option

VSX-84TXSi-S, VSX-82TXS, VSX-82TXS-S, VSX-84TXSI specifications

The Pioneer VSX-84TXSi, VSX-82TXS, VSX-84TXSi-S, and VSX-82TXS are part of Pioneer's renowned lineup of home theater receivers, notable for their impressive audio capabilities and advanced features. Designed for enthusiasts who appreciate high-quality sound, these receivers stand out in the crowded market of A/V receivers.

The VSX-84TXSi and VSX-84TXSi-S come equipped with a robust 7.1-channel amplifier configuration, delivering a powerful output that ensures dynamic and immersive audio experience. Both models boast Pioneer's sophisticated Class D3 amplification technology, which efficiently provides high power output while minimizing distortion and heat. This feature allows listeners to enjoy their favorite music and movies with clarity and depth.

One standout feature of these receivers is the Advanced MCACC (Multi-Channel Acoustic Calibration System) technology. This automatically adjusts the speaker settings to fit the unique acoustics of the room, ensuring balanced sound across all channels. The calibration process is user-friendly, allowing even novice users to achieve optimal sound performance.

In terms of connectivity, the VSX-84TXSi and VSX-82TXS are equipped with multiple HDMI inputs, supporting the latest audio and video formats, including 4K Ultra HD. They also support Dolby TrueHD and DTS-HD Master Audio, which deliver lossless audio quality for a truly cinematic experience at home.

The VSX-84TXSi and VSX-82TXS models feature a user-friendly interface that includes on-screen displays and intuitive controls. They also offer extensive compatibility with various formats, including MP3, WMA, and AAC. For those who want to stream their music, both models have built-in support for networking capabilities, allowing users to connect to their home network and stream content from devices seamlessly.

The VSX-82TXS, while slightly less powerful than the VSX-84TXSi, offers many features that appeal to casual users and audiophiles alike. It retains the same high-quality audio processing and supports a variety of surround sound formats, making it a versatile choice for different media types.

Overall, the Pioneer VSX-84TXSi, VSX-82TXS, VSX-84TXSi-S, and VSX-82TXS are excellent choices for anyone looking to enhance their home entertainment experience. With a blend of advanced technology, impressive audio performance, and user-friendly features, these receivers continue to be favored options for home theater setups.