Additional information | 14 |
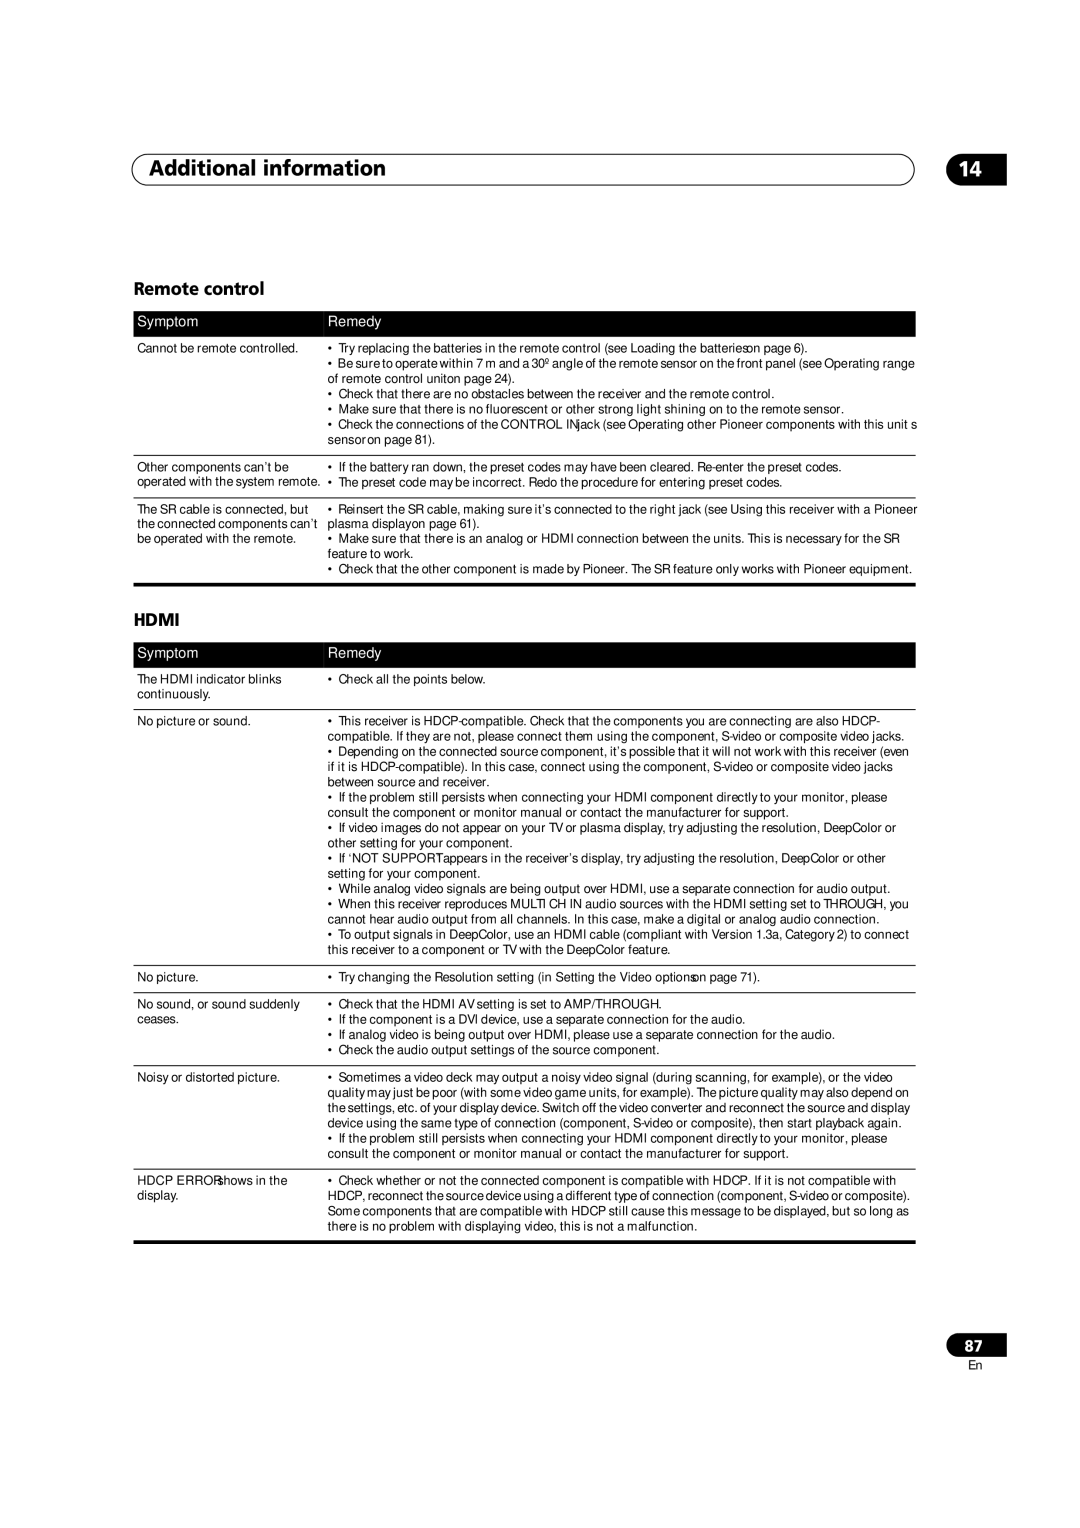
Remote control
Symptom | Remedy |
Cannot be remote controlled. | • Try replacing the batteries in the remote control (see Loading the batteries on page 6). |
| • Be sure to operate within 7 m and a 30º angle of the remote sensor on the front panel (see Operating range |
| of remote control unit on page 24). |
| • Check that there are no obstacles between the receiver and the remote control. |
| • Make sure that there is no fluorescent or other strong light shining on to the remote sensor. |
| • Check the connections of the CONTROL IN jack (see Operating other Pioneer components with this unit’s |
| sensor on page 81). |
|
|
Other components can’t be | • If the battery ran down, the preset codes may have been cleared. |
operated with the system remote. | • The preset code may be incorrect. Redo the procedure for entering preset codes. |
|
|
The SR cable is connected, but | • Reinsert the SR cable, making sure it’s connected to the right jack (see Using this receiver with a Pioneer |
the connected components can’t | plasma display on page 61). |
be operated with the remote. | • Make sure that there is an analog or HDMI connection between the units. This is necessary for the SR |
| feature to work. |
| • Check that the other component is made by Pioneer. The SR feature only works with Pioneer equipment. |
|
|
HDMI
Symptom | Remedy |
The HDMI indicator blinks | • Check all the points below. |
continuously. |
|
|
|
No picture or sound. | • This receiver is |
| compatible. If they are not, please connect them using the component, |
| • Depending on the connected source component, it’s possible that it will not work with this receiver (even |
| if it is |
| between source and receiver. |
| • If the problem still persists when connecting your HDMI component directly to your monitor, please |
| consult the component or monitor manual or contact the manufacturer for support. |
| • If video images do not appear on your TV or plasma display, try adjusting the resolution, DeepColor or |
| other setting for your component. |
| • If ‘NOT SUPPORT’ appears in the receiver’s display, try adjusting the resolution, DeepColor or other |
| setting for your component. |
| • While analog video signals are being output over HDMI, use a separate connection for audio output. |
| • When this receiver reproduces MULTI CH IN audio sources with the HDMI setting set to THROUGH, you |
| cannot hear audio output from all channels. In this case, make a digital or analog audio connection. |
| • To output signals in DeepColor, use an HDMI cable (compliant with Version 1.3a, Category 2) to connect |
| this receiver to a component or TV with the DeepColor feature. |
|
|
No picture. | • Try changing the Resolution setting (in Setting the Video options on page 71). |
|
|
No sound, or sound suddenly | • Check that the HDMI AV setting is set to AMP/THROUGH. |
ceases. | • If the component is a DVI device, use a separate connection for the audio. |
| • If analog video is being output over HDMI, please use a separate connection for the audio. |
| • Check the audio output settings of the source component. |
|
|
Noisy or distorted picture. | • Sometimes a video deck may output a noisy video signal (during scanning, for example), or the video |
| quality may just be poor (with some video game units, for example). The picture quality may also depend on |
| the settings, etc. of your display device. Switch off the video converter and reconnect the source and display |
| device using the same type of connection (component, |
| • If the problem still persists when connecting your HDMI component directly to your monitor, please |
| consult the component or monitor manual or contact the manufacturer for support. |
HDCP ERROR shows in the display.
•Check whether or not the connected component is compatible with HDCP. If it is not compatible with HDCP, reconnect the source device using a different type of connection (component,
87
En
