M M E R C I a L P R O D U C T S D I V I S I O N
Important Safety Instructions
Grounding Instructions
Safety Approval
Table of Contents
Back cover
Maintenance
Exercising on the Treadmill
Courses
European Applications
Radio Frequency Interference RFI
About this Manual
Obtaining Service
Unpacking the Treadmill
Standard Equipment
Other Equipment
Hardware KIT
Additional Tools Needed
Setting Up the Treadmill
Installation Requirements
Assembly Instructions
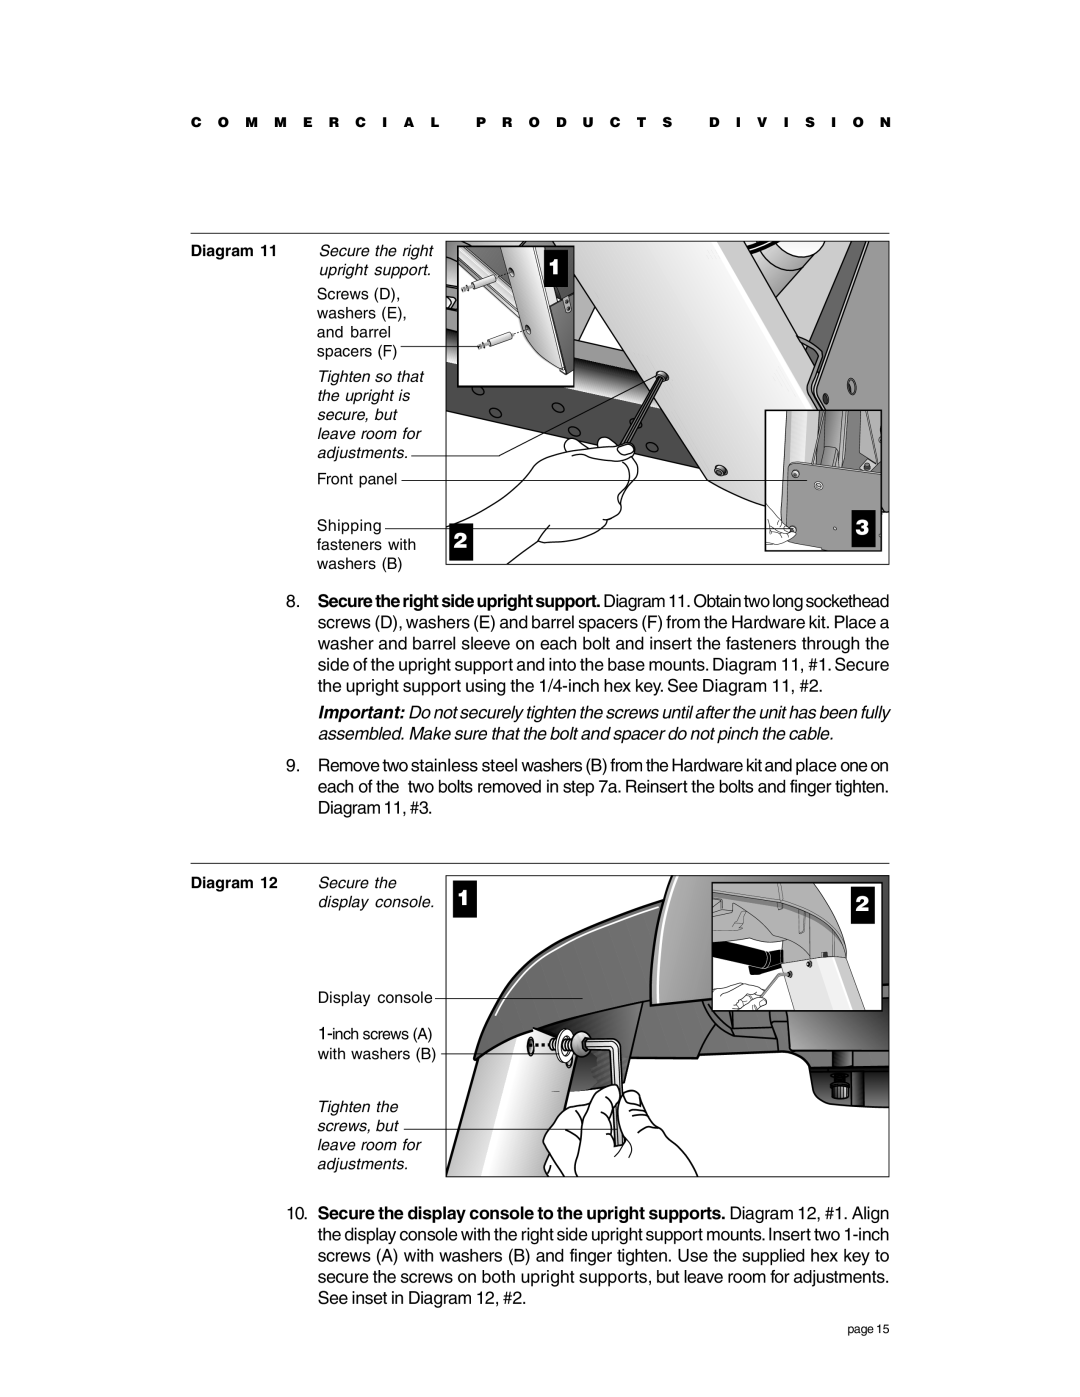
Diagram
Remove
Attach
Connect
M M E R C I a L O D U C T S V I S I O N
Diagram 13 Handrail alignment and installation
Diagram
M M E R C I a L O D U C T S V I S I O N
Power cord to
Turning the Unit on and OFF
Checking the Alignment of the Running Belt
If the running belt Then
Club Information
Changing the Club Settings
Selecting the Language
To access the Club settings, the following must occur
Speed , Speed , Speed , Reset, Speed , Speed , Speed
Keypad key functions within the Club Custom Mode
Determining the Club Speed Limit
Setting a Workout Time Limit
Setting a Pause Time Limit
Setting a Cool Down Time Limit
Press Enter to confirm your selection
Speed or Incline or Enter Stop or Reset
Removing or Providing a Fitness Test
Changing the Custom Courses
User ID Entry Program Keys
Using Csafe Standard Equipment
Reset
Speed , Speed Or, you can opt to use the number keys 6
C966 Display
Features on the Display Console
TOP Display Windows
Upper Display
Center Display
M M E R C I a L P R O D U C T S D I V I S I O N
Keypad Tips
Keys on the Display Console
M M E R C I a L P R O D U C T S D I V I S I O N
Chest strap. If no Age entry occurs, the SmartRate display
Quickstart Default Values
Prompts DefaultValue
If QuickStart is pressed after an Age is entered, then
Press QuickStart at Following occurs
A course You press This is what happens
Using the Security Clip
PAUSE, Cool DOWN, Summary and Exit Features
Exercising on the Treadmill
At theWorkout Summary banner You press This is what happens
Pause mode You press This is what happens
Speed
Cool down You press This is what happens
Grips on the handrail
Quick Steps to Working OUT
Workout Tips
For your Heart Rate to appear on the display, you need to
Cooling Down After a Workout
Heart Rate Feature
Using the Smartrate Feature
Courses
Rate
Weight
Track Course
Manual Mode and the Quickstart KEY
To use the interval course, take the following steps
5K Course
Preprogrammed Courses
Interval Course
Custom Courses
Fitness Test
Fitness Test Guidelines
You press the Stop key
Random Course
Heart Rate Course
Fitness Test ends if any one of the following occurs
Weight Loss Course
GOAL-BASED Courses
Perform a daily inspection of the treadmill
Maintenance
Cleaning the Equipment
Inspection
Align
Aligning the Running Belt
Servicing the Treadmill
Storing the Polar Chest Strap
Long Term Storage
Exploded Views
View
Exploded Views
Exploded Views
Exploded Views
Thank You and Welcome to Precor
How many members do you have?
Date of Purchase
Product Serial Numbers
Please indicate the type and number of products purchased
Complete this portion and keep for your records
Limited Warranty
Warranty Periods and Coverage
Conditions and Restrictions
Electronic Specifications
Product Specifications