INSTALLATION

tant to support the vent pipe every 3 feet, to avoid excessive stress on the elbows, and possible sep- aration. Wall straps are available for this purpose. See diagram 9.

Galvanized pipe and elbows may be utilized in the attic as well as above the roofline. The galvanized finish is desirable above the roofline due to its higher corrosion resist- ance.

Continue to add pipe sections through the


flashing until the height of the vent cap


meets the minimum height requirements


specified in diagram 12 or local codes. Note


that for steep roof pitches, the vertical


height must be increased. A poor draft, or


down drafting can result from high wind


conditions near big trees or adjoining roof


lines, in these cases, increasing the vent

Diagram 13

height may solve the problem.


Slope

"X"


0/12

- 2/12

4"


2/12

- 7/12

5-1/2"


7/12

- 12/12

6-3/4"


12/12 - 24/12

7-1/2"


24/12+

12-1/2"

Diagram 12


Roof Pitch


Minimum Vent Height


Feet

Meters

flat to 7/12


2

0.61

over 7/12 to 8/12


2

0.61

over 8/12 to 9/12


2

0.61

over 9/12 to 10/12


2.5

0.76

over 10/12 to 11/12


3.25

0.99

over 11/12 to 12/12


4

1.22

over 12/12 to 14/12


5

1.52

over 14/12 to 16/12


6

1.83

over 16/12 to 18/12


7

2.13

over 18/12 to 20/12


7.5

2.29

over 20/12 to 21/12


8

2.44


7)Ensure vent is vertical and secure the base of the flashing to the roof with roofing rails, slide storm collar over the pipe section and seal with a mastic.

8)Install the vertical termination cap by twist locking it.

Notes:

a)For multistorey vertical installations, a Ceiling Fire stop (Part# 963) is required at the second floor, and any subse- quent floor. See diagram 13. The open- ing should be framed to 10 " x 10" inside dimensions, in the same manner as shown in diagram 10.

b)Any occupied areas above the first floor, including closets and storage spaces, through which the vertical vent passes, must be enclosed.

Offset Chart

CATHEDRAL CEILINGS

Round Support (RDS) & Square

Support (SQS)

If your home has a cathedral ceiling (no attic space between the ceiling and the roof), install the chimney and support as follows.

1)Situate the chimney in a convenient location as near as possible to the appliance outlet. Cut and frame a hole in the roof for the support. The sides of this hole must be vertical with 1-1/4" clearance.

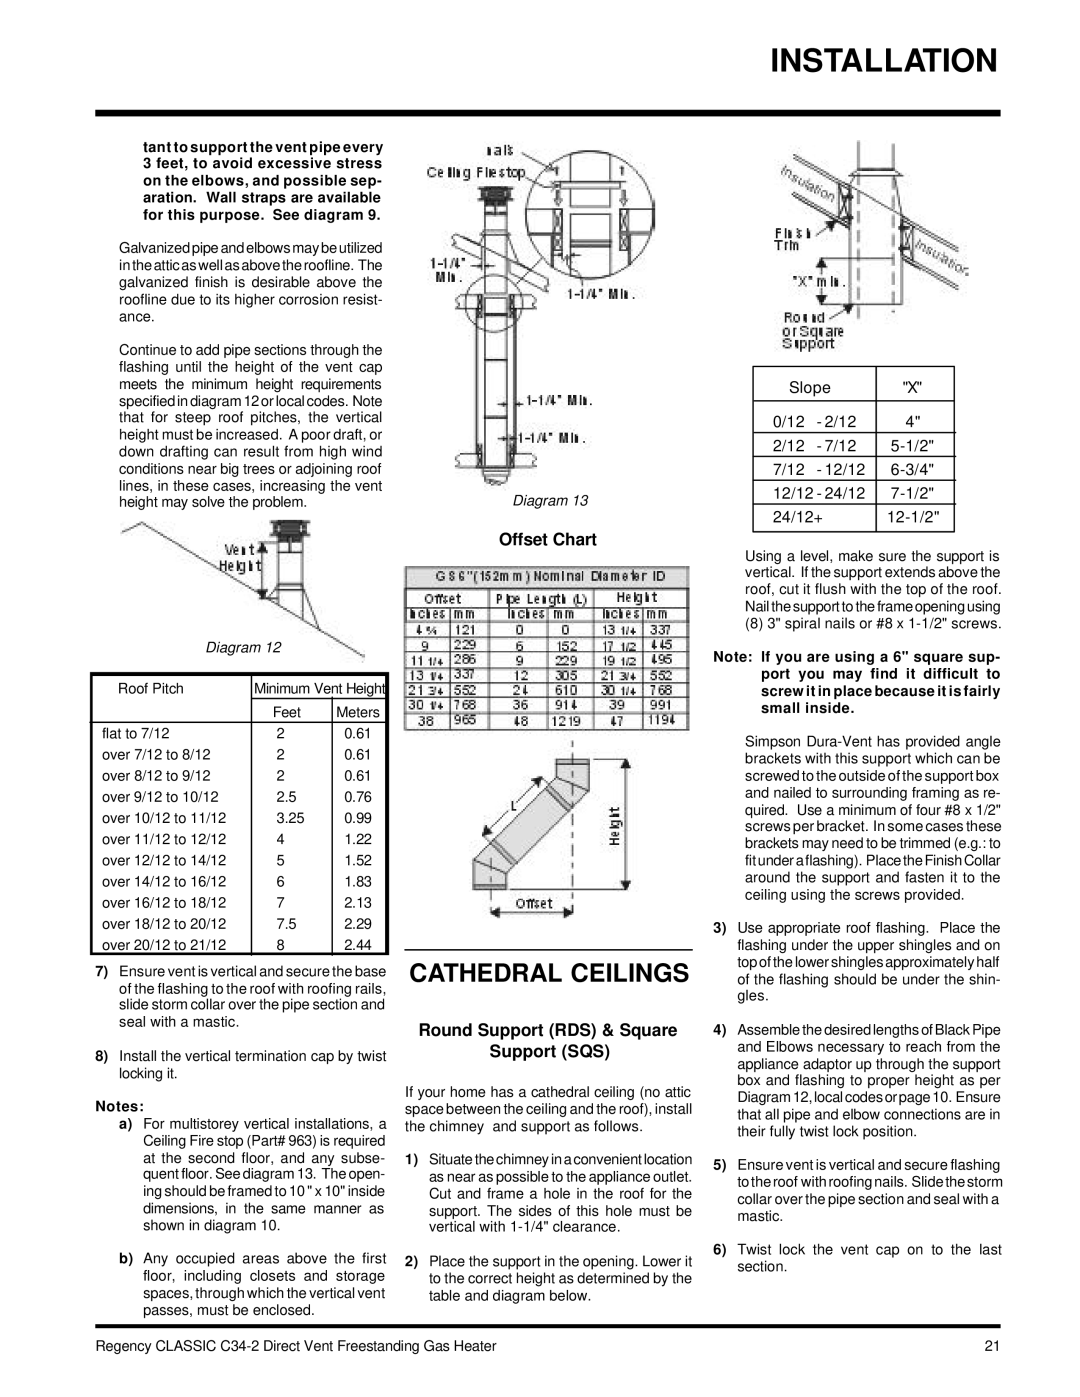
2)Place the support in the opening. Lower it to the correct height as determined by the table and diagram below.

Using a level, make sure the support is vertical. If the support extends above the roof, cut it flush with the top of the roof. Nail the support to the frame opening using

(8) 3" spiral nails or #8 x 1-1/2" screws.

Note: If you are using a 6" square sup- port you may find it difficult to screw it in place because it is fairly small inside.

Simpson Dura-Vent has provided angle brackets with this support which can be screwed to the outside of the support box and nailed to surrounding framing as re- quired. Use a minimum of four #8 x 1/2" screws per bracket. In some cases these brackets may need to be trimmed (e.g.: to fit under a flashing). Place the Finish Collar around the support and fasten it to the ceiling using the screws provided.

3)Use appropriate roof flashing. Place the flashing under the upper shingles and on top of the lower shingles approximately half of the flashing should be under the shin- gles.

4)Assemble the desired lengths of Black Pipe and Elbows necessary to reach from the appliance adaptor up through the support box and flashing to proper height as per Diagram 12, local codes or page 10. Ensure that all pipe and elbow connections are in their fully twist lock position.

5)Ensure vent is vertical and secure flashing to the roof with roofing nails. Slide the storm collar over the pipe section and seal with a mastic.

6)Twist lock the vent cap on to the last section.

Regency CLASSIC C34-2 Direct Vent Freestanding Gas Heater

21

Page 21
Image 21
Regency C34-LP2, C34-NG2 installation manual Cathedral Ceilings, Offset Chart, Round Support RDS & Square Support SQS

C34-LP2, C34-NG2 specifications

The Regency C34-LP2 and C34-NG2 are two exceptional offerings in the world of gas fireplaces, designed to bring both warmth and style to modern living spaces. These units are perfect for homeowners who appreciate the ambiance of a traditional fireplace but desire the convenience and efficiency of gas heating.

Starting with the design, both the C34-LP2 and C34-NG2 feature a sleek and contemporary aesthetic, easily integrating into various interior styles. The clean lines and large viewing area provide an unobstructed view of the flames, creating a focal point in any room. The glass front complements the modern decor while emphasizing the natural flicker of firelight.

One of the standout features of the C34 series is the dual burner system, which allows for enhanced flame control and efficiency. The design offers an impressive flame pattern that can be adjusted to suit the user's preference, whether they seek a cozy, intimate setting or a more robust fire experience. This versatility is especially appealing for entertaining guests or creating a romantic atmosphere at home.

Technologically, both models are equipped with advanced features to optimize performance. The electronic ignition system ensures reliable lighting, while the precision flame adjustment allows users to easily manipulate heat levels. This adaptability can lead to significant energy savings, making the C34 series not only environmentally conscious but also cost-effective.

In terms of technical specifications, the C34-LP2 is designed for liquid propane, while the C34-NG2 runs on natural gas, providing flexibility depending on the homeowner's fuel availability. Both models possess impressive heating capabilities, with an output sufficient to warm larger spaces, making them ideal for living rooms, dining areas, or open-concept homes.

Safety is also a priority with the C34 series. Equipped with a safety shutoff system and a glass front that remains cool to the touch, these units are designed to provide peace of mind for families. The option for a remote control adds an additional layer of convenience, allowing users to adjust settings from across the room.

Overall, the Regency C34-LP2 and C34-NG2 unite modern innovation with traditional comfort. With their stunning design, advanced technology, and excellent heating efficiency, these gas fireplaces are a valuable addition to any home, enhancing both aesthetic and functional appeal.