INSTALLATION

Top Header

1/2" Drywal

2"

3-1/2" 4"

Openingforgas connectio

10"dia.hole throughwall for Flex orforDuraVent

32-1/2"

37”

40-1/2"

17-1/8"


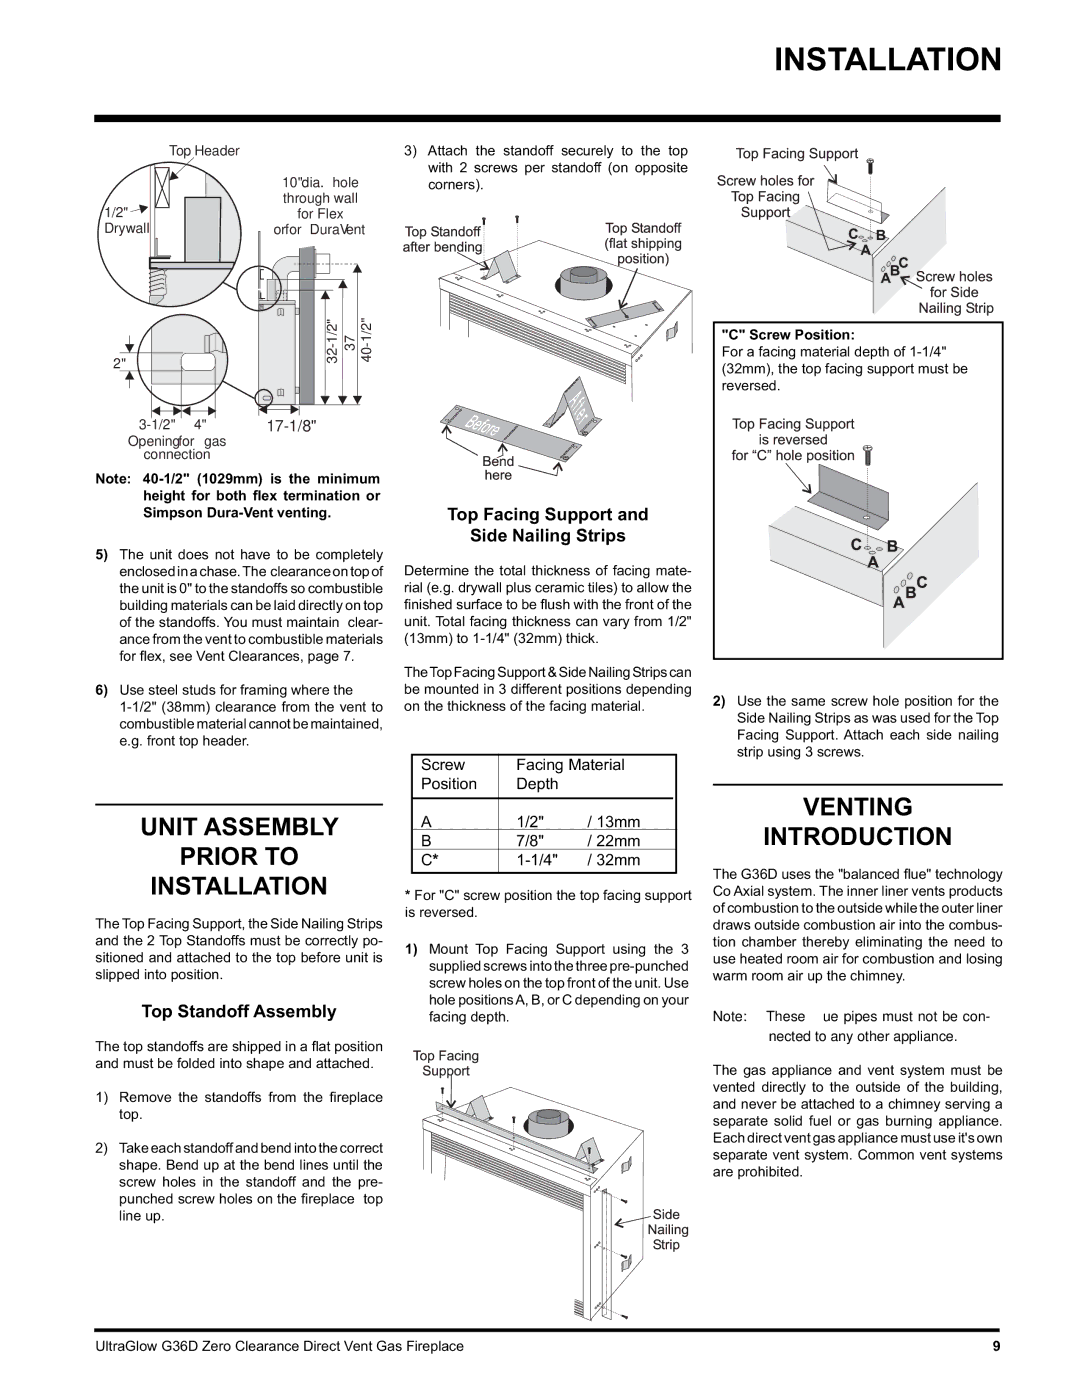
3)Attach the standoff securely to the top with 2 screws per standoff (on opposite corners).

"C" Screw Position:

For a facing material depth of 1-1/4" (32mm), the top facing support must be reversed.

Note: 40-1/2" (1029mm) is the minimum height for both flex termination or Simpson Dura-Vent venting.

5)The unit does not have to be completely enclosed in a chase.The clearance on top of the unit is 0" to the standoffs so combustible building materials can be laid directly on top of the standoffs. You must maintain clear- ance from the vent to combustible materials for fl ex, see Vent Clearances, page 7.

6)Use steel studs for framing where the

1-1/2" (38mm) clearance from the vent to combustible material cannot be maintained, e.g. front top header.

UNIT ASSEMBLY

PRIOR TO

INSTALLATION

The Top Facing Support, the Side Nailing Strips and the 2 Top Standoffs must be correctly po- sitioned and attached to the top before unit is slipped into position.

Top Standoff Assembly

The top standoffs are shipped in a fl at position and must be folded into shape and attached.

1)Remove the standoffs from the fi replace top.

2)Take each standoff and bend into the correct shape. Bend up at the bend lines until the screw holes in the standoff and the pre- punched screw holes on the fi replace top line up.

Top Facing Support and

Side Nailing Strips

Determine the total thickness of facing mate- rial (e.g. drywall plus ceramic tiles) to allow the

nished surface to be fl ush with the front of the unit. Total facing thickness can vary from 1/2" (13mm) to 1-1/4" (32mm) thick.

TheTopFacingSupport&SideNailingStripscan be mounted in 3 different positions depending on the thickness of the facing material.

Screw

Facing Material

Position

Depth


A

1/2"

/ 13mm

B

7/8"

/ 22mm

C*

1-1/4"

/ 32mm


*For "C" screw position the top facing support is reversed.

1)Mount Top Facing Support using the 3 supplied screws into the three pre-punched screw holes on the top front of the unit. Use hole positionsA, B, or C depending on your facing depth.

2)Use the same screw hole position for the Side Nailing Strips as was used for the Top Facing Support. Attach each side nailing strip using 3 screws.

VENTING

INTRODUCTION

The G36D uses the "balanced flue" technology Co Axial system. The inner liner vents products of combustion to the outside while the outer liner draws outside combustion air into the combus- tion chamber thereby eliminating the need to use heated room air for combustion and losing warm room air up the chimney.

Note: These flue pipes must not be con-

nected to any other appliance.

The gas appliance and vent system must be vented directly to the outside of the building, and never be attached to a chimney serving a separate solid fuel or gas burning appliance. Each direct vent gas appliance must use it's own separate vent system. Common vent systems are prohibited.

UltraGlow G36D Zero Clearance Direct Vent Gas Fireplace

9

Page 9
Image 9
Regency G36D-NG NATURAL GAS Unit Assembly Prior to Installation, Venting Introduction, Top Standoff Assembly

G36D-NG NATURAL GAS, G36D-LP PROPANE specifications

The Regency G36D-LP Propane and G36D-NG Natural Gas fireplaces are exemplary models designed to enhance both aesthetic appeal and functional warmth in any home. These innovative units are perfect for individuals looking to add a touch of elegance while enjoying the convenience of modern fireplace technology.

One of the primary features of the G36D series is its impressive heating capability, which can produce up to 34,000 BTUs, making it effective for warming large living spaces. This efficiency is complemented by their design, which allows for rapid heat distribution, ensuring that the warmth is felt throughout the room.

Both models are available in propane and natural gas options, providing flexibility based on user preference or availability. The G36D-LP utilizes propane, making it ideal for homes without a natural gas line, while the G36D-NG is suitable for those connected to a natural gas supply. This adaptability allows homeowners to choose the most economical and convenient fuel source for their needs.

A standout characteristic of the G36D series is its clean, contemporary design. The fireplace features large viewing windows that are bordered by an elegant frame, offering an unobstructed view of the flames. The realistic log set and glowing embers create a visually stunning fire experience that mimics the ambiance of a traditional wood-burning fireplace without the associated maintenance.

The fireplaces are also equipped with state-of-the-art technology, including a reliable electronic ignition system, which ensures easy starts every time while enhancing safety. The G36D series features adjustable flame height settings, allowing users to customize their experience based on preference or room ambiance.

In terms of efficiency, the G36D fireplaces boast an annual fuel utilization efficiency (AFUE) rating that meets modern energy standards. This characteristic not only contributes to environmental sustainability but also results in lower utility costs over time.

Moreover, the G36D series is designed with a user-friendly interface, allowing homeowners to operate their fireplace with ease. With optional remote controls and wall switches available, adjusting the settings has never been more convenient.

The Regency G36D-LP and G36D-NG are perfect for those who seek the charm of a fireplace with the benefits of modern innovation. Their blend of aesthetic appeal, advanced technology, and efficient heating makes them a standout choice for any homeowner looking to enhance their living space.