|
| Troubleshooting | |
|
|
|
|
|
|
|
|
|
|
|
|
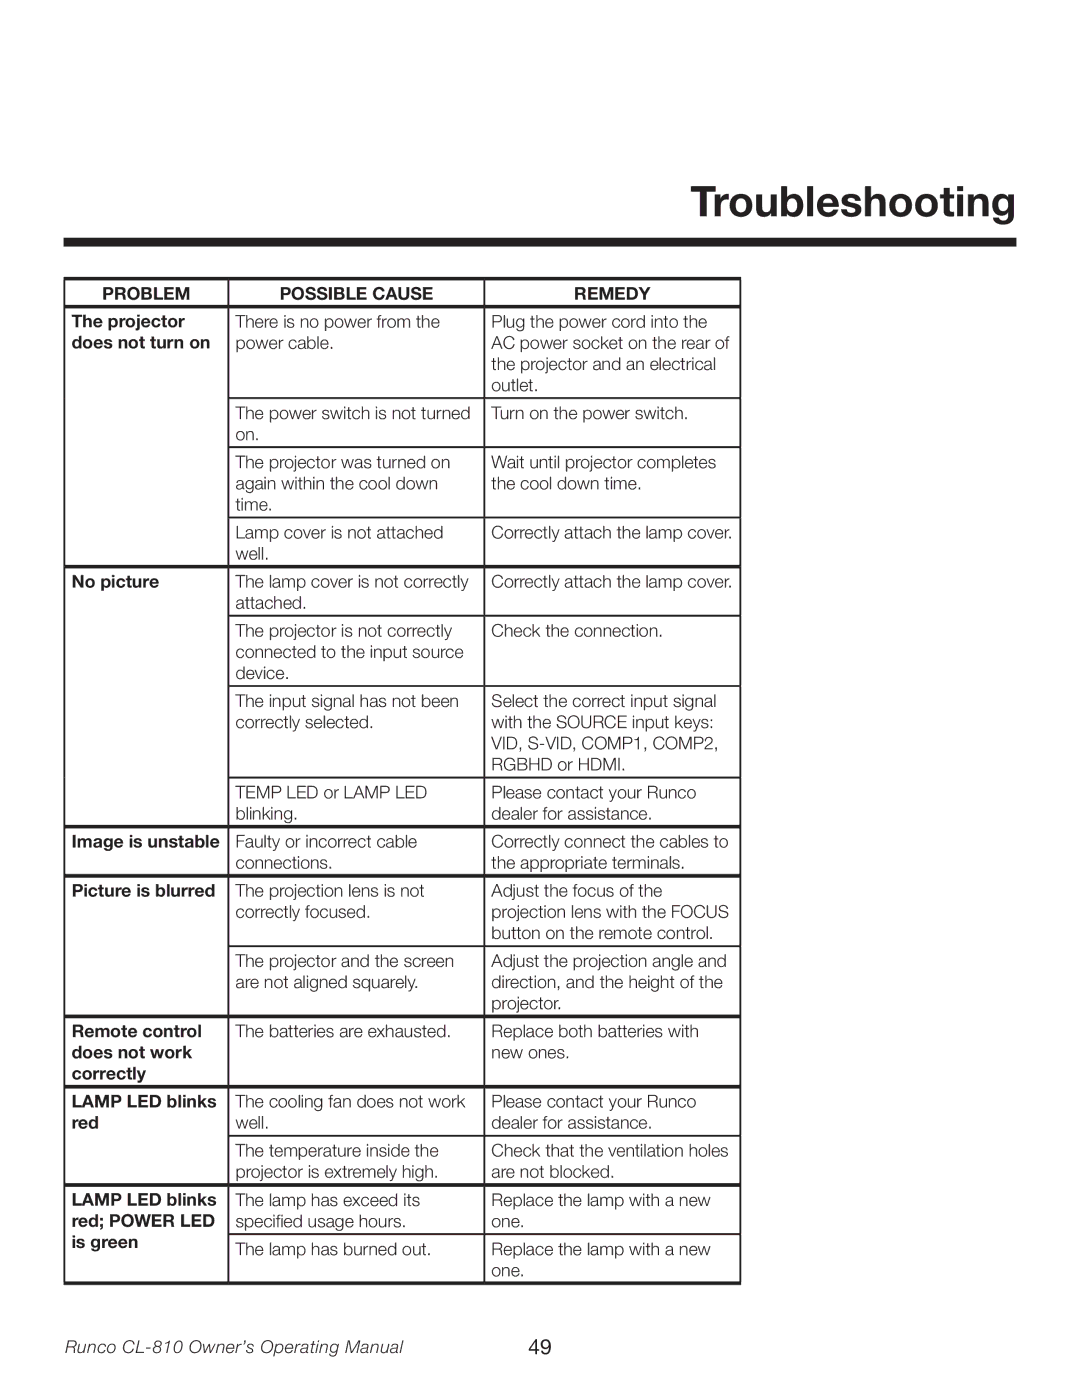
PROBLEM | POSSIBLE CAUSE | REMEDY |
|
The projector | There is no power from the | Plug the power cord into the |
|
does not turn on | power cable. | AC power socket on the rear of |
|
|
| the projector and an electrical |
|
|
| outlet. |
|
|
|
|
|
| The power switch is not turned | Turn on the power switch. |
|
| on. |
|
|
|
|
|
|
| The projector was turned on | Wait until projector completes |
|
| again within the cool down | the cool down time. |
|
| time. |
|
|
|
|
|
|
| Lamp cover is not attached | Correctly attach the lamp cover. |
|
| well. |
|
|
No picture | The lamp cover is not correctly | Correctly attach the lamp cover. |
|
| attached. |
|
|
|
|
|
|
| The projector is not correctly | Check the connection. |
|
| connected to the input source |
|
|
| device. |
|
|
|
|
|
|
| The input signal has not been | Select the correct input signal |
|
| correctly selected. | with the SOURCE input keys: |
|
|
| VID, |
|
|
| RGBHD or HDMI. |
|
|
|
|
|
| TEMP LED or LAMP LED | Please contact your Runco |
|
| blinking. | dealer for assistance. |
|
|
|
|
|
Image is unstable | Faulty or incorrect cable | Correctly connect the cables to |
|
| connections. | the appropriate terminals. |
|
Picture is blurred | The projection lens is not | Adjust the focus of the |
|
| correctly focused. | projection lens with the FOCUS |
|
|
| button on the remote control. |
|
|
|
|
|
| The projector and the screen | Adjust the projection angle and |
|
| are not aligned squarely. | direction, and the height of the |
|
|
| projector. |
|
Remote control | The batteries are exhausted. | Replace both batteries with |
|
does not work |
| new ones. |
|
correctly |
|
|
|
LAMP LED blinks | The cooling fan does not work | Please contact your Runco |
|
red | well. | dealer for assistance. |
|
|
|
|
|
| The temperature inside the | Check that the ventilation holes |
|
| projector is extremely high. | are not blocked. |
|
LAMP LED blinks | The lamp has exceed its | Replace the lamp with a new |
|
red; POWER LED | specified usage hours. | one. |
|
is green |
|
|
|
The lamp has burned out. | Replace the lamp with a new |
| |
|
| ||
|
| one. |
|
|
|
|
|
Runco | 49 |