OPERATION
SETTINGS AND ADJUSTMENTS
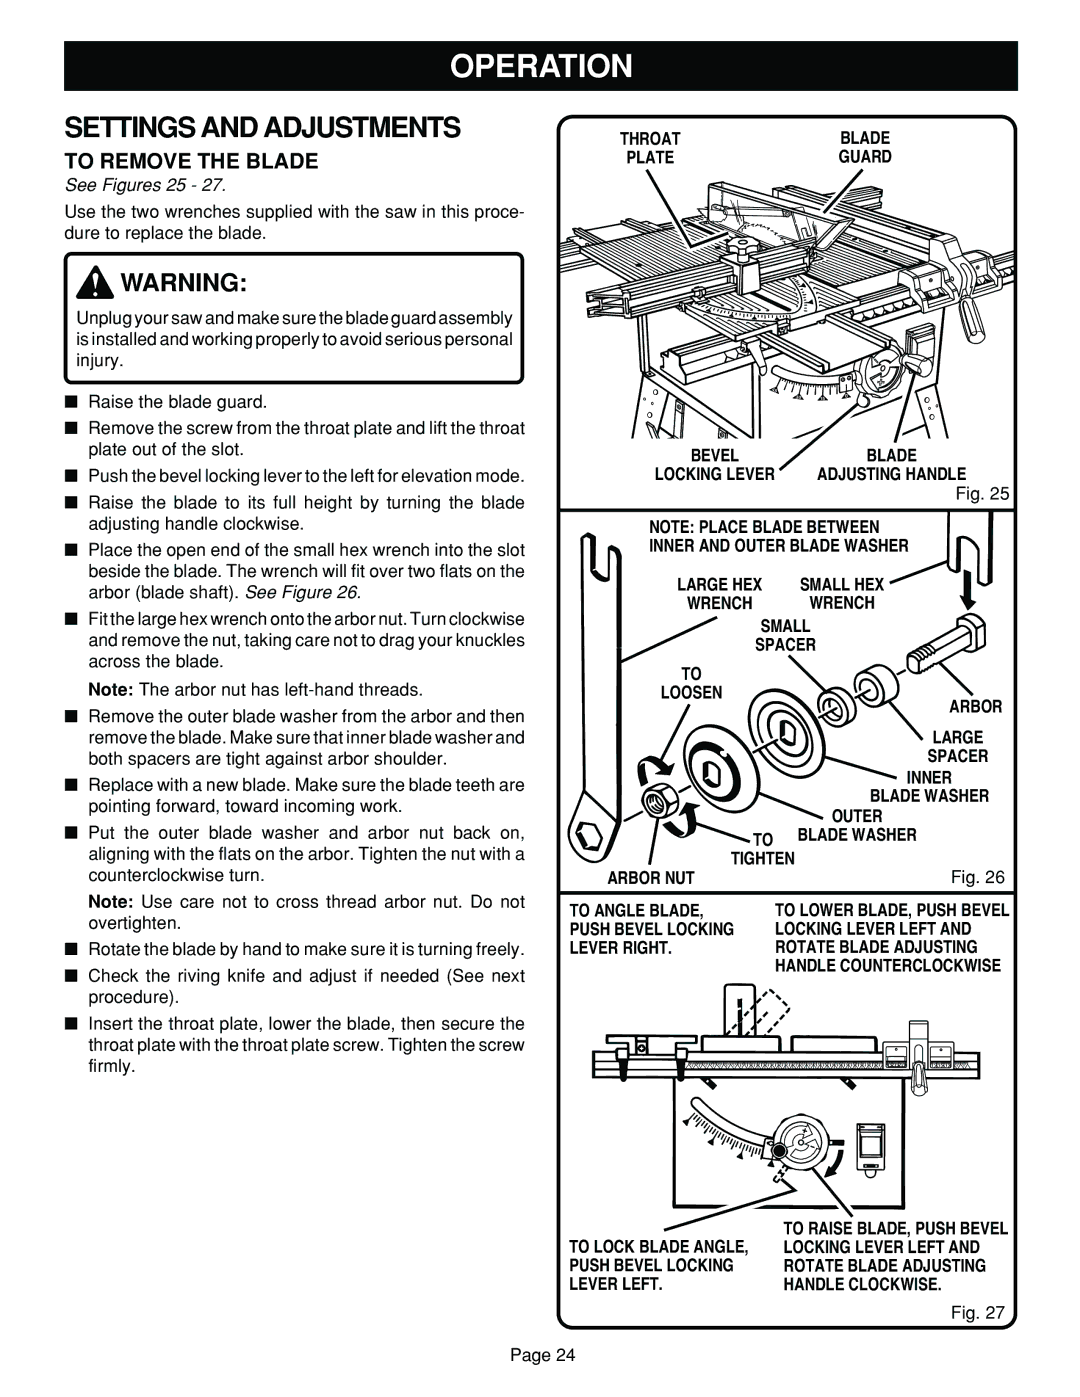
TO REMOVE THE BLADE
See Figures 25 - 27.
Use the two wrenches supplied with the saw in this proce- dure to replace the blade.
![]() WARNING:
WARNING:
Unplug your saw and make sure the blade guard assembly is installed and working properly to avoid serious personal injury.
■Raise the blade guard.
■Remove the screw from the throat plate and lift the throat plate out of the slot.
■Push the bevel locking lever to the left for elevation mode.
■Raise the blade to its full height by turning the blade adjusting handle clockwise.
■Place the open end of the small hex wrench into the slot beside the blade. The wrench will fit over two flats on the arbor (blade shaft). See Figure 26.
■Fit the large hex wrench onto the arbor nut. Turn clockwise and remove the nut, taking care not to drag your knuckles across the blade.
Note: The arbor nut has
■Remove the outer blade washer from the arbor and then remove the blade. Make sure that inner blade washer and both spacers are tight against arbor shoulder.
■Replace with a new blade. Make sure the blade teeth are pointing forward, toward incoming work.
■Put the outer blade washer and arbor nut back on, aligning with the flats on the arbor. Tighten the nut with a counterclockwise turn.
Note: Use care not to cross thread arbor nut. Do not overtighten.
■Rotate the blade by hand to make sure it is turning freely.
■Check the riving knife and adjust if needed (See next procedure).
■Insert the throat plate, lower the blade, then secure the throat plate with the throat plate screw. Tighten the screw firmly.
THROAT | BLADE |
PLATE | GUARD |
BEVEL | BLADE |
LOCKING LEVER | ADJUSTING HANDLE |
Fig. 25
NOTE: PLACE BLADE BETWEEN
INNER AND OUTER BLADE WASHER
LARGE HEX | SMALL HEX |
WRENCH | WRENCH |
SMALL
SPACER
TO
LOOSEN
ARBOR
LARGE
SPACER
INNER
BLADE WASHER
OUTER
TO BLADE WASHER
TIGHTEN
| ARBOR NUT |
|
|
|
|
|
|
|
|
|
|
|
|
|
|
|
|
|
|
|
|
|
|
|
|
|
|
|
|
|
|
|
|
|
|
|
|
|
|
|
|
|
|
|
| Fig. 26 | |||||
TO ANGLE BLADE, |
|
|
|
|
|
|
| TO LOWER BLADE, PUSH BEVEL | |||||||||||||||||||||||||||||||||||||||||||
PUSH BEVEL LOCKING |
|
|
|
|
|
|
| LOCKING LEVER LEFT AND | |||||||||||||||||||||||||||||||||||||||||||
LEVER RIGHT. |
|
|
|
|
|
|
| ROTATE BLADE ADJUSTING | |||||||||||||||||||||||||||||||||||||||||||
|
|
|
|
|
|
|
|
|
|
|
|
| HANDLE COUNTERCLOCKWISE | ||||||||||||||||||||||||||||||||||||||
|
|
|
|
|
|
|
|
|
|
|
|
|
|
|
|
|
|
|
|
|
|
|
|
|
|
|
|
|
|
|
|
|
|
|
|
|
|
|
|
|
|
|
|
|
|
|
|
|
|
|
|
|
|
|
|
|
|
|
|
|
|
|
|
|
|
|
|
|
|
|
|
|
|
|
|
|
|
|
|
|
|
|
|
|
|
|
|
|
|
|
|
|
|
|
|
|
|
|
|
|
|
|
|
|
|
|
|
|
|
|
|
|
|
|
|
|
|
|
|
|
|
|
|
|
|
|
|
|
|
|
|
|
|
|
|
|
|
|
|
|
|
|
|
|
|
|
|
|
|
|
|
|
|
|
|
TO LOCK BLADE ANGLE, | TO RAISE BLADE, PUSH BEVEL |
LOCKING LEVER LEFT AND | |
PUSH BEVEL LOCKING | ROTATE BLADE ADJUSTING |
LEVER LEFT. | HANDLE CLOCKWISE. |
| Fig. 27 |
Page 24