00090A
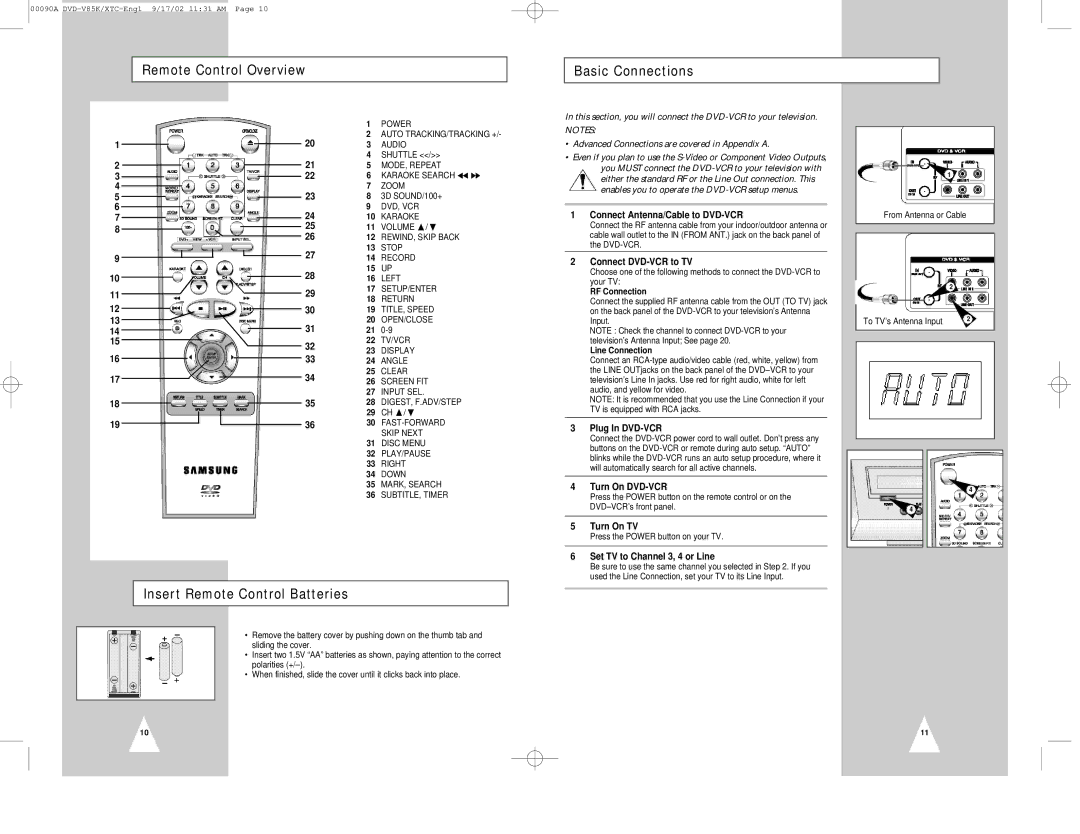
Remote Control Overview
Basic Connections
|
|
|
| 1 | POWER |
|
|
|
| ||
1 |
|
| 20 | 2 | AUTO TRACKING/TRACKING +/- |
|
| 3 | AUDIO | ||
2 |
|
| 21 | 4 | SHUTTLE <</>> |
|
| 5 | MODE, REPEAT | ||
3 |
|
| 22 | 6 | KARAOKE SEARCH |
4 |
|
| 23 | 7 | ZOOM |
5 |
|
| 8 | 3D SOUND/100+ | |
6 |
|
| 24 | 9 | DVD, VCR |
7 |
|
| 10 | KARAOKE | |
8 |
|
| 25 | 11 | VOLUME / |
|
| 26 | 12 | REWIND, SKIP BACK | |
|
|
| |||
|
|
| 27 | 13 | STOP |
9 |
|
| 14 | RECORD | |
|
|
| |||
10 |
|
| 28 | 15 | UP |
|
| 16 | LEFT | ||
11 |
|
| 29 | 17 | SETUP/ENTER |
|
| 18 | RETURN | ||
12 |
|
|
| ||
|
| 30 | 19 | TITLE, SPEED | |
13 |
|
| 31 | 20 | OPEN/CLOSE |
14 |
|
| 21 | ||
15 |
|
| 32 | 22 | TV/VCR |
|
|
| 23 | DISPLAY | |
16 |
|
| 33 | ||
|
| 24 | ANGLE | ||
17 |
|
| 34 | 25 | CLEAR |
|
| 26 | SCREEN FIT | ||
|
|
|
| 27 | INPUT SEL. |
18 |
|
| 35 | 28 | DIGEST, F.ADV/STEP |
|
|
|
| 29 | CH / |
19 |
|
| 36 | 30 | |
|
|
|
|
| SKIP NEXT |
|
|
|
| 31 | DISC MENU |
|
|
|
| 32 | PLAY/PAUSE |
|
|
|
| 33 | RIGHT |
|
|
|
| 34 | DOWN |
|
|
|
| 35 | MARK, SEARCH |
|
|
|
| 36 | SUBTITLE, TIMER |
|
|
|
|
|
|
|
|
|
|
|
|
Insert Remote Control Batteries
•Remove the battery cover by pushing down on the thumb tab and sliding the cover.
•Insert two 1.5V “AA” batteries as shown, paying attention to the correct polarities
•When finished, slide the cover until it clicks back into place.
In this section, you will connect the
NOTES:
•Advanced Connections are covered in Appendix A.
•Even if you plan to use the
1Connect Antenna/Cable to DVD-VCR
Connect the RF antenna cable from your indoor/outdoor antenna or cable wall outlet to the IN (FROM ANT.) jack on the back panel of the
2Connect DVD-VCR to TV
Choose one of the following methods to connect the
RF Connection
Connect the supplied RF antenna cable from the OUT (TO TV) jack on the back panel of the
NOTE : Check the channel to connect
Line Connection
Connect an
NOTE: It is recommended that you use the Line Connection if your TV is equipped with RCA jacks.
3Plug In DVD-VCR
Connect the
4Turn On
Press the POWER button on the remote control or on the
5Turn On TV
Press the POWER button on your TV.
6Set TV to Channel 3, 4 or Line
Be sure to use the same channel you selected in Step 2. If you used the Line Connection, set your TV to its Line Input.
1
From Antenna or Cable
| 2 |
To TV’s Antenna Input | 2 |
|
|
|
|
|
|
4
4
10
11