Macrovision Statement
Notices
Important Safety Information
Safety Instructions
Setting Up your System
Battery Disposal
Replacement Parts and Accessories
Care During Use
The requirements listed below are applicable to all countries
Laser Safety
Power Cord Requirements
General Requirements
Regulatory Compliance Statements
Wireless Guidance
802.11b Restrictions
United States of America
Unintentional Emitter per FCC Part
Intentional emitter per FCC Part
FCC Statement for Wireless LAN use
FCC Part
No repairs may be done by the customer
Canada
Unintentional Emitter per ICES-003
Intentional Emitter per RSS
for products fitted with an IC-compliant modem
Telecommunications per DOC notice
for products fitted with EU-approved radio devices
European Union
European Directives
European Radio Approval Information
European States with restrictions on use EU Accept EU
European States qualified under wireless approvals EU Accept EU
European Telecommunication Information
for products fitted with EU-approved modems
Keyboard Conventions
Using Your Documentation
Manual Documentation Conventions
Information Icons
Software User Documentation
CD-ROM Device Naming Convention
Touchpad Conventions
Getting Started
Getting Started
Introducing Your Computer
Front View
Right View
Left View
4 Users Manual
Bottom View
Back View
2. Click Turn Off Computer 3. Click Turn Off
Turning the Computer On and Off
To turn on the computer
To turn off the computer
If the computer does not turn off properly due to a system error, press Ctrl+Alt+Delete. When Windows Task Manager dialog box appears, click Shut Down Turn Off to turn off the computer. Your unsaved work may be lost/damaged
The keys on the keyboard can be grouped into the following categories
Using the Keyboard
Num Lock LED
Using the Numeric Keypad
10 Users Manual
Using Special Function Keys
F11/Num Lock
Getting Started
12 Users Manual
Using the Touchpad
Process
You can perform various actions with your touchpad as described below
Action
Function
14 Users Manual
Action
Function
Process
Hot Keys
Using Wireless LAN Button
The Status Indicator of Wireless LAN button
Changing the Hot Key Setting
Getting Started
Reading the Status Indicators
Name
Function
Adjusting LCD Brightness
Adjusting the Volume
To adjust using keyboard
To adjust using volume control program
Introducing Windows
Understanding the Desktop
20 Users Manual
Introducing Windows
Understanding the Start Menu
Click Start My Computer
Understanding a Window
Click Start Help and Support
Or click Start All Programs Accessories Tour Windows XP
Help and Support Center
Windows XP Tour
To eject a CD
Using the Computer
Using the CD Drive
To insert a CD
To play a DVD
To use the Windows Media Player
To clean a CD or DVD title
Emergency Eject Hole
To play a video CD
To write data on a CD
3. Click Start My Computer
5. Click Write these files to CD in the CD drive window
Enjoying Home Theater S/PDIF Port
Step 1. Connect 5.1 channel speaker system to your computer
Step 2. Configuring the digital sound output on the computer
Step 3. Enable S/PDIF in the DVD program
To insert a PCMCIA card
Using the PCMCIA Card Slot
To remove a PCMCIA card
Using the Memory Stick Slot
To use a Memory Stick Duo
To format Memory Stick Pro
To protect data in a memory stick
To remove a memory stick in Windows
Using Samsung Theme
Connecting to the Internet
Connecting with a Modem
Before Start
Connecting Through a Wired LAN
2. Click Start Control Panel
Connecting to the Internet
38 Users Manual
7. To use DHCP
To use a static IP
To use both DHCP and static IP simultaneously
To configure network setting
Using Samsung Network Manager
To change network places
Example changing to Office
Connecting to the Internet
2. Click Change, select a place icon then click Change
5. Click Close to close the dialog box
1 Access Point AP
Connecting Through a Wireless LAN Option
What is an Access Point AP?
Connecting to an Access Point AP
Checking the connection status
Now you are connected to the AP, and you can access the network
Connecting to computer-to-computer networks peer-to-peer or
Step 1. Setting up a computer-to-computer network
ad hoc
2. Click Advanced 3. On the Wireless Network tab, click Advanced
5. In the Wireless Networks tab, click Add
46 Users Manual
Connecting to the Internet
48 Users Manual
Step 2. Connecting to the configured computer
The two computers are connected and are able to communicate with each other. When the computers are connected, the Wireless Network Connection message is displayed for a short time over the Wireless Network Connection icon of the two computers
Wireless Network Setup Using the Wireless LAN Setup Program
Step 1. Installing the wireless LAN configuration program PROSet
Step 2. Using the wireless LAN configuration program PROSet
1. Click Scan in the Networks tab
To connect to an Access Point
Security Settings
Connecting to the Internet
To create a computer-to-computer Ad Hoc network
3. Configure password setting to be used for computer-to-computer network connection in the Security Settings window
Sharing files or folders
Using Network Services
Step 1. Configuring Sharing
Sharing Printers
Step 2. Using Shared Files or Folders
Step 1. Configuring Printer Sharing
Step 2. Adding and Using a Shared Printer
2. Click Add a printer
5. Select Browse for a printer, and click Next
Step 1. Configuring Internet Sharing
Sharing an Internet connection through a wireless network
Step 2. Checking the Shared Internet Connection
Customizing Your Computer
Using System Setup
62 Users Manual
Starting System Setup
Table 2. System Setup Menus
Table 3. System Setup Navigation Keys
2. Press Enter on Boot Device Priority item
Changing Booting Priority
2. On the Set Supervisor Password item, press Enter
Configuring the Password
Setting the Supervisor Password
Setting the User Password
Activating the Booting Password
Activating the Hard Disk Drive Password
Deactivating the Password
Configuring Resolution and Colour Depth
Switching Display Devices Using the Shortcut Key
Using External Display Devices
68 Users Manual
Using Dual View to View Extended Screen
To move a window between display devices in Dual View mode
Deactivating Dual View Mode
1. Click Start Control Panel Performance and Maintenance
Using Power Management Options
Basic Power Management Schemes
To enter the power management window complete the following
Turn off monitor Turn off hard disks System standby System hibernates
Hibernate Mode Power Management or Manual Method
5. Click OK to set your power management options and close the window
Standby Mode Power Management or Manual Method
Advanced Tab Power & Sleep Button Programming Windows
Advanced Power Management Schemes
To enter the power management window complete the following
1. Click Start Control Panel Performance and Maintenance
Ejecting and Attaching Battery
Using the Battery
Using the bridge battery
Monitoring the Battery Charge
To monitor using a shortcut key
To monitor on the battery
Battery Calibration
Removing the memory module
Upgrading Memory
78 Users Manual
Adding a memory module
Using the Security Lock Port
80 Users Manual
Tips for Using Your Computer
If you are travelling by air, follow these tips
Travelling with Your Computer
Handling Spills
Air Travel
82 Users Manual
Storing the Computer for Long Periods
Reinstalling Software
Troubleshooting
Questions and Answers
Frequently Asked Questions
Q2 The system freezes during program operation
Questions and Answers
Windows Related
Q1 The system does not shutdown properly
Q1 The LCD screen is blank
Display Related
Q11 A DVD or MPEG file is displayed only on the LCD screen
Q12 When I connected a TV, some programs, such as Mem, do not run properly in Full-DOS Screen
Q2 I cannot make a call using an extension line
Modem Related
Q1 I cannot hear the modem sound
Using an AT command
Configuring the Modem through the Control Panel
Q3 How do I use my modem when dialing from overseas?
90 Users Manual
Q1 Wake On LAN function
Wired LAN Related
Wireless LAN Related
Q4 I cannot connect to the AP Check the Computer Settings
Check the AP Settings
Q3 I cannot share an Internet connection A1 A2
A5 Verify whether the AP has been properly connected to the network
A3 Initialize the device driver
96 Users Manual
A3 If the AP is configured to ’Use network authentication Shared Key’
98 Users Manual
Q5 Fn+F4/ Key combination does not work
Games and Programs Related
Q1 3D game is not executed, or some functions are not working
Q3 A game runs only in small screen format
Q7 Running speed of a game is too slow or fast
1. Right-click on the desktop and click Properties
Restoring the System
Creating a Restore Point
Returning your computer to an earlier restore point
Undoing the last restoration
Reinstalling Software
Installing drivers
Running the system software CD
Installing programs
Reinstalling Windows
Reinstalling Windows XP
To not change the partition, press Enter
If You Cannot Run Windows
Press any key to boot from CD
Specifications
System Specification
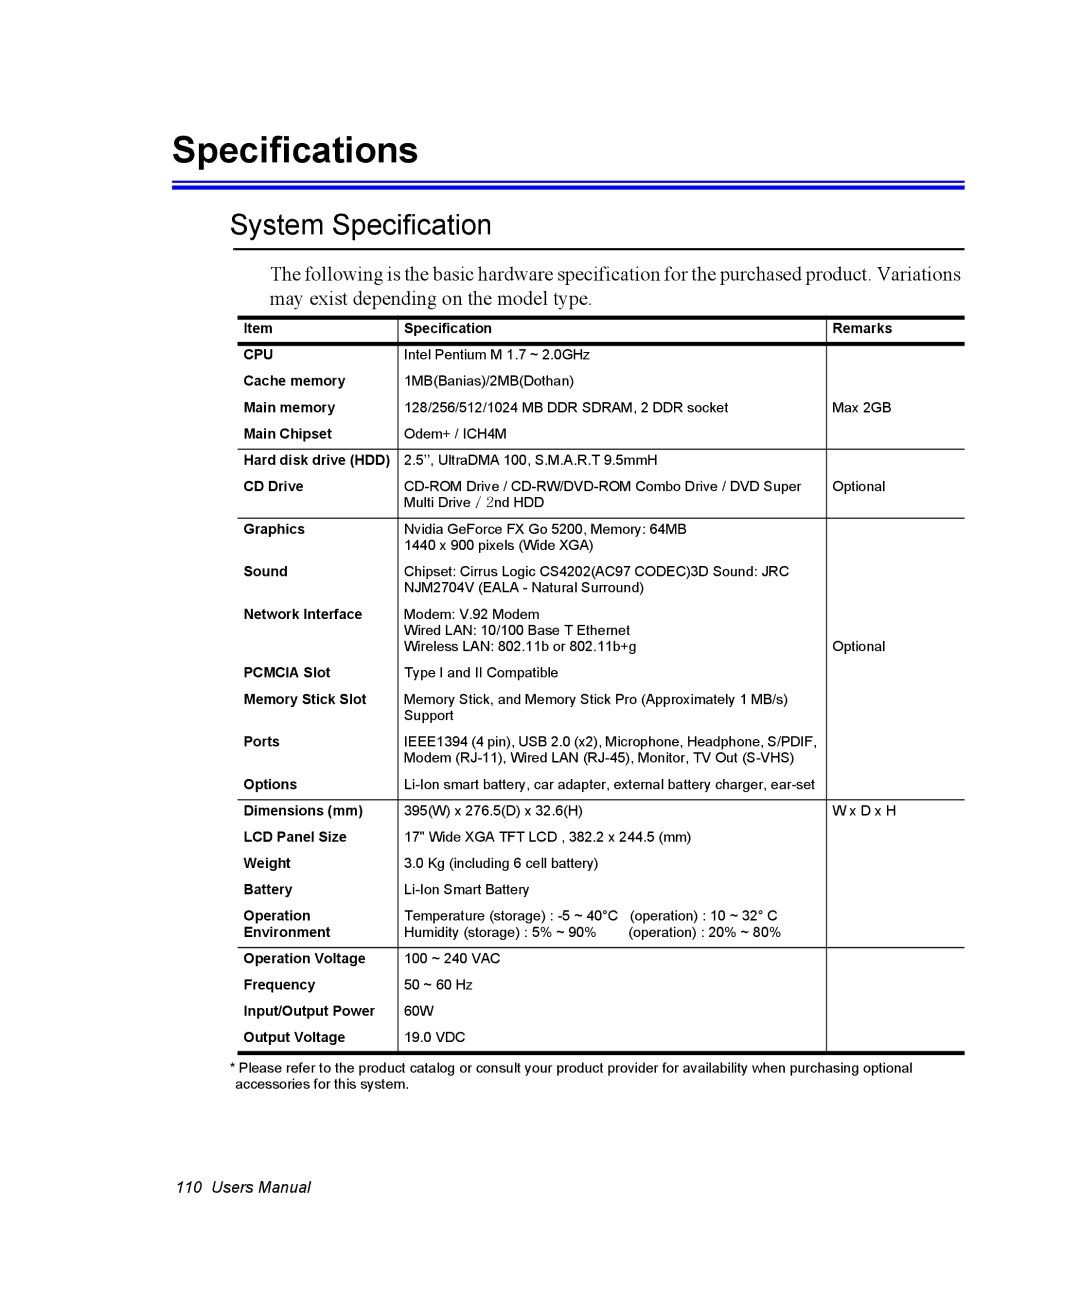
110 Users Manual
Radio Specifications
Wireless LAN Specification Optional
IntelR PRO/Wireless LAN 2100 3B Mini PCI Adapter
Product Specification
Detailed Specifications
IntelR PRO/Wireless 2200BG Network Connection
Regulatory Notice for Channel Use in France
Product Specification
Regulatory Notice for Channel Use in France
Radio Specifications
hour
Abbreviations
CD-ROM
Gigabytes
PCMCIA
Glossary
BIOS
Boot
Boot disk
COM port
DMA direct memory access
CardBus
CMOS memory
LCD liquid-crystal display
Hard drive
I/O address
IRQ interrupt request line
PC slot
RAM random access memory
Resolution
PC Card
Shadow RAM
TFT thin film transistor LCD
120 Users Manual
Using Windows
Registering Windows
Locations of Programs folder and Control Panel
Introducing Windows
To Playback Audio or Video CD
Writing Data to CD Applicable to the model equipping with CD-RW