SHR-2040/2041/2042 User’s Manual
Real Time DVR
Safety Regulations
Operation warranty temperature
Before we start
Standards Approvals
System Shutdown
Chapter 1 Overview
Safety Regulations Before we start Standards Approvals
Chapter 2 Installation
Chapter 3 Connecting with Other device
8 Chapter 8 Search and Play
5 Chapter 5 Menu Setup
6 Chapter 6 PTZ Camera Control
7 Chapter 7 Recording
Appendix
Chapter 9 Smart Viewer
Chapter 1 Overview
SHR-2040/2041/2042 USER’S MANUAL
1Introduction
2Features
Search
3Part Names and Functions
Display
Mode
Function
Reverse
Name
Function
Display
Mode
Name
Function
Search
Fast / Step
Name
VIDEO IN
ALARM
Name
Function
VIDEO IN
ALARM
Name
Function
Chapter Installation
1Installation Environment Setup
Only
2Checking Product & Accessory
Caution for HDD Addition
3HDD Addition
HDD Addition Procedure
SHR-2041 SHR-2042
SHR-2040 SHR-2041/2042
SHR-2040/2041/2042 USER’S MANUAL
the screw of the bracket to which you want to fix HDD
BRACKET-HDD
SHR-2040/2041/2042 USER’S MANUAL
6. Reattach HDD to the original position of BRACKET-HDD
SHR-2040 1 at Primary Slot and 1 at Secondary Slot respectively
@ Fix the fan as follows
2-11
SHR-2040/2041/2042 USER’S MANUAL
2-12
$ The cable should be out from the left hole
Chapter 3 Connecting with other device
SHR-2040
1Connecting the Video, Audio, and Monitor
SHR-2040/2041/2042 USER’S MANUAL
SHR-2041/2042
SHR-2040/2041/2042 USER’S MANUAL
2Connecting the Network
Connecting to Internet through Ethernet10/100BaseT
Connecting to Internet through ADSL
SHR-2041/2042
Connecting to Internet through Ethernet10/100BaseT
Connecting to Internet through ADSL
SHR-2041/2042
3Connecting the USB
Function
4Connecting the Alarm Input/Output
Name
SHR-2040/2041/2042 USER’S MANUAL
ALARM IN/OUT Connection
5Connecting the RS-485 Device
Chapter Live
1System Operation
Definition of Live Screen Icon
2Live screen Mode
Auto sequence Mode
Definition of Live Screen Mode
4 Split Mode
PIPPicture In Picture Mode
Selecting Live Screen Mode
Channel Selection and Audio On/Off Setup in the PIP Mode
3Live Channel Selection and Audio On/Off Setup
Audio On/Off Setup in the Full Screen
Audio On/Off Setup in the 4 Split Mode
Zoom Function
4Freeze and Zoom
Freeze Function
5Event Monitoring
6Spot-out monitoring
Chapter Menu Setup
Before Use
1System
Date/Time/Language Setup
Date Format
Password
System Log
Load Factory Default
Prev Back to the previous Log page
Event Log
System Log List
First Returns to the first Log page
Device Erase
System Information and Setup
USB S/W Upgrade
USB S/W Upgrade
HDD Setup
External HDD Setup
Device Erase Data will not be deleted in the backup mode
HDD End Beep
HDD Mode Setup
HDD End Mode
Parity
Remote control Device
Device
Baudrate
SHR-2040/2041/2042 USER’S MANUAL
System Shutdown
Remote Control Device
System Shutdown
2Camera
Camera Config
Title You can name the camera of selected channel
The above items shall be same to the PTZ device setup
PTZ Device
Screen Setup
Spot Out Channel
3Monitoring
Event Monitoring
OSG Display
1 CH Support
Monitor
Record Mode
4Recording Mode
Record Video size Mode
Normal
Event Record Mode setup
5Event Record Mode
PAL 720x288N
Quality will be determined
Alarm Detection Setup
Area
Motion Detection Setup
Motion Detection Mode
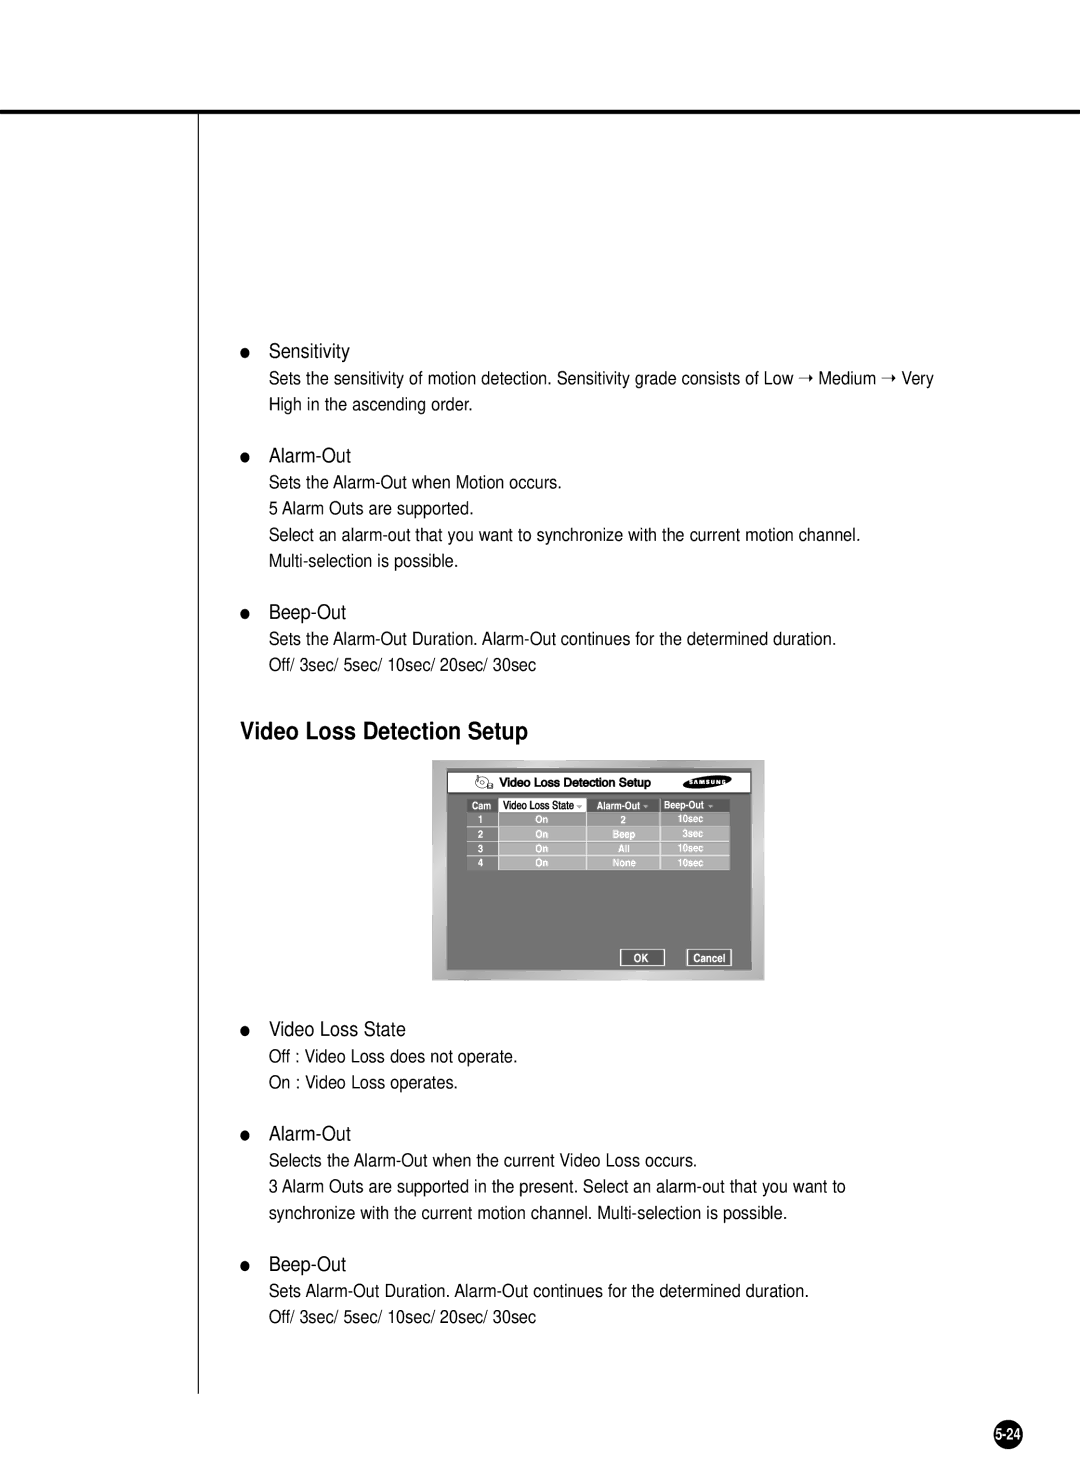
Video Loss Detection Setup
6Record Schedule
Holiday
Schedule / Event Record
Backup
7Backup
8Network
IP Setup
ADSL User ID
Password
Gateway
Subnet Mask
Transfer Protocol Settings
Retrial You may choose one from 1 to 20 and the number changes by
Callback Settings
On/Off Off is default but you may choose On
In the event of UDP Setup from Transfer Protocol Setup Page
9Network Setup
Port Setup for SmartViewer Connection
In the event of TCP Setup from Transfer Protocol Setup Page
Chapter PTZ Camera Control
TELE WIDE VIEW PRESET
1PTZ Camera Control Mode
The some functions of PTZ camera are used under restriction
2Basic Operation of PAN, TILT, & ZOOM
TELE WIDE VIEW PRESET
WIDE VIEW PRESET
TELE WIDE VIEW PRESET
3Preset Setup
For AD Protocol PTZ Camera, this memorizes only 7 Presets
Move the cursor to right and press ENTER in PTZ Control Mode first. Then, press the “Enter” to run P/T/Z/ operation mode in the PIP screen and press the “Enter” again to cancel P/T/Z/ Motion Mode
TELE
4Camera Menu Setup
WIDE VIEW PRESET
TELE WIDE VIEW PRESET
5Preset View
For example, Samsung Protocol
6Other View
TELE WIDE VIEW PRESET
Chapter 7 Recording
1REC Normal Recording
Schedule/Event recording is selected in the Schedule Recording
2Schedule Recording
Video Loss Detection
3Event Recording
Alarm Detection
Motion Detection
Chapter Search and Play
Event Search searches a video file recorded by the occurrence of event
Before Use
1Calendar Search
2Event Search
3Date/Time Search
4Go to First Search
5Go to Last Search
The Next button shows the next page
6Backup
First, select the backup device Mark the data of device
The Previous button shows the previous page
MENU. Be sure to exit from the MENU to start the playback
7Playback
Definition Play Screen Mode
Play at Faster Speed
Chapter Smart Viewer
SHR-2040/2041/2042 USER’S MANUAL
1Introduction
2Feature
VGA RAM 32Mb or higher DirectX 8.1 or higher
3PC SpecificationRecommendation
OS Win98SE, WinMe, Win2000, WinXP
Recommendation CPU Pentium 3, 1GHz or higher RAM 256 MB or higher
Smart Viewer Installation
4Smart Viewer Installation
SHR-2040/2041/2042 USER’S MANUAL
Designate a folder to install Smart Viewer in it and click “Next”
Click the “Next” button
If you agree with Smart Viewer License, click “Yes”
The system proceeds with setup file installation and system setup
SHR-2040/2041/2042 USER’S MANUAL
5Smart Viewer Program Execution
6Smart Viewer Initial Screen
Connection Failure Cases
7Monitoring Mode
You should terminate the Smart Viewer first to change them
Time Information
# Clicking the speaker icon turns the audio of channel on or off
Event Message Connecting.. Trying to connect to SHR-2040/2041/2042
Displays the connection condition of DVR and CAMERA in the list
Camera connection Indication Window
In Single Mode DVR13CH ... DVR14CH DVR21CH ... DVR11CH
Camera Off
When monitoring with Quad Mode When monitoring with Single Mode
In Single Mode DVR13CH ... DVR14CH DVR21CH ... DVR11CH
The FAVORITE button is available only when you contact SITE
Video Recording Button
The PAN / TILT / ZOOM function is supported to all the cameras
But, the AD Protocol camera can be set up to 7 PRESET items
Self Menu Setup of PTZ device
When connecting as a user, you are denied to access the search mode
8Search Mode
DVRSHR-2040/2041/2042 Selection/Change by contacting SITE
Page
@ Backup Button
$ Print
Time Line
Next Button
Initial Screen
9Setup Mode
@ It shows what the selected Setup item can set up in detail
# button to terminate the setup window
Setup Item Selection Button
DVR Setup
Information shows the information on on-line SHR-2040/2041/2042
Detailed DVR Setup Items System Information
For the detailed items of DVR Setup, refer to Chapter
Password
System Password shall be composed of numeric only, up to 8 digits
Language specification to be supported is subject to change later
9-36
Remocon Remote Control Device
@ Camera Config
9-38
PTZ device
# Monitoring Monitoring
It sets both the event monitoring and OSG display of the live mode
$ Recording Rec. Mode
NTSC PAL
Event Rec
9-40
SHR-2040/2041/2042 USER’S MANUAL
Alarm Rec It sets the information necessary for the alarm recording
More than one camera should be selected to apply the alarm
Motion Rec
Video Loss
Network Password
IP Settings
Callback You can set the Callback function of SHR-2040/2041/2042
Viewer Setup
Video Recording ! Naming
Sequence Time
Site Setup
DVR List
To add a new DVRSHR-2040/2041/2042
To add a new DVR, input all the information required
The viewer can monitor up to 4CH all the same time
# To Edit the old DVRSHR-2040/2041/2042
Site List
@ To delete an old site or DVRSHR-2040/2041/2042
To add a DVRSHR-2040/2041/2042 to the site
S/W Version
Smart Viewer Version
The S/W upgrade requires about 5 minutes
Appendix
Remarks
1Product Specification
Details
PAL 1ips/2.5ips/5ips/6.25ips/8.33ips/12.5ips/25ips
Resolution
Max Image Rate
Video size
Backup
RS-485 PTZ Device Control, Remote Control Device
Remarks
Western
2The specification of HDD and peripheral device
6Y120LO
6Y160LO
10-5
3Outline Drawings
SHR-2040 SHR-2041
SHR-2040/2041/2042 USER’S MANUAL
10-6
SHR-2042
Use System / Load Factory Default in MENU or
4Factory Default
Motion Detection Setup
5SHR-2040/2041/2042 Smart Viewer Frame Specification for the Playback
The play frame specification of Smart Viewer varies on the setup of SHR-2040/2041/2042 Recording Rate and Video Size or the screen split mode of Smart Viewer. The above specification is applicable only when the main body of SHR-2040/2041/2042 is connected with a fast network like LAN. When the main body of SHR-2040/2041/2042 is connected with a slow network like ADSL, the play speed will be 0.5 Frame/sec. In addition, the above specification has been defined to the recommended specification of your PC. If your PC specification is lower than the recommended, the number of frame to played may diminish
6TroubleshootingFAQ
7. The channel button does not operate in Live
13. Smart Viewer in operation is disconnected
Waste Electrical & Electronic Equipment
AB68-00517B
Correct Disposal of This Product